Plant Overview
Often mistaken for a native of the Sunshine State due to its name, Clematis florida actually hails from the mountain woodlands of China. Known as the "Asian Virgin’s Bower," this climber is prized for its exquisite, almost architectural blooms that look more like handcrafted silk than living petals. It is a true aristocrat of the garden, adding a layer of sophisticated vertical drama to any trellis or garden arch.
🔍 How to Identify
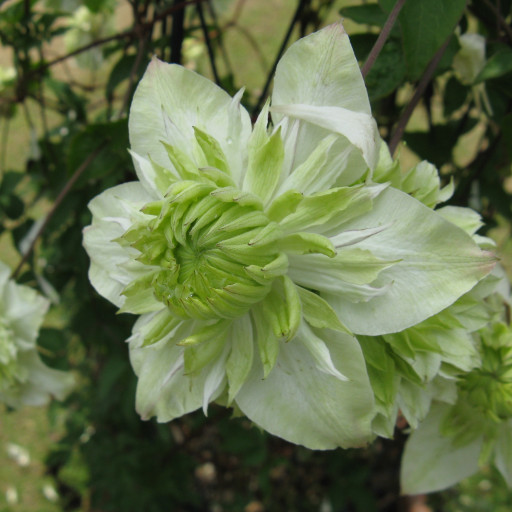
- 🌸 The Bloom: Features large, creamy-white outer sepals that serve as a backdrop for a dramatic, dome-like center of rich, violet-purple "staminodes" (modified sterile stamens).
- 🍃 Foliage: Displays delicate, dark green leaves that are typically divided into three or more leaflets; in milder winters, the vine can remain semi-evergreen.
- 🧗 Growth Habit: A slender, deciduous climber that uses its twining leaf stalks like tiny hands to grip onto wire, mesh, or neighboring shrubs.
🏡 In Your Garden
- 🦶 Cool Feet: Like most clematis, this variety demands "cool feet and a warm head." You should mulch heavily or place large stones at the base to keep the root zone shaded while the vine reaches upward for the sun.
- ✂️ Pruning Nuance: Usually categorized in Pruning Group 3, it blooms on the current year's growth. Cutting it back hard to about 12 inches from the ground in late winter encourages a vigorous flush of flowers for the coming season.
- 🪴 Container Potential: Because it is more compact and slower-growing than many hybrid clematis, it is an ideal candidate for large patio pots with a small obelisk for support.
⚠️ Safety & Toxicity
- 🚫 Status: Toxic to humans, dogs, cats, and horses if ingested.
- 🩹 Details: The plant contains protoanemonin, a chemical that causes a bitter taste and burning sensation in the mouth. Contact with the sap can also cause localized skin irritation or "Clematis dermatitis" in sensitive gardeners—wearing gloves while pruning is highly recommended.
✨ Fun Fact
Despite its name, it has no geographical link to Florida, USA! The name "florida" is simply the Latin word for "flowery" or "blooming," a title given to the plant by botanists to celebrate its exceptionally ornate and prolific flowers.

Detailed Care Instructions
To grow Clematis Florida plants, you can follow these steps:
- Choose the right location: Clematis Florida plants prefer full sun to partial shade. Make sure the location you choose receives at least 6 hours of direct sunlight each day. They also need well-draining soil with a pH range of 6.5-7.
- Prepare the soil: Before planting, prepare the soil by removing any weeds and loosening it with a garden fork or tiller. Amend the soil with compost or well-rotted manure to improve fertility and drainage.
- Planting: Dig a hole that is wider and deeper than the root ball of the plant. Place the root ball in the hole and ensure the crown (where the stems emerge from the roots) is at or slightly above soil level. Backfill the hole with soil, firm it gently, and water thoroughly.
- Watering: Water the newly planted Clematis Florida thoroughly to settle the soil around the roots. Afterward, water deeply but infrequently, aiming for about 1 inch of water per week. Avoid overwatering as it can lead to root rot.
- Mulching: Apply a layer of organic mulch around the base of the plant, such as wood chips or straw. Mulch helps to retain moisture, regulate soil temperature, and suppress weeds.
- Support: Clematis Florida is a climbing vine and requires support to grow upwards. Install a trellis, arbor, or other supports near the plant where it can climb and spread its vines.
- Pruning: Prune Clematis Florida plants in early spring before new growth begins. Cut back the previous year's growth to about 12-18 inches above the soil level. This encourages vigorous new growth and better blooming.
- Fertilizing: Feed Clematis Florida plants with a balanced fertilizer in spring, just as new growth starts to emerge. Follow the instructions on the fertilizer packaging for application rates.
- Pest and disease control: Keep an eye out for common pests such as aphids, slugs, and snails. Treat any infestations promptly with appropriate organic or chemical controls. Monitor for diseases like powdery mildew and treat accordingly with fungicides if needed.
- Supportive pruning: Throughout the growing season, you may need to lightly prune to control the plant's size and shape, or to remove any dead, damaged, or diseased parts.
By following these steps, you can successfully grow and care for Clematis Florida plants in your garden.

Place in a window with dappled sun or a spot in the middle of a room. Or directly in a window facing west or east.

To water this plant, it is important to first observe the soil moisture level. If the soil is dry to the touch or if the plant appears wilted, it may need watering.
The best method for watering is to deeply saturate the soil around the base of the plant. It is important to avoid getting water on the leaves or flowers to prevent damage or fungal growth.
When watering, use a slow and steady stream of water to allow the soil to absorb the moisture without running off. Water deeply until it reaches the root zone, and then allow the top layer of soil to dry out slightly before watering again.
During periods of hot, dry weather, the plant may require more frequent watering. Mulching around the base of the plant can help to retain moisture and keep the root system cool.
It is important to note that overwatering can be detrimental to this plant, as it prefers well-draining soil and too much moisture can lead to root rot or other fungal diseases.
To fertilize Clematis Florida plant, apply a balanced fertilizer, such as a 10-10-10 NPK fertilizer, in the spring and summer. Use one tablespoon of fertilizer per plant and apply it to the soil around the base of the plant. Water the plant thoroughly after fertilizing to ensure the nutrients reach the roots. Avoid fertilizing the plant in the fall and winter, as this can encourage new growth that may be damaged by freezing temperatures.
The ideal soil for this plant should be well-draining, fertile, and with a pH level between 6.0 and 7.0. It should also have good moisture retention properties, but not be waterlogged. The soil should contain a good mix of organic matter such as compost or well-rotted manure to provide essential nutrients. It is important to avoid using a heavy soil that is prone to compaction and restricts root development. In addition, the soil should be free from weed seeds, pests, and diseases that can affect the health of the plant. Once planted, it should be kept moist but not waterlogged, and mulched to conserve moisture and suppress weeds.
To propagate this plant, start by taking softwood cuttings from the plant in spring or early summer. These cuttings should be around 4-6 inches long and should have a few sets of leaves on them. Remove the leaves from the bottom of the cutting, leaving only one or two sets of leaves at the top.
Next, dip the bottom of the cutting in rooting hormone and plant it in a pot filled with a mix of compost and sand or perlite. Keep the soil moist and place the pot in bright, indirect light. You may also cover the pot with a plastic bag to help retain moisture.
After around 2-3 weeks, your cuttings should start to grow roots. Once the roots are established, you can transplant the new plants to their permanent location in the garden or in a larger pot.
Common pests of the asian virginsbower include Spider mites, aphids, thrips, larvae. Make a habit of checking your asian virginsbower frequently for pests so that any infestations can be caught and managed early.


