Plant Overview
Often called the "Spider Flower" or "Grandfather’s Whiskers," this tall, airy annual is a vintage garden favorite. Native to South America, it adds a dramatic, architectural flair to any flower bed with its exploding, pom-pom-like blooms. It is a rugged survivor that thrives in the summer heat where more delicate flowers might wilt.
🔍 How to Identify
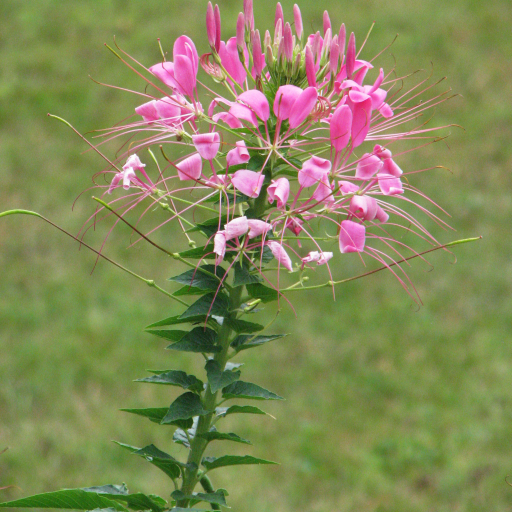
- 🌸 Bloom Structure: Large, spherical clusters of flowers with incredibly long, protruding stamens that resemble spider legs or delicate whiskers.
- 🍃 Foliage: Bright green, hand-shaped (palmate) leaves that look somewhat similar to hemp, often featuring a slightly sticky or resinous texture.
- 🦴 The Stems: Sturdy, upright stalks that can reach five feet tall, typically featuring small, sharp spines at the base of the leaf stems—giving it the species name spinosa.
🏡 In Your Garden
- 🦋 Wildlife Magnet: This plant is a high-octane nectar source. It is particularly famous for attracting hummingbirds and large hawk moths, which visit the blooms as the sun begins to set.
- 🌱 Self-Sowing Nature: Cleome is a prolific self-seeder. Once you plant it, you will likely see "babies" popping up every spring. It’s perfect for a cottage garden but may need thinning if you prefer a tidy look.
- 👃 Natural Repellent: The plant has a unique, musky, or "skunky" fragrance. While humans have mixed feelings about the scent, it is an excellent natural deterrent for deer and rabbits.
⚠️ Safety & Toxicity
- 🩹 Physical Hazard: While it is not known to be poisonous, the stems are armed with small thorns. Wear garden gloves when pruning or pulling them to avoid skin irritation or scratches.
- 🐾 Pet & Child Safety: Cleome spinosa is generally considered non-toxic to cats, dogs, and humans. Its prickly texture usually discourages curious pets from taking a second bite.
✨ Fun Fact
The seed pods of the Cleome are just as distinct as the flowers; they develop into long, thin cylinders that dangle from the stem on long stalks, making the plant look like a futuristic botanical sculpture as it matures.

Detailed Care Instructions
| Humidity | Dry |
| Lighting | Full Sun |
| Difficulty | Medium |
| Hibernation | Cold Period |
| Temperature | 21°C - 29°C |
| Hardiness Zones | 10 - 11 |
To grow Cleome spinosa (also known as Spider flower), you can follow these steps:
- Climate and Soil: Cleome spinosa thrives in warm weather and requires full sun exposure. Choose a location with well-drained soil that is rich in organic matter.
- Seed Stratification (optional): Cleome seeds can benefit from a period of cold treatment to increase germination rates. You can do this by placing the seeds in a moist paper towel and storing them in the refrigerator for about a week before planting.
- Planting: Sow the seeds directly into the garden bed after the last frost date in your area. Space the seeds about 12-18 inches apart and cover them with a thin layer of soil (approximately 1/4 inch deep).
- Watering: Keep the soil evenly moist but not waterlogged. Water when the top inch of soil feels dry. Cleome plants prefer regular watering but can tolerate some drought.
- Fertilizer: Prior to planting, incorporate a balanced slow-release fertilizer into the soil. Additionally, you can supplement with a liquid balanced fertilizer every 4-6 weeks to promote healthy growth.
- Staking: Cleome plants can grow tall and might require staking to prevent them from falling over in strong winds. Install stakes near the plants and gently tie the stems to the stakes for support.
- Pruning: Pinch off the tips of young Cleome plants to encourage branching and bushier growth. Removing spent flowers regularly and cutting back leggy stems can also promote additional blooms.
- Pests and Diseases: Monitor for common pests like aphids and caterpillars. If necessary, treat with organic insecticides or handpick the pests. Cleome plants are generally resistant to diseases if provided with proper growing conditions.
- Mulching: Apply a layer of organic mulch around the plants to retain moisture, suppress weeds, and insulate the soil. However, avoid covering the plant stems directly with mulch.
- Harvesting Seeds: Cleome plants produce interesting seed pods. Allow the pods to mature on the plant until they turn brown. Once dried, collect the seeds by opening the pods and store them in a cool and dry place for future planting.
By following these steps, you can successfully grow Cleome spinosa in your garden and enjoy its vibrant flowers throughout the growing season.

Place in a bright room that is sun drenched almost all day. Or directly in a south-facing window.

To water this particular plant, one should first assess the soil moisture level by inserting a finger about an inch deep into the soil. If the soil feels dry, it is time to water the plant. When watering, one should aim to water the soil directly around the base of the plant, rather than the foliage. This will prevent water from sitting on the leaves and potentially causing damage. It is important to water the plant deeply, ensuring that the water reaches the root zone, rather than just the top layer of soil. Watering should be done in the early morning or late afternoon, rather than during the hottest part of the day, to prevent evaporation. After watering, allow the soil to drain before placing the plant back in its desired location.
For best results, apply a balanced fertilizer with equal parts nitrogen, phosphorus, and potassium to Cleome Spinosa plants when they are actively growing. Use a slow-release fertilizer or apply liquid fertilizer every two weeks during the growing season. Avoid fertilizing during the dormant season. Be sure to follow the instructions on the fertilizer packaging and do not apply more than the recommended amount, as over-fertilization can harm the plant. Also, water thoroughly after fertilizing to help the nutrients reach the roots.
To ensure the best growth of the plant Cleome Spinosa, it is recommended to use a soil that is well-draining and has good moisture retention. The soil should be rich in organic matter and have a slightly acidic pH level, around 6.0 to 7.0. It is also important to choose a soil that is not too heavy or compact so that the roots can easily penetrate and grow. Adding compost or aged manure to the soil can improve its quality and provide necessary nutrients for the plant's growth. Before planting, it is best to loosen the soil to ensure proper aeration and improve drainage.
To propagate this plant, you will need to gather the seeds from the mature seed pods that have developed on the plant. Once the seed pods have dried and turned brown, remove the seeds and store them in a cool, dry place until you are ready to plant them.
In order to plant these seeds, you will need to prepare a well-draining, fertile soil mixture in a seed tray or small pots. Sow the seeds thinly on the soil surface, and gently cover them with a thin layer of soil mix. Water the seed tray or pots lightly, taking care not to over-water.
The best time to plant these seeds is in early spring, after the danger of frost has passed. Place the seed tray or pots in a warm, bright, and well-ventilated location, such as a windowsill or greenhouse. Monitor the soil moisture levels and water as needed.
Once the seedlings have grown to a size where they have established their true leaves, they can be transplanted into larger pots or directly into the garden bed. When transplanting, be sure to take care not to disturb the roots too much. Water the newly transplanted seedlings well and provide them with regular, light fertilization to promote healthy growth.
With proper care and attention, these young plants will grow into mature specimens that will produce beautiful flowers year after year.


