Plant Overview
Known affectionately as the Bladderpod or Burrofat, Cleomella arborea is a rugged California native that thrives where other plants struggle. It is a star of the coastal sage scrub and desert washes, loved by gardeners for its ability to produce bright yellow blooms even in the heat of summer. Its most famous trait is its pungent, savory aroma—often described as a mix of green bell peppers and toasted popcorn.
🔍 How to Identify
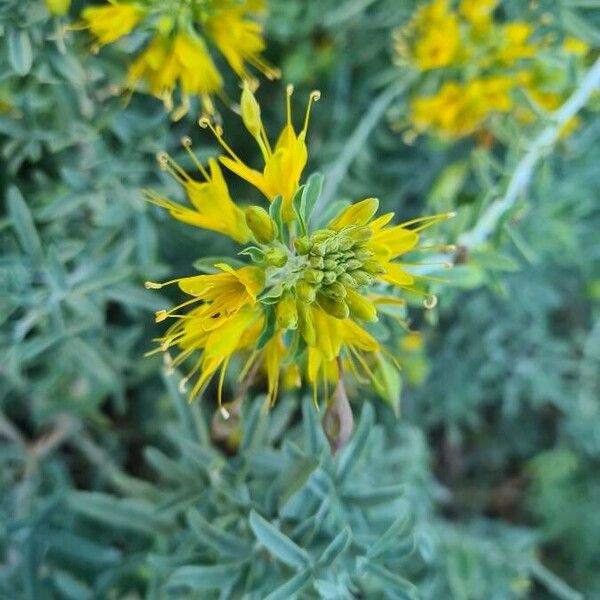
- 🌼 Whiskered Blooms: The plant produces clusters of vibrant yellow flowers with four petals and exceptionally long, protruding stamens that give the clusters a "spidery" or whiskered appearance.
- 🎈 Balloon Pods: Its namesake feature is the large, inflated, teardrop-shaped seed pods. These papery "bladders" dangle from the branches and turn from a soft green to a light tan as they age.
- 🌿 Drought-Resistant Foliage: The leaves are trifoliate (divided into three leaflets) and have a waxy, bluish-green hue, which helps the plant reflect intense sunlight and conserve water.
🏡 In Your Garden
- 🏜️ The Ultimate Survivor: Bladderpod is incredibly drought-tolerant and actually prefers "tough love." It thrives in poor, sandy, or rocky soils and requires very little water once established; overwatering is often the only way to accidentally kill it.
- 🐝 A Pollinator Magnet: Because it can bloom year-round in warmer climates, it serves as a vital "fast food station" for hummingbirds, harlequin bugs, and native bees during the lean winter months when other nectar sources are dormant.
⚠️ Safety & Toxicity
- ✅ Non-Toxic Status: This plant is generally considered safe and non-toxic for humans, dogs, and cats. It does not possess the dangerous alkaloids found in many other desert shrubs.
- 👃 Scent Warning: While safe, the plant is "olfactorily aggressive." The oils in the leaves are very strong; if your dog brushes against it, they may come inside smelling like a spicy bell pepper for a few hours!
✨ Fun Fact
Native Californians once used the flower buds of the Bladderpod as a culinary treat. When gathered and boiled (or pickled), the buds are said to taste remarkably similar to commercial capers!

Detailed Care Instructions
Growing Cleomella arborea, commonly known as bladderpod, can be a rewarding experience as it is a hardy and attractive plant native to North America, particularly in arid and semi-arid regions. Here's a step-by-step guide to help you grow Cleomella arborea:
1. Site Selection
- Sunlight: Choose a location that receives full sun. Bladderpod thrives in bright, sunny conditions.
- Soil: Well-drained soil is essential. This plant is tolerant of poor soils but does not do well in waterlogged conditions. Sandy or gravelly soil mimics its natural habitat.
2. Soil Preparation
- pH Level: Cleomella arborea prefers slightly alkaline to neutral soil pH (around 6.5 to 7.5).
- Amendments: If your soil is heavy (clay-like), consider amending it with sand or gravel to improve drainage. Compost can be added to provide nutrients but keep it light.
3. Planting Seeds
- Seed Collection: If collecting seeds from an existing plant, wait until the seed pods have dried and then harvest them.
- Sowing Seeds: Directly sow the seeds in the prepared soil in early spring after the danger of frost has passed. Plant the seeds about 1/4 inch deep and cover lightly with soil.
- Spacing: Space the seeds or seedlings about 12 to 18 inches apart to give them room to grow.
4. Watering
- Initial Watering: Water the seeds thoroughly after planting but ensure the soil is not waterlogged.
- Ongoing Care: Once established, Cleomella arborea is quite drought-tolerant. Water occasionally, allowing the soil to dry out between watering sessions. Overwatering can lead to root rot.
5. Mulching
- Mulch: Apply a light layer of mulch (such as gravel or a thin layer of organic mulch) around the plants to help retain moisture and suppress weeds. Be careful not to mulch too heavily as this can retain too much moisture around the roots.
6. Fertilization
- Minimal Needs: The plant generally does not need much fertilization. If desired, you can apply a balanced, slow-release fertilizer in the spring. Avoid high-nitrogen fertilizers, which can encourage excessive foliage at the expense of flowers.
7. Maintenance
- Pruning: Minimal pruning is required. Remove any dead or damaged branches as needed to maintain plant health and appearance.
- Weeding: Keep the area around the plants free from weeds to reduce competition for nutrients and water.
8. Pests and Diseases
- Pest Control: Cleomella arborea is relatively resistant to pests and diseases. However, monitor for common issues such as aphids or spider mites, especially in areas with high insect activity.
- Disease Prevention: Good air circulation and proper watering practices can prevent most common diseases like root rot or mildew.
9. Seed Collection and Propagation
- Seed Harvesting: If you want to propagate more plants, you can collect seeds in the fall once the pods have dried. Store them in a cool, dry place until the next planting season.
By following these steps, you should be able to successfully grow and enjoy Cleomella arborea in your garden. Its unique and attractive flowers can add a distinct touch to your landscape, and its hardy nature makes it relatively low-maintenance.

Place in a bright room that is sun drenched almost all day. Or directly in a south-facing window.

Here's a detailed guide on how to water Cleomella arborea:
### Soil Moisture
1. Initial Watering: When you first plant Cleomella arborea, give it a thorough watering to help settle the soil around the roots.
2. Soil Type Consideration: This plant prefers well-drained soil, so overwatering can be a concern. Ensure that water does not pool around the roots.
### Frequency
1. Growing Season: During the active growing season (spring through summer), water the plant moderately. The soil should be kept consistently but lightly moist.
2. Dormant Period: In the dormant period, reduce watering significantly. The soil can be allowed to dry out almost completely between waterings.
### Method
1. Deep Watering: Aim to water deeply but less frequently to encourage the roots to grow deeper into the soil. This method promotes a stronger root system.
2. Morning Watering: Watering in the early morning is preferable as it allows any excess moisture on the foliage to evaporate, reducing the risk of fungal diseases.
### Environment
1. Climate: In areas with hot, dry climates, you may need to water more frequently. Conversely, in cooler, wetter climates, reduce the watering frequency.
2. Container Plants: If growing Cleomella arborea in a container, check the soil more regularly. Containers tend to dry out faster than ground soil.
### Tools and Tips
1. Mulching: Applying mulch around the plant can help retain soil moisture and reduce the frequency of watering.
2. Soil Moisture Meter: Using a soil moisture meter can assist in determining the right time to water, ensuring you don’t overwater or underwater your plant.
By following these guidelines, you can maintain a healthy watering routine for your Cleomella arborea without the risk of waterlogging or dehydration.
Here’s a guide on how to fertilize Cleomella arborea:
- Timing:
- Begin fertilizing in early spring as new growth starts.
- Continuously feed the plant throughout the growing season, ending in late summer or early fall.
- Begin fertilizing in early spring as new growth starts.
- Type of Fertilizer:
- Use a balanced, water-soluble fertilizer with an equal ratio of nitrogen, phosphorus, and potassium (e.g., a 10-10-10 formulation).
- Use a balanced, water-soluble fertilizer with an equal ratio of nitrogen, phosphorus, and potassium (e.g., a 10-10-10 formulation).
- Application:
- Dilute the fertilizer according to the package instructions.
- Apply the diluted fertilizer every 4-6 weeks during the growing season.
- Avoid over-fertilizing, as this can lead to excessive foliage growth at the expense of flowers.
- Dilute the fertilizer according to the package instructions.
- Method:
- Pour or spray the diluted fertilizer solution around the base of the plant, ensuring it reaches the root zone.
- Water the plant well after fertilizing to help distribute the nutrients into the soil.
- Pour or spray the diluted fertilizer solution around the base of the plant, ensuring it reaches the root zone.
- Considerations:
- Always fertilize when the soil is moist.
- Monitor the plant for signs of nutrient deficiency or over-fertilization, such as yellowing leaves or burned leaf edges, and adjust feeding accordingly.
- Always fertilize when the soil is moist.
- Organic Alternatives:
- For a more organic approach, consider using compost or well-rotted manure mixed into the soil around the plant in early spring.
- Liquid seaweed or fish emulsion can also be used as organic fertilizers, applied every 4-6 weeks during the growing season.
By following these guidelines, you can help ensure your Cleomella arborea remains healthy and vibrant.
- For a more organic approach, consider using compost or well-rotted manure mixed into the soil around the plant in early spring.
Cleomella arborea, a flowering plant adapted to arid and semi-arid environments, thrives best in well-drained soil. The ideal soil mixture for this plant should have the following characteristics:
- Well-Draining: The soil must ensure excellent drainage to prevent water from pooling around the roots, which can lead to root rot. A sandy or gritty soil composition is preferable.
- Sandy or Loamy Texture: A mixture of sandy or loamy soil is optimal as it replicates the plant's natural habitat, allowing roots to spread and access necessary nutrients while providing sufficient aeration.
- Low to Moderate Fertility: This plant does not require highly fertile soil. Low to moderate nutrient levels are adequate, aligning with its adaptation to less nutrient-rich environments.
- Neutral to Slightly Alkaline pH: Aim for a soil pH ranging from 6.5 to 8.0. Most desert or semi-desert plants prefer this pH range, which supports their nutrient uptake mechanisms.
- Organic Matter: Incorporating a small amount of organic matter, such as compost or leaf mold, can improve soil structure and provide a slow release of nutrients without overwhelming the plant.
- Natural Soil Type: In natural settings, this plant often grows in calcareous soils. Mimicking this with a mix that includes some limestone or gypsum can be beneficial.
When preparing soil for cultivation, combining equal parts of sandy soil, garden loam, and coarse sand or perlite typically yields a suitable medium. This composition ensures adequate drainage, moderate nutrient retention, and proper root aeration, facilitating healthy growth and blooming of Cleomella arborea.
Cleomella arborea, a fascinating member of the Caper family, can be propagated effectively through seeds. Here's a step-by-step guide to propagating this plant:
1. Seed Collection:
- Timing: Collect seeds when the seed pods mature, typically in late summer to early fall. The pods will begin to turn brown and dry out.
- Extraction: Gently open the mature pods and extract the seeds. Allow them to air dry for a few days if they seem moist.
2. Seed Preparation:
- Scarification: The seeds of this plant have a tough outer coat. To improve germination rates, you can scarify the seeds. This involves lightly scratching or nicking the seed coat with a file, sandpaper, or a knife.
- Soaking: After scarification, soak the seeds in warm water for about 24 hours. This helps to further soften the seed coat and initiate the germination process.
3. Sowing the Seeds:
- Soil Preparation: Use a well-draining, sandy soil mix. You can create a suitable mix by combining standard potting soil with sand or perlite. This ensures that the seeds are not waterlogged.
- Planting Depth: Sow the seeds about 1/8 to 1/4 inch deep in the soil. Cover them lightly with soil.
- Spacing: If planting multiple seeds, space them at least 2 to 3 inches apart to allow for adequate growth.
4. Germination Conditions:
- Temperature: Maintain soil temperature between 70-80°F (21-27°C) for optimal germination.
- Moisture: Keep the soil consistently moist but not waterlogged. Use a spray bottle to mist the soil surface to avoid displacing the seeds.
- Light: Place the seeded containers in a bright, indirect light location. Full sun can be too intense for the tender seedlings.
5. Transplanting:
- Timing: Once the seedlings have developed a couple of true leaves and are strong enough to handle, they can be transplanted.
- Site Selection: Choose a sunny, well-drained location for transplanting. This species prefers full sun exposure.
- Spacing: Space the young plants about 12 to 18 inches apart to ensure they have enough room to grow.
6. Care Post-Transplant:
- Watering: Water the plants regularly to establish them, but be cautious of overwatering. Once established, they are relatively drought-tolerant.
- Fertilization: Feed the plants with a balanced fertilizer sparingly since they often thrive well in nutrient-poor soils.
- Pruning: Minimal pruning is needed. Remove any dead or damaged stems to maintain the plant's appearance and health.
By following these steps, you can successfully propagate Cleomella arborea and enjoy its unique contribution to your garden.


