Plant Overview
Often called the Cinnamon Clethra or Mountain Pepperbush, this Appalachian native is a woodland masterpiece known for its multi-season beauty. While many gardeners prize it for its spicy-scented summer blooms, its true "wow factor" is the striking, peeling bark that glows with warm copper tones in the winter. It is a sophisticated alternative to more common shrubs, bringing a touch of the wild, misty highlands into a home landscape.
🔍 How to Identify
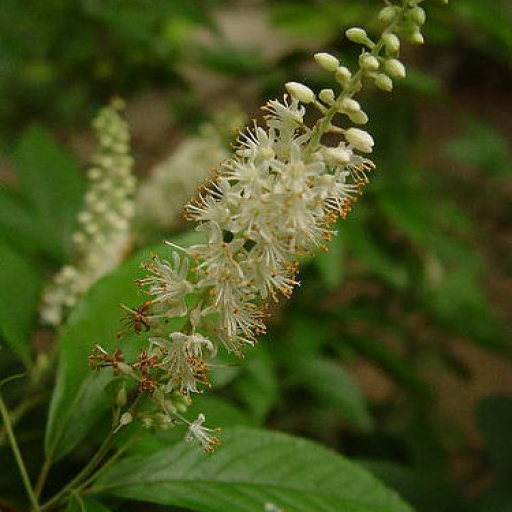
- 🍂 Pointed Foliage: The leaves are dark green, elliptical, and feature a long, tapering tip—a characteristic known as "acuminate," which gives the plant its scientific name.
- 🪵 Exfoliating Bark: As the shrub matures, the smooth, reddish-brown bark begins to flake and peel in thin, papery layers, revealing a polished, cinnamon-colored surface beneath.
- ☁️ Drooping Racemes: In late summer, it produces 3- to 8-inch long drooping clusters of tiny, bell-shaped white flowers that carry a delicate, honey-like fragrance.
🏡 In Your Garden
- ⛰️ The Mountain Habit: This plant is a "slow and steady" grower. Because it originates from cool mountain slopes, it thrives in dappled shade and acidic, well-draining soil that stays consistently moist.
- 🦋 Pollinator Paradise: It serves as a vital late-season nectar source. When most spring flowers have faded, the Cinnamon Clethra keeps bees, butterflies, and hummingbirds humming through the dog days of summer.
- 🏺 Winter Interest: Don't hide this plant in the back of a border; plant it where you can see it in winter, as the coppery bark looks stunning against a backdrop of snow or evergreen ferns.
⚠️ Safety & Toxicity
- ✅ Non-Toxic Status: Clethra acuminata is generally considered non-toxic to humans, dogs, and cats. It is a "worry-free" addition to a family garden.
- 🐝 Bee Activity: Because it is so attractive to pollinators, those with severe bee allergies should avoid planting it directly next to high-traffic seating areas or entryways.
✨ Fun Fact
🪵 While it is called "Cinnamon Clethra" because its bark looks exactly like a cinnamon stick, the wood itself is remarkably hard and durable. Early Appalachian settlers often used its straight, sturdy branches to craft high-quality tool handles and walking sticks!

Detailed Care Instructions
To grow Clethra acuminata, also known as cinnamon clethra or mountain pepperbush, you can follow these steps:
- Climate and location: Clethra acuminata prefers growing in moist, acidic soils and thrives in partial shade to full sun. It is native to eastern North America and grows well in USDA hardiness zones 5-8.
- Soil preparation: Prepare the soil by ensuring it is well-drained and acidic. Clethra acuminata prefers a soil pH between 4.5 and 6.0. If your soil is alkaline, you can amend it with organic matter such as compost or peat moss to lower the pH.
- Planting: Plant your clethra acuminata in early spring or late fall when the plant is dormant. Dig a hole twice the width and depth of the plant's root ball and place the plant in the hole so that the top of the root ball is level with the soil surface. Backfill the hole with soil and lightly tamp it down.
- Watering: Keep the soil consistently moist but not waterlogged. Water deeply once or twice a week during dry periods, especially during the plant's first year of growth. Mulching around the base of the plant with a layer of organic matter will help retain moisture and regulate temperature.
- Pruning: Clethra acuminata typically requires minimal pruning. However, you can prune any dead or damaged branches during early spring before new growth begins. This will help maintain a compact and attractive shape.
- Fertilization: While Clethra acuminata can benefit from a balanced, slow-release fertilizer in spring, it generally doesn't require heavy feeding. Apply a granular fertilizer according to the manufacturer's instructions, typically in early spring or early fall.
- Pest and disease control: Clethra acuminata is generally resistant to pests and diseases, but it may occasionally face issues like aphids or powdery mildew. Monitor your plant regularly, and if necessary, treat with organic pest control methods or consult with a professional for appropriate solutions.
- Mulching and weed control: Apply a layer of mulch around the base of the plant, keeping it a few inches away from the stem. This will help suppress weeds, conserve moisture, and regulate soil temperature.
By following these steps, you should be able to successfully grow Clethra acuminata and enjoy its beautiful foliage and fragrant flowers.

Place in a window with dappled sun or a spot in the middle of a room. Or directly in a window facing west or east.

To water this particular plant, it is recommended to deeply water it once a week, ensuring that the soil is thoroughly moistened. It is important to avoid frequent shallow watering, as this can cause the roots to remain close to the surface, making the plant more susceptible to drought and heat stress. It is also important to avoid allowing the soil to become waterlogged, which can cause root rot and other fungal diseases. When watering, it is best to apply the water directly to the soil around the base of the plant, rather than spraying water onto the leaves or flowers. This will help to prevent fungal diseases from developing on the foliage. Additionally, it is important to monitor the soil moisture level regularly, and adjust watering frequency as needed based on environmental conditions and the moisture level of the soil.
To fertilize this particular plant, you should use a slow-release fertilizer in early spring before new growth appears. Apply into the soil around the base of the plant, following the instructions on the package for the correct amount. Avoid fertilizing during the growing season as it may cause excessive growth.
Clethra acuminata is a deciduous flowering shrub native to North America. It prefers a well-drained soil that is slightly acidic and moist. The ideal soil pH for this plant is between 4.5 and 6.5. The soil should be rich in organic matter, and it should be kept consistently moist, but not waterlogged. This plant does well in soils with a high clay content or in loamy soils. It is important to provide good drainage and avoid soil that is compacted or heavy. The use of a high-quality soil conditioner or compost is recommended to enrich and improve the soil structure. Additionally, mulching around the base of the plant will help retain moisture and encourage healthy root growth.
To propagate this plant, start by taking softwood cuttings from the parent plants in early summer. Use a clean, sharp pair of pruning shears to cut off a 4- to 6-inch section of new, healthy growth from the tip of a stem. Strip off all the leaves from the bottom half of the cutting, and dip the cut end in rooting hormone powder.
Next, fill a pot with moist, sandy soil and create planting holes with a pencil or other small tool. Insert the cuttings into the holes, burying the bottom half of each stem. Firm the soil around the cuttings and water them thoroughly.
Then, cover the pot with a clear plastic bag to create a humid, greenhouse-like environment that will help the cuttings root. Place the pot in a warm, bright location out of direct sunlight and keep the soil moist.
Check the cuttings periodically to make sure the soil stays damp and to monitor their progress. You should see new growth appearing within a few weeks, indicating that the cuttings have taken root. Once the new plants are well established, you can transplant them to their permanent locations in the garden.


