Plant Overview
Often called the "Mexican Dayflower," Commelina coelestis is a rare gem in the gardening world for its "true-blue" petals—a color that is notoriously difficult to find in nature. Native to the mountain regions of Mexico, this perennial creates a lush, tropical atmosphere with its vibrant foliage and delicate, ephemeral blooms that open with the morning sun and vanish by dusk.
🔍 How to Identify
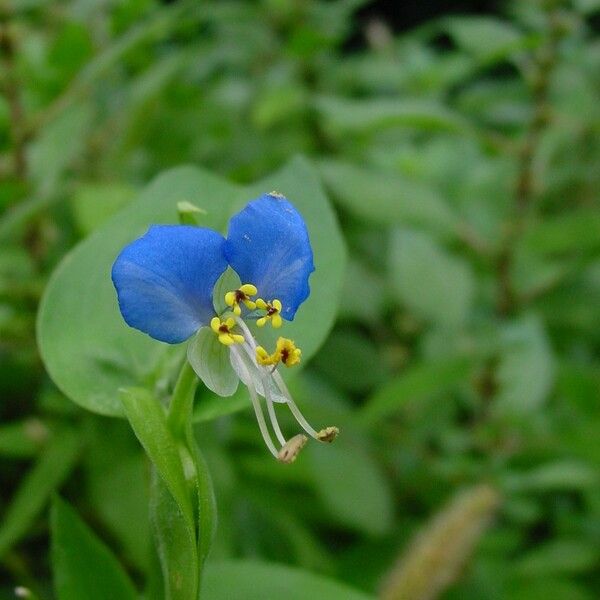
- 💙 The "True Blue" Petals: The flowers feature three petals; the top two are large, rounded, and a striking gentian blue, while the third lower petal is significantly smaller and often paler.
- 🍃 Succulent-like Foliage: The leaves are bright green, lance-shaped, and slightly fleshy, wrapping around the stems in a way that gives the plant a lush, architectural look.
- 🌱 Growth Habit: It typically grows in clumping mounds, reaching about 12 to 18 inches in height, often leaning or sprawling gracefully as it matures.
🏡 In Your Garden
- 💧 Moisture Lovers: Unlike many succulents they resemble, these plants crave consistent moisture. They thrive in "cool feet" conditions, meaning they love soil that stays damp but drains well to prevent their tubers from rotting.
- 🌤️ The Morning Show: Because the individual flowers only last for a single day, place them somewhere you enjoy your morning coffee. They will bloom successively throughout the summer, providing a constant cycle of fresh color.
- ❄️ Tuberous Roots: In colder climates, treat them like Dahlias. Their secret weapon is a tuberous root system that can be dug up and stored indoors over winter if your ground freezes solid.
⚠️ Safety & Toxicity
- 🟢 Non-Toxic: This plant is generally considered safe and non-toxic for humans and most common garden visitors.
- 🐾 Pet Caution: While not listed as a major toxin, the sap of Commelina species can sometimes cause mild skin irritation or "itchy tummies" in particularly sensitive dogs or cats if they graze on the succulent stems.
✨ Fun Fact
The genus Commelina was named by Carolus Linnaeus after the three Commelijn brothers. Two were famous botanists (represented by the two large, bright petals), while the third brother was a "disappointment" to the family and not a botanist at all—represented by the tiny, inconspicuous third petal!

Detailed Care Instructions
| Humidity | Normal |
| Lighting | Part Sun |
| Difficulty | Easy |
| Temperature | 14°C - 39°C |
| Hardiness Zones | 8 - 10 |
To grow a Commelina Coelestis plant, also known as the Heavenly Blue Dayflower, you can follow these steps:
- Purchase healthy seeds or starter plants from a reputable source.
- Determine the appropriate time to sow the seeds in your area. Generally, this plant is best started indoors 4-6 weeks before the last frost date.
- Prepare a well-draining potting mix by combining equal parts of potting soil, perlite, and vermiculite.
- Fill a seed tray or pots with the potting mix, leaving about 1/4 inch (0.6 cm) of space at the top for watering.
- Sow the Commelina Coelestis seeds on the surface of the soil, then lightly sprinkle a thin layer of the potting mix on top to cover the seeds.
- Water gently to ensure the soil is evenly moist but not saturated. Use a spray bottle or watering can with a fine nozzle to avoid displacing the seeds.
- Place the seed tray or pots in a warm location with bright but indirect light. A temperature of around 70°F (21°C) is ideal for seed germination.
- Keep the soil consistently moist but not waterlogged. Check the moisture level regularly and water accordingly.
- Germination typically takes around 7-14 days. Once the seedlings appear, ensure they receive adequate light to promote healthy growth.
- After the last frost date, when the seedlings have developed their first true leaves, they can be transplanted outdoors in a sunny or partially shaded location.
- Prepare the planting area by loosening the soil and removing any weeds or debris.
- Space the Commelina Coelestis plants about 8-12 inches (20-30 cm) apart to allow for their spreading habit.
- Dig a hole slightly larger than the plant's root ball and place the plant in the hole, ensuring it is at the same depth as it was in its container.
- Backfill the hole with soil, gently firming it around the plant's roots.
- Water the newly planted Commelina Coelestis thoroughly. Regular watering is necessary for establishing the plants.
- Mulch around the plants with a layer of organic material to help retain moisture, suppress weeds, and regulate soil temperature.
- Water the plants regularly, aiming for about 1 inch (2.5 cm) of water per week, unless there is sufficient rainfall.
- Remove any weeds that compete with the plants for nutrients and water.
- Fertilize the Commelina Coelestis plants every 4-6 weeks during the growing season with a balanced, water-soluble fertilizer. Follow the manufacturer's instructions for application rates.
- Enjoy the beautiful flowers of the Commelina Coelestis plant, and remove spent flowers to encourage continuous blooming.
Remember to closely monitor your plants for any signs of pests or diseases. Proper care, including regular watering, mulching, and fertilizing, will help your Commelina Coelestis plant thrive and produce abundant blooms.

Place in a bright room that is sun drenched almost all day. Or directly in a south-facing window.

The Commelina Coelestis plant should be watered regularly, but it is important not to overwater it. The soil should be allowed to slightly dry out between watering to prevent root rot. Water should be applied directly to the soil and not on the leaves to avoid fungal growth. The plant prefers a humid environment, so misting the leaves occasionally can help as well. When watering, use room temperature water to avoid shocking the plant's roots. If the plant is in a pot, make sure there is drainage so that excess water can escape. In summary, the watering schedule should be consistent, the soil should slightly dry out before each watering, water should be applied directly to the soil, and misting can help provide necessary humidity.
- Choose a balanced fertilizer with equal parts nitrogen, phosphorus, and potassium.
- Dilute the fertilizer according to package instructions.
- Water the plant thoroughly before applying the fertilizer.
- Apply the diluted fertilizer to the soil around the base of the plant.
- Be careful not to get any fertilizer on the leaves or stems.
- Repeat the fertilization process once a month during the growing season (spring and summer).
- Reduce fertilization in the fall and winter when the plant is dormant.
The ideal soil for this plant is a well-draining mix that is loamy and rich in nutrients. It should have a pH level between 5.5 to 7.5 and should not be waterlogged or overly dry. Compost or organic matter can be added to the soil to enhance its quality. The plant grows best in a slightly acidic soil that is moist but not waterlogged. Avoid using heavy clay or sandy soils as they can negatively affect the growth of the plant. Over-fertilization should also be avoided as it can cause the plant to produce too much foliage and fewer flowers.
To propagate this plant, first select a healthy and mature stem. Cut the stem just below a node using a sharp, sterile pruning shears. The cutting should measure about six inches in length. Remove all the leaves from the lower half of the cutting.
Dip the cut end of the cutting into a rooting hormone powder to encourage faster root development. Place the cutting into a pot filled with a well-draining potting mix. Water the cutting until the soil is moist.
Cover the pot with a clear plastic bag or a plastic container to create a humid environment. Keep the cutting in a warm, bright area but away from direct sunlight.
Check the cutting regularly, making sure the soil stays moist and there's condensation on the plastic cover. After two to three weeks, the cutting should start to root, and new growth will appear.
After several weeks, remove the plastic cover and allow the plant to acclimate to normal humidity levels. Once the roots have established, transplant the new plant into a larger pot or into the garden.


