Plant Overview
Commonly known as "Tickseed" due to its small, hook-shaped seeds that resemble tiny insects, Coreopsis is the quintessential "happy" flower of the North American prairie. These sun-loving perennials are famous for their rugged reliability and their ability to transform a dry, neglected corner of the yard into a vibrant "Pot of Gold." Whether dancing in a summer breeze or feeding a hungry butterfly, they are the backbone of the sustainable, low-maintenance garden.
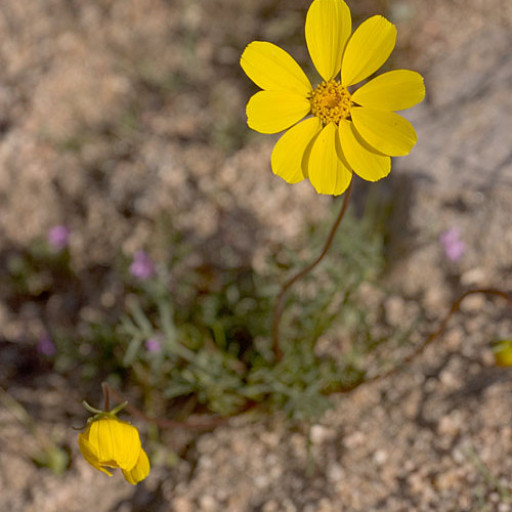
🔍 How to Identify
- 🌼 Petal Texture: The flowers are typically daisy-like with a unique "toothed" edge at the tips of the petals, looking as if they were trimmed with pinking shears.
- 🍃 Foliage Variety: Depending on the species, the leaves are either broad and lobed or fine and "thread-like," giving the plant an airy, delicate appearance despite its toughness.
- 🎨 Color Palette: While classic bright yellow is most common, many modern varieties feature "halo" centers of deep burgundy, burnt orange, or even bicolor stripes.
🏡 In Your Garden
- ☀️ Sun Seekers: Coreopsis is "hardwired" for the sun. If planted in too much shade, the stems will become "leggy" and weak as they stretch toward the light, often resulting in fewer blooms and a floppy habit.
- ✂️ Deadheading Rewards: This plant is a bit of a workaholic. If you take the time to snip off faded flowers (deadheading), the plant will skip seed production and reward you with a second, or even third, flush of blooms throughout the season.
- 🌵 Drought Defiance: Once their root systems are established, these plants are remarkably drought-tolerant. They actually prefer soil that is a bit "lean" or sandy; over-fertilizing can lead to lots of leaves but very few of those iconic golden flowers.
⚠️ Safety & Toxicity
- ✅ Friendly Status: Coreopsis is widely considered non-toxic and safe for homes with curious dogs, cats, and children.
- 👐 Mild Sensitivity: While safe to touch and grow, some gardeners with highly sensitive skin may experience minor contact dermatitis (redness or itching) from the sap when pruning large amounts. Wearing gardening gloves is always a good practice.
✨ Fun Fact
In the 19th century, Coreopsis was more than just a pretty face; it was a staple in the textile industry. Native Americans and early settlers boiled the flower heads to create rich, permanent yellow and orange dyes for wool and blankets.

Detailed Care Instructions
| Color | Yellow, Orange, Pink, Red |
| Soil Ph | 5.5 To 6.5 |
| Humidity | Dry |
| Lighting | Full Sun |
| Soil Type | Well-Draining, Sandy Soil |
| Bloom Time | Summer |
| Difficulty | Medium |
| Plant Type | Perennial Flower |
| Hibernation | Cold Period |
| Mature Size | 10 To 18 Inches Tall And 12 To 24 Inches Wide |
| Native Area | Prairie And Woodlands Of North America |
| Temperature | 15°C - 24°C |
| Sun Exposure | Full Sun, Part Shade |
| Hardiness Zones | 4-9 |
To grow Coreopsis plants, follow these steps:
- Choose a sunny location: Coreopsis plants thrive in full sun, so select a spot in your garden that receives at least 6-8 hours of direct sunlight each day.
- Prepare the soil: Coreopsis plants prefer well-drained soil. Amend the soil by adding organic matter such as compost or aged manure to improve fertility and drainage.
- Watering: Once established, Coreopsis plants are drought-tolerant. However, it is important to water them regularly during their first growing season to help them establish a strong root system. After that, they will only require occasional watering during dry periods.
- Planting: Dig a hole in the prepared soil that is slightly larger than the pot the Coreopsis plant is in. Gently remove the plant from its container and loosen the roots. Place the plant in the hole, ensuring that the top of the root ball is level with or slightly above the soil surface. Backfill the hole with soil and gently firm it around the plant.
- Mulching: Applying a layer of organic mulch, such as wood chips or straw, around the base of the Coreopsis plant can help conserve moisture, suppress weed growth, and regulate soil temperature.
- Fertilizing: Coreopsis plants do not require heavy fertilization. However, you can apply a balanced, granular fertilizer once or twice during the growing season to promote healthy growth and flowering.
- Pruning: Coreopsis plants benefit from regular deadheading, which involves removing faded flowers. This encourages the plant to continue blooming throughout the season. Additionally, you can cut the plants back to about half of their height in late summer or early fall to promote tidy growth and prevent self-seeding.
- Division: Coreopsis plants can become crowded over time, leading to reduced blooming. Every few years, you can divide the plants in early spring or fall to rejuvenate them and create new plants. Dig up the clump, carefully separate it into smaller sections, and replant them in prepared soil.
By following these guidelines, you can successfully grow Coreopsis plants and enjoy their vibrant flowers in your garden.

Place in a bright room that is sun drenched almost all day. Or directly in a south-facing window.

To water this plant, you should aim to keep the soil consistently moist but not waterlogged. Allow the top inch of soil to dry out before watering again. It is best to water deeply and infrequently rather than shallowly and frequently. A good rule of thumb is to water about once a week, depending on weather conditions and soil type. Avoid getting water on the leaves or blooms, as this can promote disease. Instead, water at the base of the plant. It is also important to make sure the plant has good drainage, as waterlogged soil can lead to root rot.
To fertilize the Coreopsis plant, use a balanced slow-release granular fertilizer with an N-P-K ratio of 10-10-10 or similar. Start fertilizing in early spring, just as new growth appears.
Measure the recommended amount of fertilizer according to the instructions on the package. Sprinkle the fertilizer evenly around the base of the plant, taking care to avoid direct contact with the stem or leaves.
Gently work the fertilizer into the top inch of soil using a garden fork or trowel. Be careful not to damage the roots of the plant.
Water the area thoroughly after fertilizing to help the nutrients penetrate into the soil. Ensure the plant receives adequate moisture but avoid overwatering, as it may lead to root rot.
Repeat the fertilization process every four to six weeks during the growing season, typically from spring to early fall. Adjust the frequency and amount of fertilizer based on the specific instructions on the product label and the plant's response.
Monitor the plant's health and appearance regularly. If you notice excessive foliage growth but decreased blooming, reduce the amount of fertilizer or switch to a formulation with lower nitrogen content to encourage more flowering.
Remember to always follow the specific instructions provided by the fertilizer manufacturer and consider the unique needs of your particular Coreopsis plant.
The best type of soil to use for planting the Coreopsis plant is well-draining soil that has a neutral pH level. It should also be rich in organic matter and nutrients, such as nitrogen, phosphorus, and potassium. The soil should be moist but not soggy, as Coreopsis plants do not tolerate standing water. Additionally, the soil should be loose and friable, allowing for adequate aeration and water penetration. Maintaining good soil health is essential for the longevity and performance of Coreopsis plants, as this will ensure proper nutrient uptake and support sustainable growth and flowering.
Coreopsis can be propagated through several methods, including division, stem cuttings, and seed sowing. Here are the steps to propagate Coreopsis without using its common names:
- Select a healthy, mature Coreopsis plant for propagation. Choose a plant that is disease-free and free from any signs of stress.
- Prepare the garden bed or container where the new plants will be grown. Ensure that the soil is well-draining, rich in organic matter, and has a pH level of around 6.0 to 7.0.
- Division: In early spring or fall, carefully dig up the Coreopsis plant. Gently separate the clumps into smaller sections, ensuring each section has its own set of roots. Trim any damaged or dead roots.
- Transplant the divided sections into the prepared garden bed or containers, spacing them appropriately to allow for their growth. Water thoroughly after planting and keep the soil moderately moist until new growth is established.
- Stem cuttings: Select healthy, non-flowering stems for cuttings. Cut the stem just below a node, ensuring the cutting is around 4 to 6 inches long. Remove any lower leaves, leaving a few at the top.
- Dip the cut end of the stem into a rooting hormone powder or liquid, following the instructions on the packaging. This will help promote root development.
- Prepare a container with a well-draining soil mixture or a propagation tray filled with perlite or vermiculite. Make holes in the growing medium with a pencil or your finger, then gently insert the cutting into the hole while firming the medium around it.
- Place the container or tray in a warm, well-lit area, but away from direct sunlight. Maintain a consistent humidity level by covering the container or tray with a plastic bag or using a propagation dome.
- Check for root development after a few weeks by giving the cuttings a gentle tug. If resistance is felt, roots have formed. Once the roots are well-established, transfer each cutting into an individual pot with a well-draining potting mix.
- Seed sowing: Collect seeds from mature Coreopsis flowers by allowing the seedheads to dry out fully. Gently crush the seedheads to release the seeds. Alternatively, purchase Coreopsis seeds from a reputable seed supplier.
- Prepare seed trays or small pots filled with a sterile seed-starting mix. Moisten the mix prior to sowing.
- Scatter the Coreopsis seeds evenly over the surface of the mix. Lightly press the seeds into the soil, ensuring good seed-to-soil contact, but do not cover them, as they require light to germinate.
- Place the trays or pots in a warm, well-lit area, preferably under grow lights or in a greenhouse. Keep the soil consistently moist but not soaking wet.
- Germination typically occurs within 10 to 14 days. Once the seedlings have grown their first true leaves, thin them out to provide sufficient space for each seedling to grow.
- When the seedlings have developed enough roots and leaves, carefully transplant them into individual pots or directly into the garden bed, following proper spacing guidelines.
By following these propagation methods, you can successfully propagate Coreopsis plants without relying on its common names.
Common pests of the tickseed include Aphids. Make a habit of checking your tickseed frequently for pests so that any infestations can be caught and managed early.


