Plant Overview
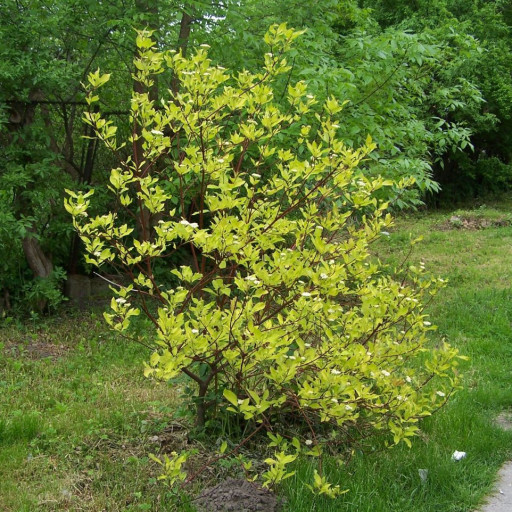
Known as the "Red-twig Dogwood," Cornus alba is a deciduous shrub that acts as a landscape’s ultimate winter warrior. While many plants fade into a dull gray during the colder months, this Siberian native ignites with brilliant crimson stems that provide a stunning contrast against white snow. It is a favorite among gardeners for its year-round interest, transitioning from lush green summers to fiery autumns and architectural winters.
🔍 How to Identify
- 🌿 The Foliage: The leaves are oval-shaped with distinct, curved veins that arc toward the leaf tip. In the summer, they are a rich green, but they transform into deep shades of purple or reddish-orange as the temperature drops.
- 🪵 The Stems: Its most famous feature is the bark. On young growth, the stems are a vivid, glossy red. As the wood ages, it tends to turn a more muted brown, which is why regular pruning is key to keeping its "glow."
- 🌼 Flowers & Fruit: In late spring, it produces flat-topped clusters of small, creamy-white flowers. These eventually give way to clusters of white or slightly bluish berries (drupes) that are highly attractive to local bird populations.
🏡 In Your Garden
- ✂️ Pruning for Color: To keep those stems looking like bright neon tubes, you should practice "renewal pruning." Cutting the oldest stems down to the ground in early spring encourages the plant to send up fresh, vibrant red shoots.
- 💧 The "Wet Feet" Solution: Unlike many shrubs that rot in soggy soil, Cornus alba is incredibly tolerant of wet, swampy conditions. It’s an ideal choice for rain gardens, low spots in the yard, or stabilizing soil near a pond or stream.
- 🛡️ Natural Screen: Because of its rapid growth and multi-stemmed habit, it works beautifully as a living privacy fence or a thick thicket to protect smaller garden birds from predators.
⚠️ Safety & Toxicity
- 🐾 Mildly Toxic: While not considered deadly, the berries and sap contain compounds that can cause mild stomach upset if ingested by pets or curious children.
- 🧤 Skin Irritation: Some people may experience minor skin irritation or a "stinging" sensation when handling the foliage or sap. It is always a good idea to wear gardening gloves when pruning this shrub.
✨ Fun Fact
The genus name Cornus is derived from the Latin word "cornu," meaning horn. This refers to the incredible density and hardness of the wood, which was historically used to make tools, skewers, and even daggers!

Detailed Care Instructions
To grow Cornus Alba, also known as the Red Twig Dogwood, it is important to follow these steps:
- Select the appropriate location: Cornus Alba prefers well-draining soil and full sun to partial shade. Choose a location that receives at least six hours of sunlight per day.
- Prepare the soil: Ensure the soil is well-draining and amend it with organic matter, such as compost, to improve fertility. Remove any weeds or grass from the planting area.
- Planting: Dig a hole that is twice the width and depth of the root ball. Place the plant in the hole, ensuring that the top of the root ball is level with or slightly above the ground surface. Backfill the hole with soil, gently firming it around the roots.
- Watering: Water the plant deeply immediately after planting, and then provide regular watering. Keep the soil consistently moist but not waterlogged. Avoid letting the soil dry out completely between waterings.
- Mulching: Apply a layer of mulch around the base of the plant to help retain moisture and suppress weed growth. Mulch should be about 2-3 inches thick and kept a few inches away from the trunk.
- Pruning: Prune Cornus Alba in late winter or early spring to maintain its shape and promote vibrant new growth. Remove any dead, damaged, or diseased wood. Additionally, you can prune back older stems to encourage the growth of new, colorful twigs.
- Fertilizing: Apply a balanced slow-release fertilizer in early spring, following the manufacturer's instructions. This will provide the necessary nutrients for healthy growth.
- Pest and disease control: Cornus Alba is generally resistant to common pests and diseases. However, occasional issues with aphids or powdery mildew may occur. Monitor the plants regularly and treat any problems with suitable solutions.
By following these steps, you should be able to successfully grow Cornus Alba plants and enjoy their attractive red twigs and vibrant foliage.

Place in a bright room that is sun drenched almost all day. Or directly in a south-facing window.

Cornus Alba is a deciduous plant that requires regular watering during its growing season, which typically runs from spring through to fall. When watering Cornus Alba, it's important to ensure that the soil around the plant is kept moist but not waterlogged. This can be achieved by watering deeply once or twice a week, rather than giving the plant frequent shallow waterings.
To water Cornus Alba, use a hose or watering can to apply water to the soil around the base of the plant. Water slowly and deeply, allowing the water to soak into the soil rather than running off. Aim to water the plant to a depth of around 4 to 6 inches.
Once the soil around the plant has been watered, check the moisture level regularly to ensure it remains consistently moist. If the soil begins to dry out, it's time to water the plant again.
During periods of hot weather or drought, it may be necessary to water Cornus Alba more frequently to prevent the soil from drying out completely. However, be careful not to over-water the plant, as this can lead to root rot and other problems.
In summary, to water Cornus Alba:
- Water deeply once or twice a week
- Ensure the soil remains moist but not waterlogged
- Check the soil moisture level regularly
- Water more frequently during hot or dry weather
- Avoid over-watering the plant.
The best time to fertilize Cornus Alba is during early spring or late winter before new growth appears. Use a balanced fertilizer with a ratio of 10-10-10 or 20-20-20. Apply the fertilizer at a rate of 1/2 to 1 pound per 100 square feet of soil. Spread the fertilizer evenly around the base of the plant and water it in thoroughly. Avoid getting any fertilizer on the foliage. Repeat the fertilization process every four to six weeks during the growing season.
Cornus Alba is a type of woody shrub that prefers a well-draining, nutrient-rich soil. The ideal soil for this plant should have a pH range between 5.5 and 7.5, with a mixture of sand, loam, and clay. A soil mix that contains organic matter such as compost or aged manure will help provide nutrients and improve soil structure. Additionally, the soil should be kept consistently moist but not saturated to prevent waterlogging and root rot. When planting, it is important to amend the soil if necessary to ensure that the plant has adequate drainage and access to nutrients.
To propagate this plant, you will need to take softwood cuttings from healthy and mature stems during the growing season, typically in the early summer. Cut the stem near the base with a sharp and clean knife, ensuring that the cutting is at least six inches long and has a couple of leaves attached to it.
Strip off any leaves from the lower half of the cutting, leaving only two or three leaves near the top. Dip the end of the cutting into rooting hormone powder and then plant it in a small pot filled with a well-draining and moist rooting mix, such as peat moss and sand.
Cover the pot with a plastic bag or plastic wrap to create a humid environment for the cutting and place it in a bright and warm spot, but out of direct sunlight. Water the cutting regularly to keep the soil evenly moist, but avoid overwatering, as it can cause the cutting to rot.
After 3-4 weeks, carefully check the base of the cutting for signs of new growth or roots. Once roots have formed, usually after 6-8 weeks, gently transfer the new plant into a slightly larger pot or in the garden bed with good soil and drainage. Keep the new plant sheltered from direct sunlight for a few days and gradually expose it to more light and outdoor conditions over time.
Common pests of the siberian dogwood include Scale insect, larvae. Make a habit of checking your siberian dogwood frequently for pests so that any infestations can be caught and managed early.


