Plant Overview
Often called Crown Vetch, this sprawling beauty is a member of the pea family that carries a bit of a split personality. While it was once the "gold standard" for preventing erosion on steep highway banks across North America, its enthusiastic growth has earned it a reputation as a persistent invader in home landscapes. Its delicate, clover-like appearance hides a rugged survivalist spirit that can thrive where other plants fail.
🔍 How to Identify
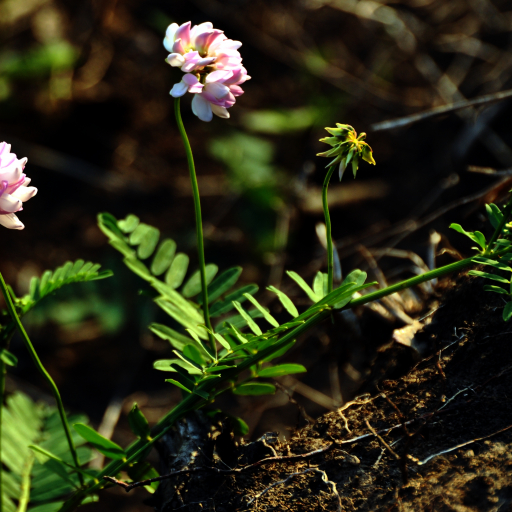
- 👑 The Crown Blooms: It features small, pea-like flowers clustered in "umbels" (circular groups) of pink and white that look like tiny floral crowns.
- 🌿 Compound Foliage: The leaves are pinnately compound, meaning they consist of 11 to 25 small, oval leaflets arranged in pairs along a central stem, resembling a delicate fern.
- 🕸️ Mat-Forming Habit: Unlike true vetches, it lacks tendrils to climb; instead, it forms thick, tangled mats that can reach up to 6 feet in length, sprawling across the ground.
🏡 In Your Garden
- 🚜 Erosion Control: This plant is a powerhouse for stabilizing steep slopes or "impossible" hillsides where soil wash-out is a major concern.
- ⚔️ Competitive Nature: Be very careful where you plant it! Crown Vetch is extremely aggressive and can easily smother native wildflowers or delicate garden perennials. It spreads via underground "rhizomes," making it hard to contain once established.
⚠️ Safety & Toxicity
- 🐴 Toxic to Horses: It contains nitroglycosides, which can be harmful or even fatal to horses and other non-ruminant animals if consumed in large quantities.
- 🤢 General Irritant: While not typically considered a high risk for humans, ingesting any part of the plant can cause digestive upset in curious pets or small children.
✨ Fun Fact
Crown Vetch is a "nitrogen fixer." It hosts special bacteria in its root nodules that take nitrogen from the air and turn it into a form of fertilizer in the soil, effectively "feeding" the ground as it grows!

Detailed Care Instructions
To grow Coronilla Varia (Crown Vetch) plants, you can follow these steps:
- Choose a suitable planting location: Coronilla Varia prefers full sun but can tolerate some light shade. It prefers well-draining soil with a neutral to slightly alkaline pH.
- Prepare the soil: Remove any weeds, rocks, or debris from the planting area. Loosen the soil using a garden fork or tiller, breaking up any clumps. Incorporate organic matter such as compost or aged manure to improve soil fertility and drainage.
- Sow the seeds: Coronilla Varia can be propagated from seeds. Sow the seeds directly into the prepared soil in early spring or early fall. Scatter the seeds evenly over the soil surface, then lightly rake or tamp them into the soil. Keep in mind that this plant can spread vigorously, so avoid sowing near gardens or areas where you don't want it to grow.
- Watering: Keep the seeds moist but not waterlogged until germination occurs, which usually takes around 10-15 days. After the plants are established, they are quite drought-tolerant and do not require much additional watering.
- Care and maintenance: Once the plants reach a height of about 6 inches, thin them to allow about 12 inches of space between each plant. This will help prevent overcrowding and encourage better growth. Depending on your preference, you can also provide support such as stakes or a trellis for the plants to climb on.
- Pruning: Coronilla Varia can benefit from occasional pruning to keep it in shape and prevent it from spreading excessively. Trim back any unwanted or straggly growth to maintain a neat appearance.
- Fertilization: Coronilla Varia doesn't require heavy fertilization. However, if your soil lacks nutrients, you can apply a balanced slow-release fertilizer during the spring to promote healthy growth.
- Prevention of invasiveness: Coronilla Varia has a tendency to be invasive, so it's important to monitor its growth and prevent it from spreading into unwanted areas. Regularly remove any volunteers or unwanted seedlings to control its spread.

Place in a bright room that is sun drenched almost all day. Or directly in a south-facing window.

To properly water this particular plant species, it is necessary to take into consideration a variety of factors. One should first ensure that the soil is always moist but not overly saturated. It is essential to avoid watering the leaves, as this can lead to rot and disease.
To water effectively, gently pour the water directly onto the soil around the base of the plant. It is recommended that the plant receives at least two inches of water per week, especially during hot and dry weather conditions.
It is important to note that during the plant's initial growth period, it requires more frequent watering than during its later stages. It is also essential to avoid allowing water to accumulate in the saucer or base of the pot, as this can lead to root rot.
Overall, it is important to consistently monitor the plant's soil moisture levels to ensure proper growth and health.
To fertilize this plant, use a balanced fertilizer with equal parts nitrogen, phosphorus, and potassium. Apply the fertilizer in the spring, before new growth appears. If using a liquid fertilizer, dilute it with water according to package instructions. Scatter granular fertilizer around the base of the plant and water in well. Avoid over-fertilizing, which can lead to weak growth and poor flowering.
Coronilla Varia plant prefers an acidic, well-draining soil with a pH range of 6.0 to 6.5. A mixture of sand, loam, and peat moss can be used to create a suitable growing medium for the plant. The soil should be loose and drain well to prevent waterlogging, as this can harm the plant's roots. Additionally, the soil should be enriched with organic matter, like compost or aged manure, to improve its fertility and micronutrient content. It is important to maintain adequate moisture levels in the soil, but not to let it become waterlogged, as this can lead to root rot. The plant should be placed in a well-lit area, but not exposed to direct sunlight for extended periods. Regular fertilization is essential, especially during the growing season, to promote strong growth and flowering.
Coronilla Varia can be propagated through stem cuttings. Take a healthy stem cutting from the parent plant in late spring or early summer. Choose a stem that is mature, but not woody. The cutting should be about 6 inches long, with several leaves and a node, which is where the leaf attaches to the stem.
Remove the lower leaves from the cutting, leaving only a few at the top. Dip the bottom of the cutting in rooting hormone powder and plant it in a pot filled with moist potting soil. Water the cutting and cover the pot with a plastic bag.
Place the pot in a warm, bright location, but avoid direct sunlight. Make sure the soil stays moist and mist the cutting daily. After a few weeks, check for roots by gently tugging on the cutting. If there is resistance, the roots have formed.
Once the roots have formed, remove the plastic bag and continue to care for the plant as usual. After a few months, the new plant will be established and can be transplanted to a permanent location.
Common pests of the crownvetch include Spider mites, aphids, thrips. Make a habit of checking your crownvetch frequently for pests so that any infestations can be caught and managed early.


