Plant Overview
Often called the Grassland Croton or Silver-leaf Croton, this understated beauty is a survivor of the American Southwest and Mexican plains. Unlike its flashy, multi-colored tropical cousins found in living rooms, Croton dioicus opts for a sophisticated, shimmering silver palette. Its name "dioicus" reveals a secret about its private life: it is a "dioecious" species, meaning individual plants are strictly either male or female.
🔍 How to Identify
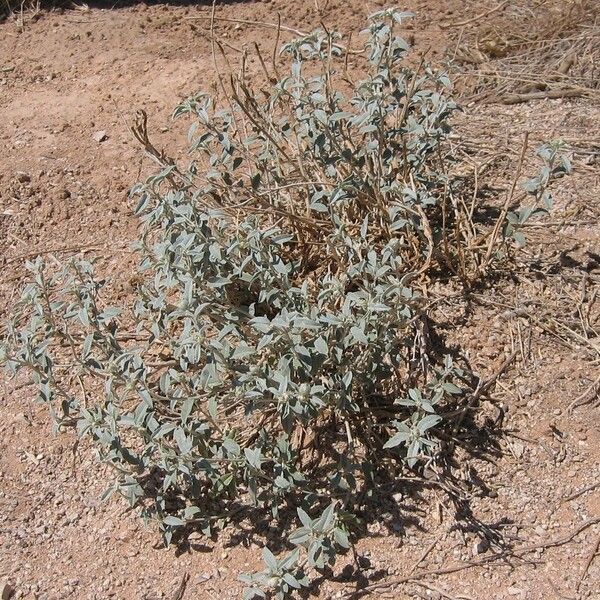
- 🌫️ The Silver Sheen: The most striking feature is its foliage. The narrow, lance-shaped leaves are covered in dense, star-shaped (stellate) hairs that give the plant a dusty, metallic, or frosted appearance.
- 🌿 Compact Growth: It is a low-growing sub-shrub, usually reaching only 1 to 2 feet in height. It has a woody base and a branching, bushy habit that hugs the dry earth.
- 🌼 Petal-less Blooms: The flowers are tiny and lack petals. You’ll find them at the tips of the branches; male plants produce small clusters of stamens, while female plants feature fuzzy, rounded ovaries destined to become seeds.
🏡 In Your Garden
- 🌵 Xeriscaping Champion: This is a plant built for the "tough spots." It thrives in poor, rocky, or sandy soil and requires almost no supplemental water once established. Its deep taproot makes it incredibly drought-tolerant but also means it hates being transplanted.
- 🌬️ The Wind's Help: Because it relies on the wind for pollination rather than showy petals to attract bees, it is a great choice for naturalistic "wild" gardens where subtle textures are preferred over bright pops of color.
⚠️ Safety & Toxicity
- 🚫 Toxic Latex: Like most members of the Spurge family (Euphorbiaceae), Croton dioicus contains a milky sap that can cause contact dermatitis or skin irritation. Always wear gloves when pruning.
- 🐕 Internal Danger: The plant is toxic if ingested by humans, pets, or livestock. It contains croton oil and other compounds that can cause severe gastrointestinal distress and vomiting.
✨ Fun Fact
The genus name Croton is derived from the Greek word for "tick." This isn't because the plant attracts pests, but because the mottled, rounded seeds of many Croton species bear an uncanny resemblance to a well-fed tick!

Detailed Care Instructions
To grow Croton Dioicus (or Fountain Croton) successfully, follow these steps:
- Climate: Ensure that your climate is suitable for Croton Dioicus. It is native to tropical regions, so it thrives in warm and humid conditions. It requires a temperature range of 60-85°F (15-30°C) and high humidity levels.
- Lighting: Provide bright, indirect light to your Croton Dioicus. It needs at least 4-6 hours of sunlight daily, but avoid direct sunlight as it can scorch the leaves. Place it near a window with filtered sunlight or in a well-lit spot indoors.
- Soil: Use a well-draining, loamy soil mix for your Croton Dioicus. A mix containing peat moss, perlite, and compost will work well. Good drainage is vital to prevent root rot.
- Watering: Croton Dioicus prefers consistently moist soil. Water it thoroughly when the top inch of soil feels dry. However, be careful not to overwater, as excessive moisture can cause root rot. Mist the leaves occasionally to increase humidity levels.
- Fertilizer: Feed your Croton Dioicus with a balanced liquid fertilizer every 2-3 weeks during the growing season (spring and summer). Reduce frequency in fall and winter. Follow the instructions on the fertilizer packaging for proper dosage.
- Pruning: Prune your Croton Dioicus regularly to maintain its shape and encourage bushier growth. Remove any dead, damaged, or yellow leaves. You can also pinch off the top of the plant to promote lateral branching.
- Propagation: Croton Dioicus can be propagated through stem cuttings. Take a 4-6 inch cutting with several leaves and remove the lower leaves. Dip the cut end in a rooting hormone powder and insert it into a moist soil mix. Place it in a warm and humid environment and mist it regularly. Roots should develop in a few weeks.
- Pests and Diseases: Monitor your Croton Dioicus for common pests like aphids, spider mites, and mealybugs. If infested, treat with insecticidal soap or neem oil. Avoid overwatering to prevent root rot and ensure good airflow around the plant to prevent fungal diseases.
Remember to provide proper care, and your Croton Dioicus should grow into a beautiful and vibrant plant.

Place in a bright room that is sun drenched almost all day. Or directly in a south-facing window.

To water this plant, it is important to ensure that the soil is slightly moist but not waterlogged. The frequency of watering will depend on factors such as the weather conditions, humidity levels, and the moisture retention capabilities of the soil. One way to check if the plant needs water is to touch the soil with your finger. If it feels dry, it is time to irrigate. When watering, use a watering can or a hose with a gentle flow to prevent damaging the plant's delicate foliage. Avoid getting water on the leaves as this can lead to spotting and other diseases. Allow excess water to drain from the bottom of the container or from the ground to avoid waterlogging, which can cause root rot.
To fertilize this plant, use a balanced fertilizer with equal amounts of nitrogen, phosphorus, and potassium. Apply the fertilizer every four weeks during the growing season, which is typically from spring to fall. You can mix the fertilizer into the soil or apply it as a liquid. Be sure not to fertilize the plant during the winter months when it goes dormant. Over-fertilization can lead to burnt leaves, so be careful not to apply too much fertilizer.
Croton Dioicus plant is a tropical species that requires well-draining soil. It prefers soils that are rich in organic matter, such as compost, and it also needs good air circulation. This type of plant prefers slightly acidic soils, with a pH range of 5.5 to 6.5. A mixture of 3 parts potting soil, 2 parts sand, and 1 part perlite or vermiculite is ideal for this plant, as it provides the right balance of water retention and drainage. It is important to avoid overwatering the plant, as it can lead to root rot and other problems. When planting, ensure the soil is moist but not waterlogged. Regular fertilization with a balanced fertilizer can also help the plant thrive. It is essential to keep the soil around the plant healthy, as it can impact the health and vitality of the plant.
To propagate this plant, first select a healthy stem that is about 4-6 inches long and without any damage or diseases. Use a sterilized knife or scissors to make a clean cut at a 45-degree angle just below a node.
Remove all the leaves from the lower half of the stem and dip the cut end in rooting hormone powder. Plant the stem gently into a small pot with fresh soil mix, making sure to bury the node and firm the soil around the stem.
Place the pot in a warm and brightly lit area, but away from direct sunlight, and keep the soil lightly moist. Cover the pot with a plastic bag or a clear plastic container to create a mini greenhouse and maintain high humidity around the cutting.
Check the soil moisture and remove the cover for a few minutes daily to allow air circulation and prevent mold growth. In about 2-3 weeks, the cutting should develop roots and new leaves. At this point, you can remove the cover and gradually acclimate the new plant to normal conditions.


