Plant Overview
Often referred to as the Purging Croton or Rushfoil, Croton tiglium is a plant that commands respect. While it belongs to the same family as the colorful ornamental Crotons found in living rooms, this species is a woody shrub native to Southeast Asia with a notorious history. Historically used in traditional medicine as a "drastic purgative," its seeds contain one of the most potent oils in the botanical world.
🔍 How to Identify
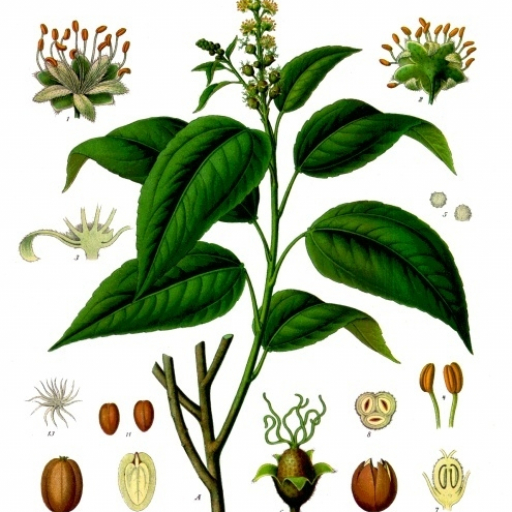
- 🌿 Leaf Shape: Features ovate or elliptical leaves that are smooth and shiny, usually tapering to a sharp point at the tip.
- 🌼 Subtle Blooms: Unlike its flashy relatives, its flowers are small, greenish-yellow, and grow on slender spikes at the ends of branches.
- 🍒 The Fruit: Produces small, three-lobed capsules (about the size of a hazelnut) that contain three brownish-black seeds—the source of its powerful oils.
🏡 In Your Garden
- 🌞 Tropical Demands: This plant thrives in heat and high humidity; it will quickly drop its leaves if exposed to a draft or temperatures below 50°F (10°C).
- 💧 Soil Sensitivity: It prefers rich, well-draining soil. Because it has a sensitive root system, it dislikes being moved once established, so choose its permanent "forever home" carefully.
- ✂️ Maintenance Warning: When pruning, the plant bleeds a milky sap that can cause significant skin irritation. Always wear gloves and long sleeves when tending to this species.
⚠️ Safety & Toxicity
- 🚫 Status: EXTREMELY TOXIC. This is not a plant for households with curious pets or young children.
- 🧴 Skin & Internal Risk: Every part of the plant is poisonous, but the seeds and oil are particularly dangerous. Touching the sap can cause blistering or "Croton dermatitis," and ingestion can lead to severe gastrointestinal distress or worse.
- 🐾 Pet Safety: Highly toxic to cats, dogs, and horses. Even a small amount of chewed foliage can lead to a medical emergency.
✨ Fun Fact
In the past, the potent oil from the seeds was so strong it was used by indigenous hunters as a fish poison; they would toss crushed seeds into ponds to stun fish, making them easy to catch by hand!

Detailed Care Instructions
To grow Croton Tiglium (also known as Purging Croton or Croton Oil plant), you can follow these steps:
- Select a suitable location: Croton Tiglium requires full sun to partial shade. Choose a location where the plant can receive at least 6 hours of direct sunlight daily.
- Soil preparation: The plant prefers well-draining soil that is rich in organic matter. Ensure the soil pH is slightly acidic to neutral (around 6.0 to 7.0). If needed, amend the soil with compost or well-rotted manure to improve fertility.
- Planting: Dig a hole slightly larger than the root ball of the Croton Tiglium. Place the plant in the hole, ensuring that it sits at the same depth as it did in the pot. Backfill the hole with soil, gently firming it around the plant.
- Watering: The plant requires regular watering to establish its roots. Water deeply, but allow the top inch of soil to dry out before watering again. Once established, reduce watering frequency, as Croton Tiglium is somewhat drought-tolerant.
- Mulching: Apply a layer of organic mulch around the base of the plant to conserve moisture in the soil, suppress weed growth, and regulate soil temperature.
- Fertilizing: Feed the Croton Tiglium with a balanced slow-release fertilizer formulated for ornamental plants. Follow the instructions provided on the fertilizer packaging for application rates and frequency.
- Pruning: Prune the plant in early spring to promote bushier growth and remove any dead or damaged branches. Pinch back tips of stems periodically to encourage branching and fuller growth.
- Pest and disease control: Monitor the plant regularly for signs of pests such as aphids, spider mites, or mealybugs. Treat any infestations promptly using insecticidal soap or horticultural oil, following the instructions on the product label.
- Protect from extreme temperatures: Croton Tiglium is sensitive to cold temperatures. If you live in a region with frost or freezing temperatures, either grow the plant in a container that can be moved indoors during winter or cover it with a frost cloth during cold spells.
By following these steps, you can successfully grow and care for Croton Tiglium, a beautiful and unique plant.

Place in a bright room that is sun drenched almost all day. Or directly in a south-facing window.

To adequately hydrate the Croton Tiglium plant, it is crucial to pay attention to several key aspects of its watering needs. Here is a detailed guide on providing optimal irrigation for this particular plant species:
1. Observe soil moisture: Before watering, examine the moisture level in the soil by inserting your finger about an inch deep into the soil. If it feels dry at this depth, it is an indication that the plant requires watering.
2. Select the appropriate watering method: When watering the Croton Tiglium, it is best to use the bottom watering technique. Fill a tray or saucer with water, and then place the plant's pot in the saucer, allowing it to absorb water from the bottom. This helps prevent overwatering and limits humidity around the foliage, minimizing the risk of fungal diseases.
3. Watering frequency: The watering frequency for the Croton Tiglium can vary depending on factors such as temperature, humidity, and soil type. As a general guideline, water the plant thoroughly, ensuring the entire root ball is saturated, and then allow the soil to partly dry out before watering again. Overwatering can lead to root rot while underwatering can cause stress and leaf drop.
4. Adequate drainage: Ensure that the plant is potted in well-draining soil and a container with drainage holes at the bottom. This promotes healthy root growth by preventing excess water from stagnating around the roots and causing rot.
5. Water temperature: Maintain an ambient temperature when watering the Croton Tiglium. Avoid using cold water straight from the tap, as it can shock the roots and negatively impact the plant's overall health. Allow the water to reach room temperature before watering.
6. Avoid water accumulation in the saucer: After the bottom watering method, discard any excess water remaining in the saucer after about 30 minutes. This prevents the plant from sitting in standing water, which can lead to root problems.
7. Humidity considerations: Croton Tiglium plants appreciate higher humidity levels, which can be provided either through misting the foliage or placing a tray with water nearby to increase moisture in the surrounding air. This can be particularly beneficial in dry indoor environments.
Remember, every plant has its unique requirements, so it is essential to observe the specific needs of your Croton Tiglium plant and adjust the watering routine accordingly.
To fertilize the Croton Tiglium plant, follow these instructions:
- Choose a well-balanced fertilizer with equal parts of nitrogen, phosphorus, and potassium or a slow-release granular fertilizer specifically formulated for tropical plants.
- Dilute the fertilizer according to the package instructions, typically mixing 1 tablespoon of fertilizer per gallon of water.
- Water the soil around the plant thoroughly before applying the fertilizer mixture. This ensures that the nutrients will be absorbed effectively.
- Pour the diluted fertilizer solution onto the soil, avoiding direct contact with the plant's foliage.
- Make sure to apply the fertilizer evenly around the root zone of the plant, maintaining a distance of a few inches from the stem.
- After fertilizing, water the plant again to help incorporate the nutrients into the soil.
- Repeat the fertilizing process every 2-4 weeks throughout the growing season, which is usually spring and summer.
- During winter or periods of dormancy, reduce the frequency of fertilization to once every 4-6 weeks or as recommended for the specific fertilizer you are using.
- Always read and follow the instructions on the fertilizer packaging for specific guidance on the application frequency and dosage for your selected fertilizer.
- Monitor the plant for any signs of over-fertilization, such as burnt or yellowing leaves. If these symptoms occur, flush the soil with water to remove excess salts and adjust the fertilizer dosage accordingly.
Remember, it's important to use caution and wear protective gloves when handling fertilizers, as some may be harmful to humans and pets.
Croton Tiglium plant grows best in well-draining soil with a slightly acidic to neutral pH level. It prefers soil that is rich in organic matter and has good water retention capabilities. The soil should be loose and friable, allowing roots to penetrate easily.
A mix of equal parts loam, peat moss, and sand can be suitable for Croton Tiglium. Loam provides necessary nutrients and good drainage, while peat moss helps retain moisture and improve aeration. Adding sand helps to further improve drainage and prevent waterlogging.
It is important to ensure that the soil is well-drained, as waterlogged conditions can lead to root rot. Supplementing the soil with organic matter, such as compost or well-rotted manure, can help improve its fertility and promote healthy growth.
Regularly assessing the moisture level of the soil is important for proper care of the Croton Tiglium plant. The soil should be moist but not overly saturated. Overwatering should be avoided as it can lead to root damage and other issues.
Overall, providing the Croton Tiglium plant with well-draining, nutrient-rich soil that allows proper air circulation around the root system will contribute to its overall health and vibrant appearance.
Croton tiglium plant propagation can be done through various methods including seed propagation, stem cuttings, and air layering. Each method has its own process and care requirements. Here are detailed steps on how to propagate Croton tiglium plant:
- Seed Propagation:
- Collect mature seeds from an existing Croton tiglium plant.
- Soak the seeds in warm water for a few hours or overnight to soften the seed coat.
- Prepare a seed tray or pots filled with well-draining potting mix.
- Sow the seeds on the surface of the soil and lightly press them into it.
- Cover the seeds with a thin layer of soil or vermiculite.
- Place the tray or pots in a warm and humid environment, ideally under a propagation dome or plastic bag.
- Water the soil regularly to keep it moist but not overly saturated.
- Germination can take several weeks to a few months. Once the seedlings have developed at least two or three true leaves, they can be transplanted into individual pots.
- Collect mature seeds from an existing Croton tiglium plant.
- Stem Cuttings:
- Choose a healthy, mature Croton tiglium plant to take cuttings from.
- Using a clean and sharp knife or pruning shears, cut a 4-6 inch (10-15 cm) long stem from the plant, preferably from the top portion.
- Remove the lower leaves from the cutting, leaving only a few leaves at the top.
- Dip the cut end of the stem in a rooting hormone powder or gel to promote root growth.
- Prepare a pot filled with well-draining, sterile potting mix or a mixture of peat moss and perlite.
- Create a small hole in the soil and gently insert the cutting, ensuring that at least 2-3 nodes are covered with soil.
- Firmly press the soil around the cutting to provide stability.
- Water the cutting thoroughly and place it in a warm and bright location, but avoid direct sunlight.
- Keep the soil consistently moist, but avoid overwatering or allowing the soil to become waterlogged.
- Within a few weeks to a couple of months, roots should develop, indicating successful propagation.
- Choose a healthy, mature Croton tiglium plant to take cuttings from.
- Air Layering:
- Choose a healthy and mature Croton tiglium plant with a flexible stem suitable for air layering.
- Make a 1-inch (2.5 cm) downward diagonal cut on the stem, about a third of the way through.
- Apply a rooting hormone to the cut area to stimulate root development.
- Place moist sphagnum moss, wrapped in plastic wrap, around the cut area and secure it with twine or plant ties.
- Ensure the moss remains consistently moist by misting it regularly or placing a small reservoir of water at the top.
- After several weeks to a few months, roots will start to form within the moss.
- Once a good amount of roots have developed, detach the rooted section from the main plant by making a clean cut below the rooting area.
- Plant the rooted section in a well-draining potting mix and provide it with proper care.
By following these propagation methods, you can successfully propagate Croton tiglium plant and increase your collection or share it with others. Remember to provide the young plants with their preferred growing conditions, including proper light, temperature, and humidity, to promote healthy growth.
- Choose a healthy and mature Croton tiglium plant with a flexible stem suitable for air layering.


