Plant Overview
Often called the Ivy-leaved Cyclamen, this hardy Mediterranean native is a master of the autumn landscape. While most of the garden is preparing for winter slumber, Cyclamen hederifolium bursts into life with delicate, "upside-down" flowers and intricate, marbled foliage. Its historical nickname, "Sowbread," comes from an old belief that wild pigs enjoyed digging up the tubers, though today it is far more prized for its silver-patterned beauty than its flavor.
🔍 How to Identify
- 🍃 The Foliage: True to its name (hederifolium means "ivy-leaved"), the leaves are shaped like classic ivy, featuring stunning silver or pewter marbling on a dark green base. The undersides are often a rich, secret purple.
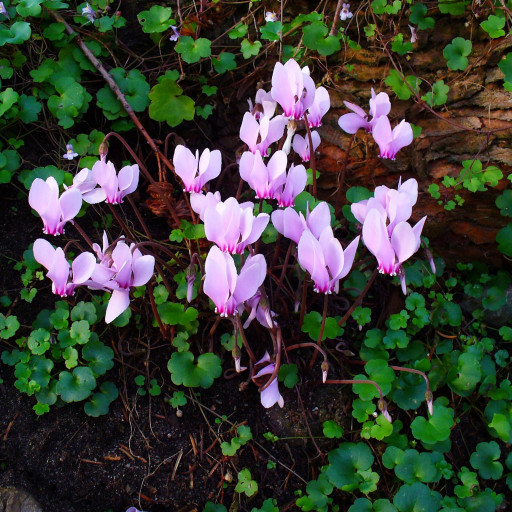
- 🌸 The Blooms: Dainty, honey-scented flowers appear in late summer or autumn. The petals are elegantly swept backward, pointing toward the sky like tiny pink or white shuttlecocks.
- 🥔 The Tuber: The plant grows from a large, flattened, corky tuber. Unlike many bulbs that grow roots from the bottom, this Cyclamen often sprouts roots from the top and sides of the "potato."
🏡 In Your Garden
- 🌳 Dry Shade Specialist: This is one of the rare gems that thrives in "dry shade"—those difficult areas under mature trees or shrubs where other plants often wither. It loves the protection of a leafy canopy.
- 💤 The Summer Nap: It follows a unique lifecycle, going completely dormant and disappearing underground during the hot summer months. It is vital not to overwater the area during this time, as the dormant tubers are prone to rotting in soggy soil.
⚠️ Safety & Toxicity
- 🚫 Toxic if Ingested: The entire plant contains triterpenoid saponins (specifically cyclamin), which are highly concentrated in the underground tubers.
- 🐾 Pet & Child Alert: If eaten, it can cause severe stomach upset, drooling, and vomiting. In large quantities, it is dangerous to cats and dogs, so it is best planted in areas where curious paws won't be tempted to dig.
✨ Fun Fact
- 🐜 Ant Gardeners: The seeds of the Ivy-leaved Cyclamen are coated in a sticky, sugary substance called an elaiosome. This "treat" attracts ants, who carry the seeds back to their nests. Once the ants eat the sugar, they discard the seed in their nutrient-rich waste tunnels, effectively planting a new colony for you!

Detailed Care Instructions
| Humidity | Normal |
| Lighting | Full Sun |
| Difficulty | Medium |
| Hibernation | Cold Period |
| Temperature | 15°C - 20°C |
| Hardiness Zones | 5 - 9 |
To grow Cyclamen hederifolium (also known as ivy-leaved cyclamen), you can follow these steps:
- Choose a planting location: Select a spot with partial to full shade, as these plants prefer cool and sheltered conditions.
- Prepare the soil: Cyclamen plants thrive in well-draining soil, so ensure the area has good drainage. If the soil is heavy and compacted, mix in some compost or sand to improve drainage.
- Planting bulbs: Plant the cyclamen bulbs in the late summer or early fall, as they require a cold season to break their dormancy. Dig holes about 2-3 inches deep and place the bulbs in the holes, pointed side up. Space them about 6-9 inches apart.
- Watering: Water the newly planted bulbs thoroughly to settle the soil. After that, water sparingly during the growing season to avoid overwatering, as these plants are susceptible to rot. Allow the soil to dry slightly between watering.
- Fertilization: Cyclamen does not require frequent fertilization. You can feed them with a balanced, slow-release fertilizer once or twice during the growing season.
- Mulching: Applying a layer of mulch around the plants can help retain soil moisture and suppress weed growth.
- Maintenance: Remove any yellow or withered leaves to maintain plant health. After the flowers fade, allow the plant to enter a period of dormancy. During this time, reduce watering and keep the plant in a cool, dry place. The plant will start to regrow when favorable conditions return.
- Propagation: Cyclamen can be propagated by division or by sowing seeds. Division is the most common method, done during the dormant period when the tubers are lifted and separated. Seeds can be sown in a well-draining soil mix and kept in a cool, dark place until germination occurs.
Cyclamen hederifolium is a hardy plant, but it may take a few years to establish and produce abundant flowers. Patience and proper care will help it flourish.

Place in a window with dappled sun or a spot in the middle of a room. Or directly in a window facing west or east.

To water this particular plant, it is recommended to allow the top layer of soil to become slightly dry before watering. When watering, pour water slowly and evenly over the soil until it begins to drain out of the bottom of the pot. It is important to not let the plant sit in standing water, as this can lead to root rot. Additionally, it is important to avoid getting water on the leaves of the plant, as this can cause damage and encourage the growth of disease.
To fertilize the plant, use a balanced slow-release fertilizer that is specifically formulated for flowering plants. Apply the fertilizer according to the instructions on the packaging, taking care not to over-fertilize as this can damage the plant. It is recommended to fertilize the plant every 6-8 weeks during the growing season, starting in early spring and ending in late summer. Water the plant thoroughly after fertilizing to ensure that the nutrients are evenly distributed throughout the soil.
The ideal soil for Cyclamen Hederifolium plant should be well-draining and loose, with a pH level of neutral to slightly acidic. It should be rich in organic matter and have good water retention capacity, but not be too wet or waterlogged as this can cause root rot. A mix of loam, leaf mold, and sand in equal parts is recommended, although some gardeners prefer to add perlite or vermiculite to improve drainage. The soil should also be light and airy, to allow for good air circulation around the plant's roots. Avoid using heavy or compacted soils, or soils that are high in clay or alkaline, as these can cause problems with nutrient uptake and root development.
To propagate this plant, you can begin by gently digging up the parent plant and carefully removing the corms from the soil. Choose healthy-looking corms and remove any that are damaged or diseased. Clean the corms by gently brushing off any excess soil.
Next, prepare a pot with well-draining soil and plant the corms about 1 inch deep. Water the soil and place the pot in a bright, filtered light location. Keep the soil consistently moist but not waterlogged.
After a few weeks, you should start to see new growth emerging from the corms. Once the new growth is established, you can transplant the young plants to their permanent location in the garden.
Propagation can also be done by seed, which can be harvested from mature plants in late summer or early fall. Sow the seeds in moist soil and keep them in a bright, filtered light location. Transplant the young seedlings to their permanent location once they have established strong roots.
Common pests of the ivy-leaved cyclamen include Spider mites, aphids. Make a habit of checking your ivy-leaved cyclamen frequently for pests so that any infestations can be caught and managed early.


