Plant Overview
Known as the "Merck’s Dahlia," this delicate beauty is a far cry from the heavy-headed, pom-pom hybrids often seen at flower shows. Hailing from the high mountains of Mexico, it brings an airy, ethereal grace to the garden that feels more like a wildflower than a cultivated prize. Its slender, nodding blossoms dance in the slightest breeze, earning it a reputation as one of the most elegant species in the Dahlia genus.
🔍 How to Identify
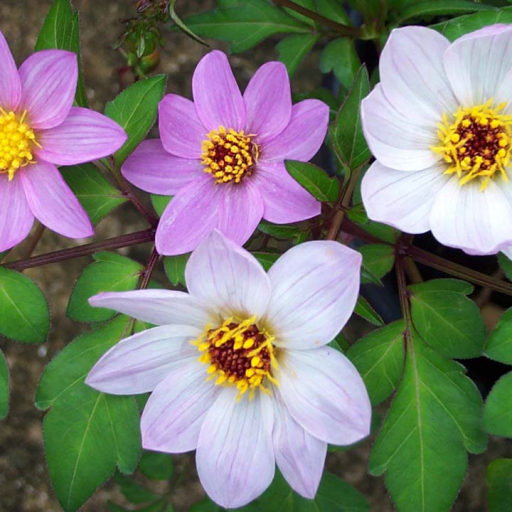
- 🌸 Single Blooms: Dainty, single-petaled flowers typically appearing in shades of lilac, soft lavender, or icy white, each surrounding a bright golden-yellow center.
- 🌿 Fern-like Foliage: Unlike the broad, heavy leaves of common dahlias, these leaves are deep green, glossy, and finely divided, resembling lace or fern fronds.
- 🎋 Wiry Stems: Tall, slender, and often purple-tinted stems that give the plant a "see-through" quality, allowing it to blend seamlessly into herbaceous borders.
🏡 In Your Garden
- 🏔️ Mountain Heritage: Because it originates from high-altitude regions, this plant thrives in areas with cooler summer nights. It appreciates a thick layer of mulch to keep its "feet" cool while its "head" basks in the sunlight.
- 🦋 Pollinator Buffet: While "double" dahlias hide their nectar behind layers of petals, the open-faced Dahlia merckii is a landing pad for honeybees, bumblebees, and butterflies.
- 🌬️ Wind Resistance: Its flexible, wiry stems are surprisingly resilient. Unlike top-heavy hybrids that snap in a storm, this species tends to bend and sway, though it still appreciates the support of neighboring plants.
⚠️ Safety & Toxicity
- 🐾 Toxic to Pets: Like all members of the Dahlia family, this plant is considered toxic to dogs, cats, and horses. If eaten, it can cause gastrointestinal upset and skin irritation.
- 🧤 Skin Sensitivity: The tubers and leaves contain phototoxic compounds. Some gardeners may develop a mild "Dahlia Dermatitis" (an itchy rash) if they handle the plant and are then exposed to direct sunlight.
✨ Fun Fact
- 🧪 A Scientific Namesake: This plant was named in honor of Heinrich Emanuel Merck, the 19th-century German pharmacist who founded the famous Merck chemical company. He was a passionate botanist who helped bridge the gap between pharmacy and plant science!

Detailed Care Instructions
To grow Dahlia Merckii plants, follow these steps:
- Choose a sunny location: Dahlia Merckii plants need at least 6-8 hours of direct sunlight every day. Select a spot in your garden or a large container that receives ample sunlight.
- Prepare the soil: Dahlia Merckii plants prefer well-drained soil that is rich in organic matter. Amend the soil with compost or well-rotted manure to improve its texture and fertility.
- Plant the tubers: Dahlia Merckii plants are grown from tubers (similar to bulbs). Plant the tubers in spring, after the last frost has passed. Dig a hole that is about 4-6 inches deep and place the tuber in the hole with the pointed end facing upwards. Cover the tuber with soil, leaving about an inch of space above it.
- Water properly: Keep the soil consistently moist, but not waterlogged. Water the plant deeply once or twice a week, depending on the weather conditions. Avoid overhead watering as it can lead to diseases. Mulching around the base of the plant can help retain moisture and prevent weed growth.
- Stake the plant: Dahlias can grow tall and the Dahlia Merckii variety is no exception. Stake the plant or provide supports to prevent it from falling over or bending under its weight.
- Provide regular fertilization: Feed your Dahlia Merckii plant every few weeks with a balanced, slow-release fertilizer. This will promote healthy growth and abundant flowering. Follow the instructions on the fertilizer package for proper dosage and application.
- Prune and deadhead: Remove any dead or faded flowers regularly to encourage the plant to produce more blooms. Pruning the plant by cutting back 1/3 of its height in mid-summer can result in more compact and bushy growth.
- Protect from frost: Dahlia Merckii plants are not cold-hardy and will not survive frost. If you live in a region with cold winters, dig up the tubers before the first frost and store them in a cool, dry place for the winter. Replant them in spring when the danger of frost has passed.
By following these steps, you can successfully grow your Dahlia Merckii plant and enjoy its beautiful flowers throughout the growing season.

Place in a bright room that is sun drenched almost all day. Or directly in a south-facing window.

To properly water a certain plant species, it is important to consider factors such as the plant's specific water requirements, the soil type and moisture level, and the surrounding environment. In the case of this particular plant, it is recommended to water it deeply but infrequently, allowing the soil to dry out partially between waterings. This helps prevent overwatering and root rot.
To water the plant, it is best to use a watering can with a narrow spout or a drip irrigation system to deliver water directly to the soil without getting the foliage wet. Water should be applied slowly and evenly, ensuring that the soil is thoroughly moistened but not waterlogged. It is important to avoid splashing water onto the leaves or flowers, as this can lead to fungal diseases and other issues.
In addition to watering, it is also important to monitor the plant for signs of stress or dehydration, such as wilting or yellowing foliage. These may indicate that the plant needs more water or that the soil is too dry. Regular fertilization and proper pruning can also help promote healthy growth and prevent issues such as overcrowding or disease.
Overall, careful attention to the plant's water and care requirements can help ensure healthy growth and vibrant blooms for this striking and unique species.
To fertilize this plant, first, ensure that the soil is moist. Then, use a fertilizer with balanced N-P-K ratios, such as a 10-10-10 or 20-20-20 formula. Apply the fertilizer evenly around the base of the plant at a rate of 1 tablespoon per square foot of planting area. Water the soil well after fertilizing to help distribute the nutrients. Repeat this process once a month during the growing season.
The recommended soil for Dahlia Merckii plant is a well-draining, moderately fertile soil that is rich in organic matter. It should not be too heavy or compacted, as this can lead to waterlogged conditions and root rot. A soil pH between 6.0 and 7.5 is ideal for this plant species. Humus-rich soils with a good water-holding capacity can help to prevent drought stress during periods of dry weather. Additionally, adding a slow-release fertilizer to the soil at planting time can provide the necessary nutrients for healthy growth and development. It is important to ensure that the soil is free of any potential pathogens or pests that could harm the plant, and to maintain consistent moisture levels in the soil without overwatering.
To propagate this plant, you will need to first locate a healthy parent plant with mature growth that you wish to take cuttings from. Using a clean pair of scissors or pruning shears, cut a healthy stem from the parent plant at an angle, ensuring that it is at least 5 inches long and has several nodes on it. Remove all the lower leaves on the stem, leaving only the top two or three leaves intact.
Next, fill a small pot with fresh, moist potting soil and create a hole in the center with your finger. Dip the cut end of the stem in rooting hormone powder and carefully insert it into the hole, ensuring that the bottom node of the stem is touching the soil. Firmly press the soil around the stem to ensure it is secure.
Water the soil gently, being careful not to dislodge the stem. Cover the pot with a clear plastic bag to create a humid environment for the cutting. Keep the pot in a bright, warm area, but out of direct sunlight. Check the cutting daily for any signs of dehydration or fungal growth and remove any yellowing leaves if necessary.
After two to three weeks, gently tug on the cutting to see if it has rooted. If it resists, it has established roots and can be gradually exposed to more light and less humidity. If it easily pulls out of the soil, it needs more time to root. Once the rooted cutting has several new leaves, it can be transplanted into a larger pot or into the garden.


