Plant Overview
Known as the "Alpine Daphne," this hardy little shrub is a miniature powerhouse of scent found clinging to the limestone cliffs of the European Alps. Unlike its more common evergreen cousins, this species sheds its leaves in winter, focusing all its energy into a spectacular, honey-scented floral display each spring. It is a favorite among rock gardeners who want the elegance of a Daphne but need a plant that can withstand harsher, high-altitude conditions.
🔍 How to Identify
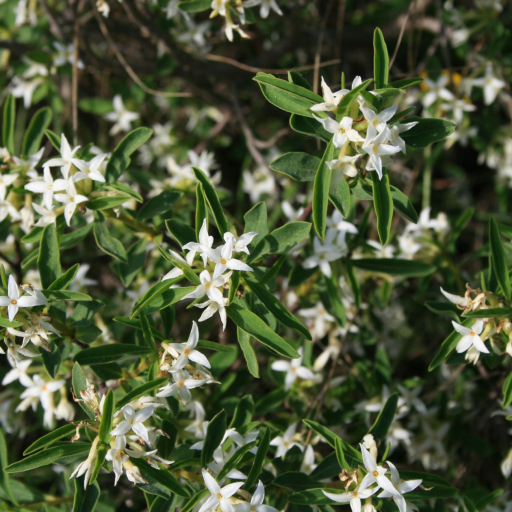
- 🌸 The Flowers: Small, star-shaped white blossoms that grow in clusters. They are famous for their intense, sweet fragrance that can fill an entire corner of a garden.
- 🍃 The Foliage: Unlike many other Daphnes, these leaves are grayish-green, soft to the touch, and drop off in the winter (deciduous). They are typically narrow and lance-shaped.
- 🍒 The Fruit: After flowering, the plant produces small, egg-shaped berries that turn a vibrant orange-red color when ripe.
🏡 In Your Garden
- ⛰️ The Limestone Lover: This plant is a "calcicole," meaning it thrives in alkaline soils. If your garden soil is too acidic, it will struggle; it loves the gritty, well-drained conditions of a rockery or alpine trough.
- 🚫 Look But Don't Touch: Alpine Daphne is notorious for having a sensitive root system. Once you plant it, avoid moving it at all costs, as "transplant shock" can be fatal to this picky mountain dweller.
- ☀️ Cool Feet, Sunny Head: It prefers a spot where its roots stay cool and shaded (perhaps tucked under a large rock) while its branches enjoy the bright, open sun.
⚠️ Safety & Toxicity
- 🚫 Highly Toxic: Every part of the Alpine Daphne—from the bark and sap to the bright orange berries—is poisonous if ingested.
- 🐾 Pets & Children: The berries are particularly tempting but contain mezerein, which causes severe stomach distress and mouth irritation. Keep this plant away from curious pets and toddlers.
- 🧤 Skin Irritant: The sap can cause localized dermatitis (skin rash) for some people, so wearing gloves while pruning is highly recommended.
✨ Fun Fact
The genus name Daphne comes from the Greek myth of the nymph who turned into a laurel tree to escape Apollo. While Daphne alpina isn't a laurel, its fragrant, waxy leaves reminded early botanists so much of the mythic tree that they bestowed it with this legendary name.

Detailed Care Instructions
To grow Daphne alpina, also known as the Alpine daphne, follow these steps:
- Climate and soil: Daphne alpina thrives in cool temperate climates, preferably in USDA hardiness zones 5-9. It prefers well-drained, fertile soil with a slightly acidic to neutral pH.
- Location: Choose a location that receives partial shade or dappled sunlight. Protection from hot afternoon sun is essential, as excessive heat may damage the plant.
- Propagation: Daphne alpina can be propagated from seeds or cuttings.
- Seeds: Collect fresh seeds from the berries of a mature Daphne alpina plant. Clean the seeds and soak them in water for 24 hours before sowing. Sow the seeds in a well-draining potting mix and cover them with a thin layer of soil. Place the pot in a plastic bag to create a mini greenhouse effect and keep it in a cool location (around 50°F / 10°C). Seeds may take several weeks to germinate. Once the seedlings reach a suitable size, transplant them into individual containers or directly into the ground.
- Cuttings: Take semi-hardwood cuttings in late summer or early autumn. Select a healthy stem and cut a 4-6 inch section just below a leaf node. Remove the lower leaves and dip the cut end into a rooting hormone. Plant the cutting in a container filled with a well-draining rooting medium, such as perlite or vermiculite. Keep the soil consistently moist and provide bottom heat to encourage root development. Once the cutting has rooted (usually within a few months), transplant it into a larger container or plant it directly in the ground.
- Watering and fertilizing: Daphne alpina prefers evenly moist soil, but it should never be overly wet. Water the plant regularly, maintaining moist but not soggy conditions. During dry periods, provide additional watering. Apply a balanced, slow-release fertilizer in spring to promote healthy growth, following the manufacturer's instructions.
- Pruning: Prune Daphne alpina lightly after flowering to promote compact growth and remove any dead or damaged branches. Avoid heavy pruning, as this may reduce flowering.
- Pest and disease control: Monitor the plant for common pests like aphids and scale insects. Treat infestations promptly with appropriate insecticides or horticultural oils. Prevent fungal diseases by ensuring good air circulation around the plant and avoiding overhead watering.
Remember, Daphne alpina can be slow-growing and may take a few years to become fully established. It's important to be patient and provide consistent care to help it thrive.

Place in a bright room that is sun drenched almost all day. Or directly in a south-facing window.

Daphne Alpina plants require regular watering to maintain their health. To water these plants, ensure that the soil around the roots is moist but not waterlogged. Overwatering can lead to root rot, which can eventually kill the plant.
To water Daphne Alpina plants, use a watering can or a hose with a gentle spray nozzle. Water around the base of the plant, avoiding the leaves and stems. Water deeply to ensure that the moisture reaches the roots.
During the growing season, it is best to water Daphne Alpina plants once or twice a week, depending on the weather conditions. In hot, dry weather, the plant may require more frequent watering. During the winter months, reduce the frequency of watering, as the plant will not be actively growing.
In addition to regular watering, it is important to ensure that the plant is planted in well-draining soil. If the soil retains too much moisture, it can lead to root rot. Adding organic matter or perlite to the soil can help improve drainage.
Overall, Daphne Alpina plants require regular watering and well-draining soil to thrive. With proper care, these plants can be a beautiful addition to any garden.
To fertilize this plant, apply a balanced fertilizer with equal parts nitrogen, phosphorus, and potassium in early spring before new growth emerges. Use a slow-release granular fertilizer or dilute a water-soluble fertilizer and apply it to the soil around the plant's base. Avoid over-fertilizing, as this plant is sensitive to fertilizer burn.
Daphne Alpina thrives in well-draining soil that is slightly acidic, with a pH level between 5.5 and 6.5. It prefers a rich soil that is high in organic matter and moisture-retentive, but not waterlogged. Soil that is too heavy or compact can lead to root rot, which can kill the plant. Sandy loam soil with good drainage is ideal for this plant. Avoid using soil that is alkaline or too nutrient-rich, as this can lead to stunted growth and poor flowering. To improve the quality of the soil, add compost or well-rotted manure to the soil before planting.
To propagate this plant, select a healthy stem cutting that is at least 4-6 inches long and has several leaves attached. Cut the stem just below a node, where a leaf attaches to the stem. Remove the bottom set of leaves from the cutting, leaving only the top leaves. Dip the cut end of the stem in rooting hormone powder and then plant it in moist, well-draining soil, making sure the soil covers the site of the node. Place the cutting in a warm, bright location, but out of direct sunlight. Mist the cutting regularly to keep the soil moist and cover it with a plastic bag to create a humid environment. After several weeks, the cutting should begin to grow new roots and leaves. Once roots have developed and the plant is established, it can be transplanted to a larger pot or outdoors in a suitable location.


