Plant Overview
Known as the Gympie-Gympie or the "Suicide Plant," this Australian native is arguably the most notorious member of the nettle family. While it looks like a soft, velvety shrub with lush green foliage, it is widely considered one of the most painful plants in the world. It earned its dark nickname from stories of hikers and animals driven to madness by the agonizing, long-lasting sting it delivers.
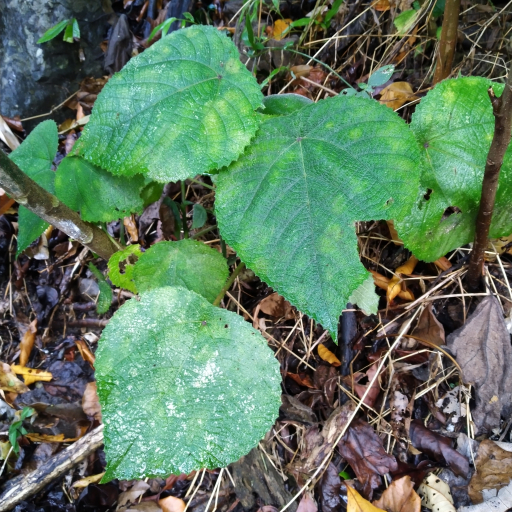
🔍 How to Identify
- 🍃 Heart-Shaped Leaves: The leaves are large, broad, and heart-shaped (cordate) with finely serrated or "toothed" edges.
- 🕸️ Velvety Coating: The entire plant—leaves, stems, and fruit—is covered in a dense layer of fine, silvery hairs. These are actually hollow needles made of silica (glass).
- 🍇 Mulberry-like Fruit: It produces clusters of bumpy, juicy-looking fruits that range from bright pink to deep purple, hanging like ornaments from the stems.
🏡 In the Wild & Ecology
- ☀️ The Light Seeker: In its native Australian rainforests, the Gympie-Gympie is a "pioneer" species. It waits for a giant tree to fall, then quickly grows in the newly created sun-drenched gap to claim the territory.
- 🌬️ Invisible Danger: You don't even have to touch the plant to feel its wrath. It constantly sheds its stinging hairs, which can float in the air. If inhaled, they cause intense sneezing, coughing, and nosebleeds.
⚠️ Safety & Toxicity
- 🚨 EXTREME DANGER: The sting is described as feeling like being burnt with hot acid and electrocuted at the same time. The pain peaks after 30 minutes but can recur for months or even years when the skin is exposed to cold water or temperature changes.
- 🚫 Do Not Touch: Even a light brush against a leaf can embed thousands of microscopic silica needles into your skin. These needles are so small that skin often heals over them, trapping the toxin inside.
- 🐾 Pet Warning: This plant is dangerous to all mammals. Pets should be kept far away from any known growth areas, as even a dried, dead leaf on the ground remains venomous for decades.
✨ Fun Fact
The toxin within the Gympie-Gympie is so unique that scientists named it "moroidin." Interestingly, the molecular structure of this plant's venom is remarkably similar to the venom found in cone snails and certain spiders!

Detailed Care Instructions
Dendrocnide moroides, commonly known as the gympie-gympie or stinging tree, is a plant native to Australia and is noted for its painful sting caused by its finely hair-like structures that can cause severe pain and discomfort. If you're interested in growing this plant, here are some tips to help you:
Growing Dendrocnide Moroides
Climate and Location:
- Climate: It thrives in warm, humid environments typical of tropical or subtropical climates.
- Light: Prefer partial to full shade. In their natural habitat, they are often found in the understory of rainforests.
Soil Requirements:
- Soil Type: Requires rich, well-draining soil. A mix of organic matter, such as compost, can improve soil quality.
- pH Levels: Slightly acidic to neutral soil (pH 6.0 to 7.0) is ideal.
Planting:
- Seeds or Cuttings: You can propagate from seeds or cuttings. If using seeds, soak them in water for 24 hours before planting to enhance germination.
- Spacing: When planting multiple specimens, ensure they have enough space to grow and spread, as they can become quite large.
Watering:
- Regular Watering: Keep the soil consistently moist, especially during the growing season. However, avoid waterlogging.
- Mulching: Apply mulch to retain moisture and suppress weeds.
Fertilization:
- Organic Fertilizers: Apply a balanced, slow-release organic fertilizer during the growing season to support healthy growth.
Maintenance:
- Pruning: Regularly prune to encourage bushier growth and remove any dead or damaged stems.
- Pest Control: Monitor for pests and diseases. While they are relatively hardy, keep an eye out for common pests.
Caution:
- Handling: Be extremely cautious when handling this plant, as its leaves and stems are covered with tiny hairs that can deliver a painful sting. Always wear gloves and protective clothing when working with it.
- Location: Consider planting it in a location away from foot traffic or areas where people frequently gather.
Legal Considerations:
- Sourcing: Check local regulations regarding cultivation, as some regions may have restrictions due to its invasive potential.
Growing Dendrocnide moroides requires care and caution due to its stinging properties. If you decide to grow this plant, ensure you are adequately prepared to handle it safely.
Watering Dendrocnide moroides requires careful attention to its specific needs as a tropical plant. Here are some detailed guidelines for properly watering this species:
- Soil Type: Use a well-draining soil mix that retains some moisture but allows excess water to escape. A combination of potting soil, perlite, and orchid bark can provide good drainage.
- Water Frequency: Check the soil moisture regularly. This plant prefers consistently moist soil but should not sit in waterlogged conditions. Water when the top inch of soil feels dry to the touch.
- Watering Method: Water thoroughly until you see water draining from the bottom of the pot. This ensures that the entire root system is moist. Empty any excess water from the saucer to prevent root rot.
- Environmental Conditions: Consider the climate in which the plant is growing. In warmer months, it may need more frequent watering, while in cooler seasons, reduce the frequency. Humidity levels also play a role; a more humid environment may require less frequent watering.
- Time of Day: Water in the morning or early afternoon to allow the plant to absorb moisture before the heat of the day causes evaporation. This also helps prevent fungal diseases.
- Signs of Overwatering: Look for yellowing leaves or a soggy soil texture, which may indicate that the plant is receiving too much water. Adjust your watering schedule accordingly.
- Signs of Underwatering: Brown, crispy leaf edges and wilting can indicate underwatering. If this occurs, increase the frequency of watering.
- Fertilization: If the plant is actively growing, consider adding a diluted liquid fertilizer during the growing season. Ensure that you still maintain a consistent watering schedule, as fertilizing without adequate moisture can harm the roots.
By adhering to these guidelines, you can effectively provide the necessary hydration for Dendrocnide moroides, supporting its growth and overall health.
To fertilize Dendrocnide moroides effectively, follow these guidelines:
- Timing: Fertilize during the growing season, which typically occurs in spring and summer. Avoid fertilizing in fall and winter when the plant is dormant.
- Type of Fertilizer: Use a balanced, slow-release fertilizer with an N-P-K ratio such as 10-10-10 or a similar formulation. Alternatively, you can use a liquid fertilizer diluted to half strength.
- Application Rate: Apply the fertilizer according to the manufacturer's instructions, generally about 1 tablespoon of slow-release granules per plant. For liquid fertilizers, use the diluted solution once every 4-6 weeks during the growing season.
- Method:
- For granular fertilizers, evenly distribute the granules around the base of the plant, avoiding direct contact with the stem. Water thoroughly after application to help incorporate the fertilizer into the soil.
- For liquid fertilizers, water the plant first to prevent root burn, then apply the diluted solution directly to the soil around the roots.
- For granular fertilizers, evenly distribute the granules around the base of the plant, avoiding direct contact with the stem. Water thoroughly after application to help incorporate the fertilizer into the soil.
- Monitoring: Observe the plant's response to fertilization. Adjust the frequency and amount based on its growth and overall health. Look for signs of nutrient deficiencies or excesses, such as yellowing leaves or stunted growth.
- Soil Testing: Consider conducting a soil test before applying fertilizers to determine the existing nutrient levels and pH. This will help tailor your fertilization approach more effectively.
- Watering: Maintain consistent moisture in the soil but avoid overwatering. Well-draining soil is crucial to prevent root rot and maximize nutrient uptake.
By following these instructions, you can promote healthy growth and vitality for your Dendrocnide moroides.
Dendrocnide moroides thrives best in a well-draining soil blend that can retain some moisture while allowing excess water to escape. Here are specific soil characteristics and components to consider:
- Soil pH: Aim for a slightly acidic to neutral pH range, ideally between 5.5 and 7.0.
- Organic Matter: Incorporate plenty of organic matter, such as well-decomposed compost or leaf mold. This aids in moisture retention and provides essential nutrients.
- Texture: A loamy soil mixture is preferable. This consists of a balanced blend of sand, silt, and clay, which helps ensure good drainage while still retaining some moisture.
- Drainage: Ensure that the soil is well-draining to prevent root rot. If using potting mixes, look for those labeled as suitable for moisture-loving plants or add perlite or coarse sand to improve drainage.
- Moisture Retention: While good drainage is essential, the soil should also be able to retain moisture. Adding materials like coconut coir or aged pine bark can enhance moisture retention without making the soil overly compact.
- Nutrients: A balanced mix with a moderate nutrient content is recommended. Consider a slow-release fertilizer during the growing season to supplement the soil, ensuring it meets the plant's nutrient needs.
- Aeration: Incorporating perlite or pumice can improve aeration within the soil matrix, facilitating healthy root development.
When preparing the soil, aim to create a well-aerated, moisture-retentive environment that avoids waterlogging, promoting the healthy growth of the plant. Regular monitoring and adjustments may be necessary based on the plant's response to the soil conditions.
Dendrocnide Moroides can be propagated through several methods, primarily focusing on seeds and cuttings. Here are the detailed steps for both methods:
Propagation from Seeds
- Seed Collection:
- Harvest seeds from mature plants when they are ripe. This typically occurs when the seed pods begin to dry and turn brown.
- Harvest seeds from mature plants when they are ripe. This typically occurs when the seed pods begin to dry and turn brown.
- Seed Preparation:
- Clean the collected seeds to remove any pulp or debris. Rinse them under running water and allow them to dry.
- Clean the collected seeds to remove any pulp or debris. Rinse them under running water and allow them to dry.
- Sowing:
- Prepare a well-draining seed-starting mix, which can include perlite, vermiculite, and peat moss.
- Sow the seeds on the surface of the soil mix and gently press them in, ensuring they have good contact with the substrate. Do not cover them with soil as they require light to germinate.
- Prepare a well-draining seed-starting mix, which can include perlite, vermiculite, and peat moss.
- Moisture and Environment:
- Mist the surface lightly to maintain humidity, and cover the container with a clear plastic lid or plastic wrap to create a humid environment.
- Place the container in a warm location with indirect sunlight or under grow lights.
- Mist the surface lightly to maintain humidity, and cover the container with a clear plastic lid or plastic wrap to create a humid environment.
- Germination:
- Monitor the moisture levels and keep the medium consistently moist but not soggy. Germination can take several weeks.
- Once seedlings develop a few true leaves, they can be transplanted into individual pots with a suitable potting mix.
Propagation from Cuttings
- Monitor the moisture levels and keep the medium consistently moist but not soggy. Germination can take several weeks.
- Selecting Cuttings:
- Choose healthy, semi-hardwood stem cuttings from a mature plant. Ideally, these should be 4-6 inches long and contain a few leaf nodes.
- Choose healthy, semi-hardwood stem cuttings from a mature plant. Ideally, these should be 4-6 inches long and contain a few leaf nodes.
- Preparation of Cuttings:
- Remove the lower leaves from the cuttings to avoid rot and to reduce water loss.
- Optionally, dip the cut end into rooting hormone to promote root development (though it's not always necessary).
- Remove the lower leaves from the cuttings to avoid rot and to reduce water loss.
- Planting:
- Prepare a pot with a well-draining potting mix, similar to that used for seeds.
- Insert the cut end of the cutting into the soil mix, burying it about an inch deep, and firm the soil around the cutting.
- Prepare a pot with a well-draining potting mix, similar to that used for seeds.
- Watering and Care:
- Water the cuttings lightly to settle the soil around them.
- Cover the pot with a plastic bag or a plastic dome to maintain humidity, securing it with a rubber band or string to prevent it from touching the leaves.
- Water the cuttings lightly to settle the soil around them.
- Light and Temperature:
- Place the pot in a warm area with indirect sunlight. Ideally, temperatures should be in a range that fosters growth (typically around 70°F to 75°F or 21°C to 24°C).
- Place the pot in a warm area with indirect sunlight. Ideally, temperatures should be in a range that fosters growth (typically around 70°F to 75°F or 21°C to 24°C).
- Root Development:
- Check the cuttings regularly for moisture and ventilation. It’s important to prevent mold while keeping humidity high.
- After a few weeks, gently tug on the cuttings; resistance typically indicates root development.
- Once roots are established (usually within 4-8 weeks), acclimate them to lower humidity and transplant into larger pots if necessary.
General Care After Propagation
Regardless of the propagation method used, provide new plants with appropriate care:
- Check the cuttings regularly for moisture and ventilation. It’s important to prevent mold while keeping humidity high.
- Watering: Keep the soil evenly moist but not waterlogged.
- Light Conditions: Gradually introduce young plants to more direct light conditions as they grow.
- Fertilization: Use a diluted, balanced fertilizer every few weeks during the growing season to promote healthy growth.
- Pest Management: Observe the plants for any signs of pests or disease and take appropriate action if detected.
By adhering to these steps, you should successfully propagate Dendrocnide Moroides, either from seeds or cuttings.


