Plant Overview
Known as the Bush Poppy or Tree Poppy, Dendromecon rigida is a striking evergreen shrub native to the dry hillsides of California and Baja. Unlike its delicate garden cousins, this poppy is a rugged survivor, often appearing as a pioneer species after wildfires. With its brilliant lemon-yellow blooms and distinct blue-gray foliage, it brings a touch of wild, sun-drenched beauty to Mediterranean-style landscapes.
🔍 How to Identify
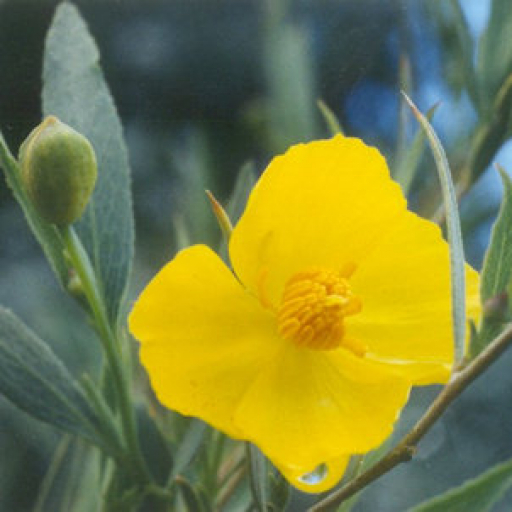
- 🌼 The Flowers: Large, four-petaled blossoms in a vivid shade of buttery yellow, featuring a dense cluster of orange-tipped stamens at the center.
- 🍃 The Foliage: Leathery, lance-shaped leaves that are a unique glaucous (blue-green) color, providing a sharp contrast to the bright flowers.
- 🪵 The Habit: A woody, upright shrub that can reach up to 10 feet tall, distinguished from other poppies by its permanent, branching framework.
🏡 In Your Garden
- 🚫 Handle with Care: This plant is notorious for its sensitive root system. It possesses a deep taproot and absolutely hates being moved once established, so choose its "forever home" carefully before planting.
- ☀️ Sun & Soil: It thrives in "tough" spots where other plants might struggle. It requires excellent drainage—ideally rocky or sandy soil—and as much direct sunlight as you can provide to mimic its native chaparral environment.
- 🔥 Fire Ecology: In the wild, its seeds are stimulated to germinate by the heat and chemicals of a fire, making it a symbol of renewal in scorched landscapes.
⚠️ Safety & Toxicity
- 🟢 Status: Generally low toxicity, but caution is advised.
- 🐾 Details: While not considered high-risk like the Opium Poppy, most members of the Papaveraceae family contain alkaloids that can cause mild stomach upset if ingested by pets or curious children. Its sap can also be a minor skin irritant for sensitive individuals.
✨ Fun Fact
The Bush Poppy is a true botanical rarity—it is one of the only members of the entire poppy family that develops a permanent, woody trunk, earning it its genus name Dendromecon, which literally translates from Greek as "Tree Poppy."

Detailed Care Instructions
Growing Dendromecon rigida, commonly known as bush poppy or tree poppy, can be a rewarding experience due to its attractive yellow flowers and evergreen leaves. Here’s a comprehensive guide to help you cultivate this beautiful native Californian plant:
Site Selection
- Climate: Dendromecon rigida is native to California and thrives in Mediterranean climates with warm, dry summers and mild, wet winters.
- Sunlight: Select a location that receives full sun, as this plant needs plenty of light to grow and flower well.
- Soil: This plant prefers well-draining, sandy or rocky soils. It does not perform well in clay or waterlogged soils. The soil pH should be slightly acidic to neutral.
Planting
- When to Plant: The best time to plant Dendromecon rigida is in the fall, which allows the root system to establish during the cooler, wetter months.
- How to Plant:
- Dig a hole that is twice the width and the same depth as the root ball of your plant.
- Place the root ball in the hole, ensuring that the top of the root ball is level with the surrounding soil.
- Backfill with native soil and water thoroughly to settle the soil around the roots.
Care and Maintenance
- Dig a hole that is twice the width and the same depth as the root ball of your plant.
- Watering:
- Initial Period: Water regularly after planting to help establish the plant. Keep the soil moist but not water-logged.
- After Establishment: Once established, usually after the first growing season, Dendromecon rigida is quite drought-tolerant. Reduce watering frequency, only watering during prolonged dry spells.
- Initial Period: Water regularly after planting to help establish the plant. Keep the soil moist but not water-logged.
- Mulching: Mulch around the base with organic material to help retain soil moisture and regulate soil temperature. Keep the mulch a few inches away from the stem to prevent rot.
- Feeding: Generally, Dendromecon rigida doesn't require much fertilization. If you feel the plant needs it, a light application of a balanced, slow-release fertilizer in the spring can be beneficial.
- Pruning: Prune lightly after the flowering season to shape the plant and remove any dead or damaged branches. Avoid heavy pruning, as this can stress the plant.
Pests and Diseases
- Dendromecon rigida is relatively pest and disease-free. However, be vigilant for signs of common issues like aphids or root rot, particularly if planted in poorly draining soil.
Propagation
- From Seed:
- Collect seeds after the pods have dried but before they open and scatter.
- Sow seeds in well-draining potting mix in a container, covering them lightly with soil.
- Keep the soil moist and place the container in a sunny location.
- Transplant seedlings when they are robust enough to handle (usually after they have at least one set of true leaves).
- Collect seeds after the pods have dried but before they open and scatter.
- From Cuttings:
- Take semi-hardwood cuttings in the late spring or early summer.
- Dip the cut ends in rooting hormone and plant them in a well-draining mix.
- Keep the cuttings moist and in a brightly lit, but not direct sun, location until roots develop.
Final Tips
- Take semi-hardwood cuttings in the late spring or early summer.
- Patience is key, as Dendromecon rigida can be slow to establish. However, once it’s settled, it’s a hardy, low-maintenance plant perfect for dry, sunny spots.
- If you are planting the bush poppy in an area that experiences frosts, consider some frost protection measures during particularly cold periods, especially for young plants.
By following these guidelines, you can successfully grow and enjoy the vibrant foliage and flowers of Dendromecon rigida in your garden.

Place in a bright room that is sun drenched almost all day. Or directly in a south-facing window.

To water this plant, you should first check the soil moisture level by inserting your finger a few inches into the soil. If it feels dry, it's time to water. Use a watering can or hose to moisten the soil around the base of the plant. Be careful not to overwater, as this plant prefers well-draining soil and can suffer from root rot if sitting in waterlogged soil. It's best to water deeply and infrequently rather than giving it small amounts of water frequently. You can also add a layer of mulch around the base of the plant to help retain moisture in the soil.
For Dendromecon Rigida, follow these fertilizing instructions:
- Timing: Fertilize in the early spring before new growth begins. Avoid fertilizing in the late fall or winter as the plant is generally dormant during this time.
- Type of Fertilizer: Use a balanced, slow-release fertilizer with an N-P-K ratio of 10-10-10 or a similar formulation. Organic fertilizers, such as compost or well-rotted manure, can also be beneficial.
- Application: For granular slow-release fertilizers, scatter the recommended amount evenly around the base of the plant, being careful not to let it touch the stems directly. Lightly work the granules into the top few inches of soil and then water thoroughly.
- Liquid Fertilizers: If you prefer to use liquid fertilizers, dilute according to the package instructions and apply evenly around the root zone. Avoid getting the fertilizer on the leaves to reduce the risk of burn.
- Frequency: With slow-release fertilizers, one application in early spring is usually sufficient. For liquid fertilizers, you may need to reapply every 4-6 weeks during the growing season following the manufacturer's guidelines.
- Observation: Monitor the plant for signs of nutrient deficiency or over-fertilization. Yellowing leaves, stunted growth, and poor flowering may indicate a need for more nutrients, while leaf burn and excessive growth can suggest over-fertilization.
By following these guidelines, you can help ensure your Dendromecon Rigida receives the nutrients it needs for healthy growth and blooming.
The recommended soil type for Dendromecon Rigida plants should be well-draining and slightly acidic. A mixture of coarse sand, coarse perlite, and peat moss with a pH range of 5.5 to 6.5 would be ideal. The soil should also be rich in nutrients and organic matter. Avoid using heavy clay soils and soils that tend to retain too much moisture as it can lead to root rot. It is also important to ensure that the soil is not too compacted to allow for proper root development.
Propagating Dendromecon rigida involves several steps, whether you choose to use seeds or perform vegetative propagation. Here's a detailed guide to both methods:
Propagation by Seeds
- Seed Collection:
- Collect seeds from mature plants in late summer or early fall when the seed capsules are dry and beginning to open.
- Place a bag or container under the capsules to catch the seeds as they are released.
- Collect seeds from mature plants in late summer or early fall when the seed capsules are dry and beginning to open.
- Seed Cleaning:
- Clean the seeds by removing any plant material or debris. This can be done by gently rubbing the seeds to separate them from the chaff.
- Clean the seeds by removing any plant material or debris. This can be done by gently rubbing the seeds to separate them from the chaff.
- Stratification:
- Seeds of Dendromecon rigida often require cold stratification to improve germination rates.
- Place the seeds in a moist medium such as sand or peat moss, then seal them in a plastic bag.
- Store the bag in a refrigerator at around 4°C (39°F) for 30 to 60 days.
- Seeds of Dendromecon rigida often require cold stratification to improve germination rates.
- Sowing:
- After stratification, sow the seeds in a well-draining seed-starting mix.
- Sow seeds on the surface and press them lightly into the soil but do not cover them completely as they need light to germinate.
- Water lightly to keep the soil moist but not waterlogged.
- After stratification, sow the seeds in a well-draining seed-starting mix.
- Germination:
- Place the seed tray in a bright location with indirect sunlight.
- Maintain a consistent temperature of around 18-21°C (65-70°F).
- Germination can take several weeks to a couple of months.
- Place the seed tray in a bright location with indirect sunlight.
- Transplanting:
- Once the seedlings have developed several sets of true leaves and are large enough to handle, they can be transplanted into individual pots or directly into the garden.
- Choose a site with well-draining soil and full sun to partial shade.
- Water regularly until the plants are established.
Propagation by Cuttings
- Once the seedlings have developed several sets of true leaves and are large enough to handle, they can be transplanted into individual pots or directly into the garden.
- Selecting Cuttings:
- Choose healthy, semi-hardwood cuttings from the current season's growth. The best time for taking cuttings is late spring to early summer.
- Cut a 4 to 6-inch section of stem with a clean, sharp knife or pruning shears.
- Choose healthy, semi-hardwood cuttings from the current season's growth. The best time for taking cuttings is late spring to early summer.
- Preparing Cuttings:
- Remove the leaves from the lower half of the cutting.
- If desired, dip the cut end in rooting hormone powder to improve rooting success, though it is not always necessary.
- Remove the leaves from the lower half of the cutting.
- Planting Cuttings:
- Insert the cut end of the cutting into a well-draining propagation medium, such as a mix of perlite and sand or a commercial propagation mix.
- Insert the cutting about 1 to 2 inches deep.
- Insert the cut end of the cutting into a well-draining propagation medium, such as a mix of perlite and sand or a commercial propagation mix.
- Rooting Environment:
- Place the cuttings in a warm, bright location out of direct sunlight.
- Maintain high humidity around the cuttings by covering them with a plastic dome or placing them in a propagator.
- Keep the propagation medium moist but not waterlogged.
- Place the cuttings in a warm, bright location out of direct sunlight.
- Root Development:
- Roots should start to form within 4 to 8 weeks.
- Gently tug on the cuttings to check for resistance, which indicates root growth.
- Roots should start to form within 4 to 8 weeks.
- Transplanting:
- Once the cuttings have established a good root system, they can be transplanted into individual pots or directly into the garden.
- As with seedlings, choose a site with well-draining soil and proper sunlight exposure.
- Provide regular water to help them establish, but take care not to overwater.
By following these methods for seed and cutting propagation, you can successfully grow new Dendromecon rigida plants.
- Once the cuttings have established a good root system, they can be transplanted into individual pots or directly into the garden.


