Plant Overview
Often called the Fishbone Cactus or the Zig Zag Cactus, this Mexican native is a showstopper that breaks all the rules of what a cactus "should" look like. Instead of sharp spines and round barrels, it offers long, flat, gracefully arching stems that mimic the skeletal anatomy of a deep-sea creature. In the wild, it lives as an epiphyte, clinging to trees in lush, humid forests rather than baking in a sandy desert.
🔍 How to Identify
- 🦴 The Fishbone Stem: Long, flat green stems feature deep, symmetrical rounded lobes that create a perfect "zig-zag" pattern.
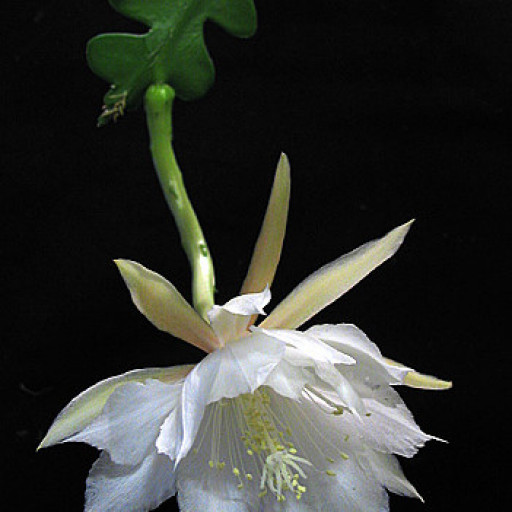
- 🕯️ Nocturnal Blooms: If you are lucky, it produces large, pale yellow or creamy white flowers that open only at night, releasing a heavy, sweet fragrance.
- 🍃 Smooth Texture: Unlike its prickly cousins, this cactus is mostly spineless and smooth to the touch, making its geometric shape the main attraction.
🏡 In Your Garden
- ☁️ Jungle Roots: Because it grows on trees in nature, it thrives in "airy" potting mixes (like orchid bark or perlite) and will rot quickly if left in heavy, soggy soil.
- ⛅ Gentle Light: Direct midday sun can scorch its "ribs." It prefers bright, dappled light—think of the sun filtering through a forest canopy.
- 💧 Humidity Lover: While it can survive dry air, it grows much faster and looks more vibrant in humid environments, making it a rare cactus that enjoys a steamy bathroom.
⚠️ Safety & Toxicity
- 🐾 Pet Friendly: The Fishbone Cactus is generally considered non-toxic to cats and dogs, so you don't have to worry if your pet decides to take a curious sniff.
- 👶 Child Safe: Because it lacks the vicious spines of desert cacti, it is a "touch-friendly" plant that is safe to keep on low tables or in reach of children.
✨ Fun Fact
The scientific name anguliger literally means "angle-bearing." While most people grow it for the foliage, it actually produces edible fruit! The small, greenish fruits are said to taste like a cross between a gooseberry and a dragon fruit.

Detailed Care Instructions
These are aerial roots, and they are totally normal for fishbone cacti! In the wild, these aerial roots help fishbone cacti anchor themselves to other plants and trees, and absorb nutrients and moisture from the surrounding air and organic material.
Why are the stems of my fishbone cactus going brown and mushy?
This is likely root rot, which is a result of overwatering. Unfortunately, there is no way to cure root rot, and the affected portions of the plant will need to be cut out and removed. To prevent more root rot in the future, ensure that the soil is well-draining, that the potting container has drainage holes, and that the top couple inches of the soil dry out between watering.
How fast does the fishbone cactus grow?
The fishbone cactus is considered a medium grower, growing faster than most desert cacti, but slower than other tropical plants such as pothos or philodendron. When cared for properly, you will be able to see noticeable growth on your fishbone cactus throughout each growing season.
| Color | White, Yellow |
| Soil Ph | Acidic |
| Humidity | Normal |
| Lighting | Part Sun |
| Soil Type | Loamy, Moist But Well-Drained |
| Bloom Time | Late Summer, Fall |
| Difficulty | Easy |
| Plant Type | Cactus |
| Hibernation | Cold Period |
| Mature Size | 6 In. Tall, 3 Ft. Long |
| Native Area | North America |
| Temperature | 15°C - 30°C |
| Sun Exposure | Partial Sun |
| Hardiness Zones | 10-12 |
To grow a Disocactus Anguliger plant, also known as a fishbone cactus or zigzag cactus, you can follow these steps:
- Choose the right location: Disocactus Anguliger plants prefer bright, indirect sunlight. Place them near an east-facing window where they can get a few hours of morning sun but are protected from direct afternoon sun. If you don't have a suitable window, you can also grow them under fluorescent lights.
- Provide the right temperature: These plants thrive in temperatures between 65°F to 75°F (18°C to 24°C). Avoid exposing them to extreme heat or cold drafts.
- Use well-draining soil: Plant your Disocactus Anguliger in a well-draining potting mixture. You can create a mix by combining cactus potting soil with perlite or pumice to improve drainage. Avoid using heavy, moisture-retaining soil.
- Choose the right pot: Select a pot with drainage holes to prevent water from sitting in the roots. The pot should be slightly larger than the current root system.
- Water correctly: Allow the soil to dry partially between watering. It's better to underwater than overwater, as Disocactus Anguliger plants are susceptible to root rot. Check the soil with your finger and water when the top inch of the soil feels dry. During the winter months, reduce watering and allow the soil to dry out more between waterings.
- Humidity: These plants appreciate some extra humidity, making a small pebble tray with water beneath the pot is helpful. You can also occasionally mist the plant to increase humidity.
- Fertilize: Use a balanced, water-soluble fertilizer diluted to half strength during the growing season (spring and summer) once or twice a month. Avoid fertilizing during the winter months.
- Prune and propagate: Disocactus Anguliger plants tend to produce long, hanging stems with zigzag patterned leaves. To maintain a compact and bushier shape, you can trim back the ends of the stems. Remove the cuttings, dip them in rooting hormone (optional), and place them in a well-draining potting mix to propagate new plants.
- Repotting: As the plant grows, it may need repotting every two to three years. When repotting, choose a slightly larger pot with fresh potting mix. Spring is the best time to repot.
Following these tips should help you grow a healthy Disocactus Anguliger plant. Good luck!

Place in a window with dappled sun or a spot in the middle of a room. Or directly in a window facing west or east.

1. Watering Frequency - The disocactus anguliger plant needs to be watered regularly, but not too often. It is important to allow the soil to dry out slightly between each watering. Overwatering can lead to root rot and other problems.
2. Watering Amount - When watering, it is important to water thoroughly to ensure the water reaches the roots. The amount of water needed depends on the size and location of the plant. As a general rule, water until the soil is moist but not waterlogged.
3. Watering Method - One of the best ways to water a disocactus anguliger plant is to use a watering can or hose with a gentle spray. This ensures that the water is evenly distributed and does not damage the plant.
4. Time of Day - It is best to water the disocactus anguliger plant early in the morning or late in the evening, when temperatures are cooler and the water is less likely to evaporate quickly.
5. Soil Type - The disocactus anguliger plant prefers well-draining soil that does not hold too much water. Adding sand or perlite to the soil can help improve drainage.
6. Humidity - The disocactus anguliger plant prefers a humid environment, so misting the plant or placing a tray of water nearby can help increase humidity levels.
7. Fertilization - While watering, it is a good time to add fertilizer to the soil. However, be sure not to over-fertilize as this can harm the plant.
8. Observation - Always observe the plant after watering. If there are any signs of overwatering or underwatering, adjust the watering frequency or amount as needed.
To fertilize the Disocactus Anguliger plant, use a balanced liquid fertilizer during the growing season, which typically occurs from spring to early fall. Dilute the fertilizer to half of the recommended strength and apply it once a month. Reduce fertilization during the winter months. Avoid fertilizing when the soil is dry, as this can damage the plant's roots.
The ideal soil for this plant should have good drainage and a pH level of 6.0 to 7.5. A sandy loam mix combined with perlite, coarse sand, and gravel would be suitable for this plant. The soil should be well-draining to avoid waterlogging, which can lead to root rot. It is important to avoid using heavy, clay-like soils or mixes that retain too much moisture. Additionally, adding organic matter such as compost can enhance the nutrient content of the soil and improve overall plant growth.
To propagate this plant, you will need a healthy and mature plant with several stems. First, carefully cut off one of the stems near the base with a clean sharp knife or scissors. Make sure the cutting is at least 4 inches long.
Next, allow the cutting to dry and callus over for a few days. This helps prevent rot and infection. Once the cutting has callused, prepare a well-draining soil mix that contains perlite or sand.
Insert the cutting into the soil mix, burying it about 1-2 inches deep. Water the cutting lightly, and then place it in a bright and warm area out of direct sunlight.
Keep the soil moist but not too wet to avoid rot. In about 3-4 weeks, you should start to see new growth on the cutting, which indicates that it has rooted successfully.
Once the new plant has grown to a decent size, you can transplant it into a larger pot with fresh soil mix. You now have a new beautiful plant to enjoy.
Common pests of the fishbone-cactus include Scale insect, mealybugs, spider mites, thrips. Make a habit of checking your fishbone-cactus frequently for pests so that any infestations can be caught and managed early.


