Plant Overview
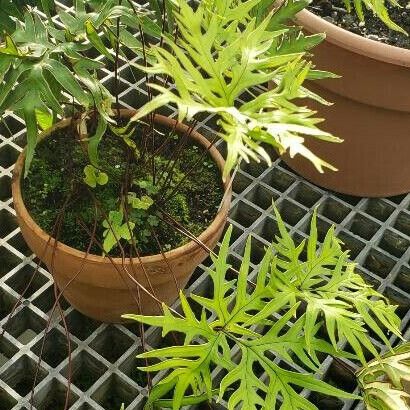
Commonly known as the Hand Fern or Geranium Leaf Fern, this tropical beauty breaks the mold of what a typical fern "should" look like. Instead of feathery, lacy fronds, it produces striking, hand-shaped leaves that resemble a maple or geranium leaf. Native to the limestone-rich areas of the West Indies and South America, it adds a touch of architectural elegance to any indoor collection.
🔍 How to Identify
- 🖐️ Frond Shape: Mature leaves are "pedate" (shaped like a bird's foot or a hand), featuring five or more distinct lobes that radiate from a single point.
- 🖤 Wiry Stems: The stipes (stems) are remarkably dark—often a deep ebony or glossy purple-black—providing a sharp, modern contrast to the bright green foliage.
- 🌿 Dual Foliage: This fern is dimorphic; the sterile leaves (low to the ground) are often simpler and more rounded, while the fertile leaves (taller) are more deeply lobed and carry spores.
🏡 In Your Garden
- 💧 The Humidity Hack: Unlike hardier ferns, the Hand Fern is a humidity lover. If the air is too dry, its "fingers" will crisp at the edges. It thrives in a bright bathroom or near a humidifier.
- 🪨 Rocky Roots: In the wild, it often grows in rocky crevices. At home, it prefers a well-draining mix (like a blend of peat and perlite) rather than heavy, dense potting soil. It hates "wet feet," so ensure the pot has excellent drainage.
⚠️ Safety & Toxicity
- ✅ Pet-Friendly: The Hand Fern is generally considered non-toxic to cats, dogs, and humans.
- 🧤 Delicate Handling: While safe to touch, the fronds are thin and can be easily damaged by oils from your hands or rough handling. Place it in a low-traffic area where it won't be bumped.
✨ Fun Fact
The name Doryopteris is derived from the Greek words dory (spear) and pteris (fern). If you look closely at the young, emerging fronds before they fully expand into "hands," they often look like pointed spearheads rising from the soil!

Detailed Care Instructions
To grow Doryopteris pedata, also known as the lace fern, you can follow these steps:
- Choose the right location: Doryopteris pedata prefers bright, indirect light. It will also tolerate partial shade, but avoid direct sunlight as it can scorch the leaves. Find a spot in your home that provides the appropriate lighting conditions.
- Prepare the soil: The ideal soil for Doryopteris pedata is a well-draining potting mix that retains moisture but doesn't become waterlogged. You can use a mixture of peat moss, perlite, and compost for a suitable medium.
- Potting the plant: Select a container that has drainage holes to prevent waterlogging. Place some stones or broken pottery in the bottom of the pot to create drainage, then fill it with the prepared potting mix. Plant the lace fern at the same depth as it was in its previous container.
- Watering: Keep the soil evenly moist but not waterlogged. Check the soil's moisture level regularly and water the plant when the top inch of soil feels dry. Avoid overwatering, as this can lead to root rot.
- Humidity: Doryopteris pedata thrives in high humidity conditions. Increase humidity by misting the leaves with water regularly or placing the pot on a tray filled with water and pebbles. The water in the tray will increase humidity around the plant as it evaporates.
- Temperature: Ideal temperatures for Doryopteris pedata range between 60°F and 80°F (15°C to 27°C). It can tolerate slightly cooler temperatures but is sensitive to cold drafts.
- Fertilizing: Feed the lace fern regularly during the growing season (spring and summer) with a balanced, water-soluble fertilizer diluted to half strength. Apply the fertilizer every two to three weeks.
- Pruning: Trim off any yellow or damaged leaves to keep the plant healthy and tidy. Regular pruning also helps improve air circulation.
- Propagation: You can propagate Doryopteris pedata by dividing the plant at its roots. Carefully remove the plant from its container and separate the rhizomes, ensuring that each division has a healthy root system. Replant the divisions in separate containers.
With proper care, your Doryopteris pedata should grow and thrive. Remember to be consistent in providing suitable conditions for it, and it will reward you with its beautiful lace-like fronds.

Place in a dark room with little light, like a dark bedroom or a spot far away from a window or directly in a north-facing window.
To water this plant, you should first assess its soil moisture level by touching the soil with your fingers or a meter. If it feels dry, you should water it thoroughly until the water drains out from the bottom of the pot. If the soil is still moist, wait a few more days before watering again. It is important to avoid overwatering, as this can cause root rot and other issues. Another tip is to use filtered or distilled water, as this plant is sensitive to chlorine and other chemicals in tap water. Additionally, you should make sure the pot has good drainage and is not sitting in water.
To fertilize the Doryopteris Pedata plant, you can follow these instructions:
- Choose a balanced fertilizer: Look for a well-balanced, water-soluble fertilizer with equal ratios of nitrogen (N), phosphorus (P), and potassium (K). The NPK ratio is usually mentioned on the packaging.
- Dilute the fertilizer: Follow the manufacturer's instructions for dilution rates. Generally, a quarter to half-strength solution is appropriate for most houseplants.
- Water the plant: Before applying fertilizer, thoroughly water the soil to ensure it is moist but not waterlogged.
- Apply the fertilizer: Pour the diluted fertilizer solution onto the soil around the base of the plant. Avoid getting fertilizer on the foliage, as it may cause burns or damage.
- Timing and frequency: Fertilize the Doryopteris Pedata plant during the growing season, which is usually spring to early autumn. Typically, fertilizing every four to six weeks is sufficient. However, always check the specific fertilizer package for precise instructions as products may vary in strength and frequency.
- Monitor the plant's response: Keep an eye on the plant's growth and foliage color. If the leaves start to turn yellow or the plant appears unhealthy, you may be over or under-fertilizing. Adjust the fertilizer application accordingly.
Remember, each plant has unique fertilization requirements, so it's essential to monitor the Doryopteris Pedata plant's specific needs.
Doryopteris pedata, a popular plant among gardeners and horticulturists, thrives under specific soil conditions that promote its growth and overall health. To ensure optimal growth and development of this plant, it is recommended to consider the following details regarding the soil:
- Soil Type: Doryopteris pedata prefers a well-draining and porous soil blend that allows excess water to pass through easily. Avoid heavy clay soils that retain water, as it can lead to root rot and other related problems.
- pH Level: The ideal pH range for Doryopteris pedata lies between slightly acidic to neutral, around 5.5 to 7 on the pH scale. This pH range allows the plant to efficiently absorb nutrients from the soil.
- Organic Matter: Incorporating organic matter into the soil mix can provide essential nutrients and improve its overall quality. Add organic materials such as well-rotted compost, leaf mold, or peat moss to increase soil fertility and enhance its water-holding capacity.
- Moisture Retention: Doryopteris pedata prefers slightly moist soil but can tolerate brief periods of dryness. It is essential to maintain a balance by ensuring that the soil remains evenly moist, avoiding both waterlogged and excessively dry conditions.
- Fertilization: Using a balanced, slow-release fertilizer specifically formulated for indoor plants can bolster the plant's overall health and growth. Be cautious not to over-fertilize, as excessive nutrients can cause negative effects on the plant's well-being.
- Aeration: Good soil aeration is crucial for the roots of Doryopteris pedata. Incorporating perlite or sand into the soil mix can improve air circulation, prevent compaction, and enhance the plant's overall root health.
- Container Gardening: If grown in pots or containers, ensure they have drainage holes to allow excess water to escape. This prevents waterlogging and assists in maintaining optimal soil moisture levels.
- Replenishment: Over time, the soil may become depleted of nutrients due to plant growth and regular watering. Regularly replenish the soil by top-dressing with organic matter or using a balanced liquid fertilizer to ensure continuous nutrient availability.
By considering these details and providing suitable soil conditions, you can provide Doryopteris pedata with a favorable environment for robust growth and thriving foliage.
Doryopteris pedata, a popular fern species, can be propagated through various methods to create new plants. Here is a detailed explanation of how you can propagate this plant:
- Spores: Doryopteris pedata reproduces through spores like most ferns. Look for spore clusters on the undersides of mature fronds, typically appearing as small dots or patches. To collect the spores, place a piece of paper or plastic below the frond and gently shake or brush the affected area. The spores will fall onto the surface, which can be collected for propagation.
- Spore Germination: Prepare a suitable growing medium consisting of a mix of equal parts peat moss, perlite, and coarse sand. Sterilize this mixture by baking it in an oven at a low temperature to eliminate any potential pathogens. Fill a small container or seed tray with the sterile medium and lightly sprinkle the spores over the surface. Be careful not to overcrowd the tray. To enhance germination, cover the container with a transparent lid or plastic wrap to maintain humidity.
- Moisture and Light: Doryopteris pedata spores require high humidity for successful germination. Place the tray or container in a warm location with indirect sunlight or under fluorescent lights. Maintain a humid environment by misting the surface gently with water or placing the container in a transparent plastic bag. Ensure good ventilation to prevent the growth of mold or fungi.
- Time and Patience: Germination time can vary, but typically it takes several weeks to a few months for spores to develop into visible young ferns. During this period, regularly monitor the moisture levels and air circulation within the container. Ensure that the soil remains consistently moist but not overly wet to prevent fungal issues.
- Transplanting: Once the tiny ferns have grown into visible plantlets with a few leaves, they can be carefully transplanted into individual small pots. Gently separate them from the germination tray, taking care not to damage their delicate root systems. Plant them in a well-draining potting mix, similar to the germination medium, and ensure the container has drainage holes.
- Care for New Plants: Place the newly transplanted Doryopteris pedata plants in a location with indirect, bright light. Mist them regularly to maintain humidity levels. Ensure the soil remains consistently moist but not waterlogged, as excess moisture can cause root rot. Avoid placing the plants in direct sunlight or overly dry conditions, as these can cause stress or damage to the young ferns.
By following these steps, you can successfully propagate Doryopteris pedata and expand your fern collection.


