Plant Overview
Often called the Crown Wood Fern, this botanical beauty is a staple of East Asian mountain forests. Its name, Crassirhizoma, literally translates to "thick rootstock," referring to the stout, scaly base that gives it a rugged, ancient appearance. In Japan and Korea, it is admired for its elegant, symmetrical growth that mimics a natural green crown rising from the forest floor.
🔍 How to Identify
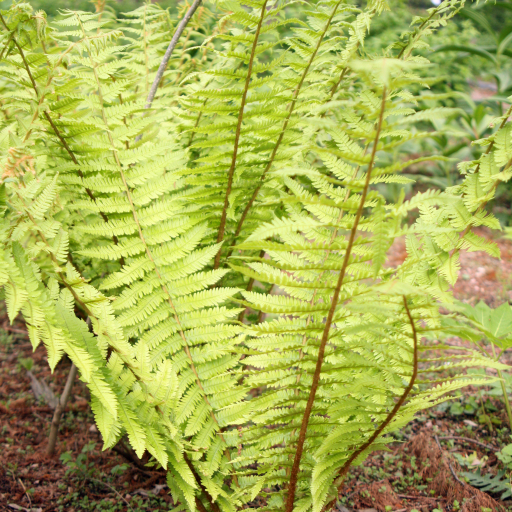
- 🌿 The Crown Shape: The fronds grow in a tight, outward-spreading circle, creating a perfect vase or "shuttlecock" silhouette that can reach up to 3 feet in height.
- 🍂 Shaggy Scales: The base of each stem (stipe) is heavily clothed in dense, shaggy brown-to-gold scales, giving the plant a fuzzy, prehistoric texture.
- 🍃 Leathery Fronds: Unlike delicate indoor ferns, these leaves are bipinnate and feel surprisingly leathery and robust, helping them survive in cooler, wilder environments.
🏡 In Your Garden
- 🌑 Shadow Play: This fern is a champion of the deep shade. It’s perfect for those "problem areas" under large canopy trees where grass refuses to grow, as it perfectly mimics its native forest habitat.
- 💧 Moisture Consistency: While it loves a good drink, the thick rhizome helps it be slightly more resilient than your average "diva" fern. However, it hates drying out completely; keep the soil consistently damp and rich with leaf mold or compost.
⚠️ Safety & Toxicity
- 🐾 Pet Friendly: The Thick-stemmed Wood Fern is generally considered non-toxic to cats and dogs, making it a safe and worry-free choice for pet-filled backyards.
- 🚫 Not For Consumption: While it has a long history in traditional East Asian medicine, humans should never ingest any part of the plant. Raw ferns can contain enzymes that interfere with vitamin B1 absorption if eaten in large quantities.
✨ Fun Fact
✨ The Ancient Healer: In traditional Korean medicine, the rhizome of this fern (known as Gwanjung) has been used for centuries. Modern science is actually looking into it today for its potent anti-viral and anti-parasitic properties!

Detailed Care Instructions
To grow a Dryopteris Crassirhizoma plant, follow these steps:
- Choose the right location: Select a spot that provides partial shade to full shade. These plants prefer indirect light and do not tolerate direct sun exposure.
- Prepare the soil: Dryopteris Crassirhizoma plants prefer moist, well-draining soil. Add organic matter such as compost or peat moss to improve the soil's moisture-retention ability.
- Planting: Dig a hole that is slightly larger than the plant's root ball. Place the plant into the hole, ensuring that the crown is level with or slightly above the soil surface. Fill the hole with soil and gently firm it around the roots.
- Watering: After planting, thoroughly water the plant to settle the soil. Make sure to keep the soil evenly moist, but not waterlogged. Water deeply whenever the top inch of soil feels dry.
- Mulching: Apply a layer of mulch around the plant to help conserve moisture and suppress weed growth. Use organic materials like wood chips or shredded leaves.
- Fertilizing: In the spring, apply a balanced, slow-release fertilizer according to the package instructions. Avoid over-fertilizing, as it can cause damage to the plant.
- Pruning: Remove any dead or damaged fronds by cutting them back to the base. Regularly remove any yellowing or diseased fronds to maintain the overall health and appearance of the plant.
- Protecting from frost: If you live in an area with cold winters, provide protection from frost by covering the plant with mulch or a frost cloth.
- Pests and diseases: Dryopteris Crassirhizoma plants are generally resistant to pests and diseases. However, occasional problems may include slugs or snails. Monitor your plant regularly and take appropriate measures if any pests are detected.
- Propagation: Propagate Dryopteris Crassirhizoma plants through division. Dig up the mature clump in early spring or fall, and carefully separate it into smaller sections. Replant the divisions immediately or pot them up for further growth.
By following these steps, you can successfully grow and care for a Dryopteris Crassirhizoma plant. Remember to provide the necessary care, and your plant will thrive and beautify your garden or indoor space.

Place in a dark room with little light, like a dark bedroom or a spot far away from a window or directly in a north-facing window.

To properly water this plant, it is important to first check the moisture level of the soil. Stick your finger about an inch deep into the soil and if it feels dry, it is time to water. When watering, use room temperature water and slowly pour it onto the soil until it begins to drain out of the bottom of the pot. Avoid watering the leaves of the plant as this can lead to fungal growth. Allow the soil to dry out between watering, but do not let it become completely dry as this can damage the roots. It is also important to provide adequate drainage to prevent overwatering.
To fertilize Dryopteris Crassirhizoma plant, follow these instructions:
- Choose a suitable fertilizer: Select a balanced, slow-release fertilizer with an NPK ratio of 10-10-10 or 14-14-14. This will provide essential nutrients without overwhelming the plant.
- Timing: Fertilize the plants during the growing season, which is typically in spring or early summer. Avoid fertilizing during the plant's dormant period.
- Preparing the fertilizer: Dilute the fertilizer according to the packaging instructions. Mix it with water to create a solution suitable for application.
- Application method: Apply the diluted fertilizer around the base of the plant, avoiding direct contact with the foliage. Pour the solution slowly to allow the roots to absorb the nutrients effectively.
- Quantity: Apply the recommended amount of fertilizer based on the specific instructions provided on the packaging. Avoid over-fertilizing, as it can burn the plant's roots.
- Watering: After fertilizing, thoroughly water the plant to help the nutrients reach the roots.
- Repeat application: Depending on the fertilizer's instructions, repeat the fertilization process every 4-6 weeks during the growing season.
- Environmental considerations: Ensure the plant is in well-draining soil and receives adequate sunlight and water. Fertilizer alone cannot compensate for poor growing conditions.
Remember that different fertilizers may have specific instructions. Always read and follow the manufacturer's guidelines for the particular fertilizer you are using to ensure the best results.
The recommended soil for the Dryopteris Crassirhizoma plant is well-draining and rich in nutrients with a slightly acidic to neutral pH. A mixture of peat moss, perlite, and coarse sand is commonly used to create a well-draining soil while compost and aged manure or a balanced fertilizer can be added to improve soil fertility. It is important to avoid using heavy clay soils that retain too much moisture, as this can lead to root rot and other fungal diseases. Additionally, the plant prefers a shady or partially shaded location to grow in, and frequent watering is necessary to keep the soil consistently moist.
Dryopteris crassirhizoma is a plant that can be propagated through various methods. Here's a detailed description of how to propagate this plant:
- Spore propagation: Dryopteris crassirhizoma reproduces via spores that are produced on the underside of the fronds. To collect spores, locate mature fronds that have a brownish color. Place a plastic bag over the selected fronds and secure it with a rubber band, ensuring that the spores will be caught as they are released.
- Spore germination: To germinate the collected spores, you will need a sterile growing medium such as a mixture of peat moss and perlite. Fill a flat tray with the growing medium and moisten it with water. Sprinkle the spores evenly on top of the medium. It is important to keep the tray covered to maintain a high humidity level.
- Maintaining optimal conditions: Place the tray in a warm, well-lit area but avoid direct sunlight. Maintain a consistent temperature of around 70°F (21°C). Mist the tray with water regularly to keep the medium moist but not waterlogged. The spores will begin to germinate within a few weeks.
- Transferring sporelings: Once the sporelings have developed into young ferns with visible fronds, they can be carefully transferred to individual pots. Use a well-draining potting mix and gently separate the sporelings from the tray. Make sure to handle them delicately to avoid damaging the fragile roots and leaves.
- Acclimation and care: Place the potted sporelings in a shaded area initially to allow them to acclimate to their new environment. Gradually introduce them to more sunlight over a few weeks. Water the young plants regularly, keeping the soil moist but not waterlogged. Provide them with consistent humidity levels by misting the foliage.
- Transplanting: Once the young ferns have grown larger and established a strong root system, they can be transplanted into larger pots or directly into well-prepared garden beds. Choose a suitable location that provides partial shade and well-draining soil. Make sure to space the plants appropriately to allow for their mature size.
By following these propagation steps, you'll be able to propagate Dryopteris crassirhizoma successfully and watch it grow into a lush fern.


