Plant Overview
Often hailed as the "Jewel of Oaxaca," the Echeveria subcorymbosa is a master of miniature elegance. Known for its tight, porcelain-like rosettes that look more like carved stone than living foliage, this succulent is a favorite among "nano-gardeners" and collectors. It is a quiet beauty that prefers to stay small, slowly forming charming, crowded colonies of blue-green stars.
🔍 How to Identify
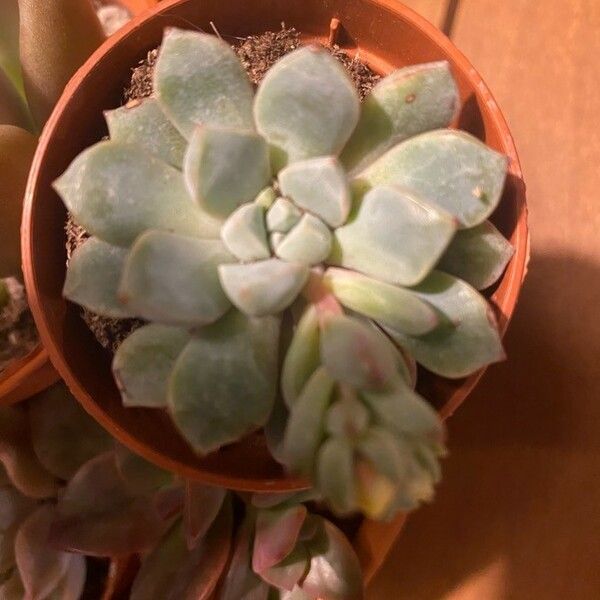
- 💠 Rosette Form: Unlike larger Echeverias, this species stays very petite, with individual rosettes rarely exceeding 2-3 inches in diameter.
- 🎨 Leaf Color: The leaves are a pale blue-gray or silvery-green, covered in a thick layer of "farina" (a powdery wax) that gives them a soft, frosted appearance.
- 🔴 The "Blush": When exposed to bright sunlight or cool temperatures, the very tips and leaf margins turn a delicate shade of rose-pink or vivid red.
🏡 In Your Garden
- ☀️ Light Nuance: This plant craves light to maintain its tight shape, but because of its small size, it can overheat quickly. Morning sun is its best friend, providing the energy for those pink "stress colors" without the risk of scorching the leaves.
- 💧 The "Crown" Caution: Because this plant grows in tight, clumping mounds, water can easily become trapped between the rosettes. This creates a perfect environment for rot. Always water the soil directly or use bottom-watering to keep the foliage bone-dry.
- 🪨 Substrate Needs: It thrives in a "gritty" mix. Think more volcanic rock and perlite than peat moss. Its fine root system hates "wet feet" and will decline rapidly if the soil stays damp for more than a couple of days.
⚠️ Safety & Toxicity
- ✅ Pet Safe: Like most Echeverias, this plant is non-toxic to cats, dogs, and horses, making it a safe choice for low-level coffee tables.
- 👐 Handle with Care: The white powder (epicuticular wax) on the leaves acts as the plant's natural sunscreen and raincoat. If you touch the leaves, the oil from your skin will rub this coating off permanently, leaving "fingerprint" scars that won't disappear until new leaves grow.
✨ Fun Fact
🏷️ The Collector's Code: You will often see this plant labeled with the codes "Lau 026" or "Lau 030." These aren't just random serial numbers—they refer to the specific collection records of Dr. Alfred Lau, a famous plant explorer who discovered these distinct variations in the wild canyons of Mexico!

Detailed Care Instructions
Growing an Echeveria Subcorymbosa, like other Echeveria species, is relatively straightforward if you follow some basic guidelines regarding its care. Here's a step-by-step guide to help you grow a healthy Echeveria Subcorymbosa:
1. Light:
- Indoors: Place the plant in bright, indirect light. A south or east-facing window is ideal. If natural light is insufficient, consider using a grow light.
- Outdoors: If you live in a suitable climate, Echeveria can be kept outdoors in full sun to partial shade. Too much direct sunlight, especially in very hot climates, can scorch the leaves.
2. Soil:
- Use a well-draining soil mix. A commercial cactus or succulent mix works well. You can also make your own mix by combining regular potting soil with coarse sand and perlite or pumice.
3. Watering:
- Watering Frequency: Over-watering is a common mistake. Water thoroughly when the soil is completely dry. Depending on the climate and the season, this might mean watering every week or two.
- Method: Water the soil directly, avoiding the leaves, as water sitting on the leaves can lead to rot.
4. Temperature and Humidity:
- Echeveria Subcorymbosa prefers temperatures between 65-80°F (18-27°C) during the growing season. Most species are not frost-tolerant, so if you live in a colder climate, bring your plants indoors before frost.
- Typical household humidity is sufficient.
5. Fertilizing:
- Fertilize sparingly. Use a balanced, water-soluble fertilizer (diluted to half strength) or a fertilizer specifically formulated for succulents. Fertilize once a month during the growing season (spring and summer).
6. Potting and Repotting:
- Pot Choice: Use a pot with drainage holes to prevent water from sitting at the bottom.
- Repotting: Repot every 1-2 years to refresh the soil and give the roots more room to grow. Spring is the best time to repot.
7. Propagation:
- Offsets: Echeverias often produce offsets (baby plants) at the base, which can be gently removed and replanted.
- Leaf Cuttings: Another method is using leaf cuttings. Gently remove a healthy leaf, let it callous for a few days, and then place it on top of the soil. It should form roots and a new rosette in a few weeks.
8. Pest Control:
- Monitor for common pests like mealybugs and aphids. If you notice any, treat them with insecticidal soap or neem oil.
9. Pruning:
- Occasionally remove dead or dried leaves to keep the plant healthy and tidy. This also helps prevent pests and diseases.
10. Dormancy:
- Many Echeverias go dormant in the winter. During this period, reduce watering and stop fertilizing, as the plant's growth slows down.
By following these guidelines, you should be able to grow and maintain a healthy Echeveria Subcorymbosa. Enjoy your succulent gardening!

Place in a bright room that is sun drenched almost all day. Or directly in a south-facing window.

Watering Echeveria subcorymbosa requires special attention to ensure the plant remains healthy and retains its attractive rosette form. Here are the key details for properly watering this succulent:
1. **Frequency:**
- **Growing Season (Spring and Summer):** Water the plant thoroughly but sparingly. Typically, watering once every 1 to 2 weeks is sufficient. Always let the soil dry out completely between waterings.
- **Dormant Period (Fall and Winter):** Reduce the frequency even further. Water only once every 3 to 4 weeks or when the soil is completely dry. Over-watering during this period can cause root rot.
2. **Method:**
- **Soak and Dry Approach:** When it's time to water, provide a deep soaking to ensure the roots get enough moisture. Pour water slowly and uniformly over the soil until it starts to drain from the bottom. This ensures that water reaches the root zone.
- **Avoid Overhead Watering:** Water at the base of the plant rather than from above. Splashing water on the leaves can lead to rot or fungal issues, especially if water gets trapped in the rosette.
3. **Water Quality:**
- Use room-temperature water, preferably rainwater or distilled water. Tap water, depending on its quality, might contain minerals that can accumulate in the soil over time and harm the plant.
4. **Soil and Drainage:**
- Ensure the plant is in well-draining soil, such as a cactus or succulent mix. Proper drainage is crucial because standing water can lead to root rot. If the soil retains too much moisture, consider adding perlite or coarse sand to improve aeration and drainage.
- Make sure the pot has drainage holes to prevent water from sitting at the bottom, which can cause root rot.
5. **Signs of Improper Watering:**
- **Underwatering:** The leaves will appear shriveled or wrinkled.
- **Overwatering:** Leaves might become mushy or translucent, and the base of the plant can start to rot.
6. **Environmental Factors:**
- The frequency of watering may need adjusting based on the plant's environment. Higher temperatures, direct sunlight, and low humidity might increase the need for water. Conversely, cooler and more humid conditions might reduce the need for frequent watering.
By following these guidelines, you can effectively manage the watering needs of your Echeveria subcorymbosa, promoting a healthy and vibrant plant.
Echeveria subcorymbosa is a type of succulent that thrives with minimal fertilization. Here are the steps to properly fertilize it:
- Frequency: Fertilize your plant during its active growing season, typically spring and summer. Once a month is sufficient.
- Type of Fertilizer: Use a balanced, water-soluble fertilizer with a ratio of 10-10-10 or dilute a higher concentration fertilizer (like 20-20-20) to half its strength. You can also use a cactus or succulent-specific fertilizer.
- Dilution: Always dilute the fertilizer to half the recommended strength to avoid burning the roots, as succulents are sensitive to high nutrient concentrations.
- Application Method: Mix the diluted fertilizer into your watering can. Water the soil thoroughly, ensuring the solution penetrates to the roots without over-saturating the soil.
- Avoid Fertilizing in Dormancy: Do not fertilize during the fall and winter months when the plant is in its dormant phase, as this can lead to root damage.
- Monitor and Adjust: Pay attention to your plant's response to fertilization. If you notice signs of over-fertilization, such as yellowing leaves or stunted growth, reduce the frequency and concentration of the fertilizer.
By following these guidelines, you can promote healthy growth and vibrant color in your Echeveria subcorymbosa.
Echeveria Subcorymbosa thrives in a well-draining soil mix that mimics its natural habitat. Given the plant's succulent nature, a specialized succulent or cactus potting mix is typically ideal. Here are the detailed characteristics to look for in the soil:
- Drainage: The soil must offer excellent drainage to prevent water retention, which can lead to root rot. It's crucial to use a mix that water can easily pass through.
- Composition: A typical mix for Echeveria Subcorymbosa includes a combination of organic matter and inorganic components. A balanced mixture might contain:
- 40-60% Inorganic Components: Such as coarse sand, perlite, pumice, or crushed granite. These materials increase aeration and ensure that excess moisture is quickly drained.
- 40-60% Organic Matter: Like coconut coir, pine bark fines, or a small amount of regular potting soil. These components provide some essential nutrients and help support root structure without retaining too much water.
- 40-60% Inorganic Components: Such as coarse sand, perlite, pumice, or crushed granite. These materials increase aeration and ensure that excess moisture is quickly drained.
- Aeration: The soil should be light and not compact easily, allowing air to reach the roots. Good aeration is vital for the overall health of the plant.
- Neutral to Slightly Acidic pH: Aim for a soil pH between 6.0 to 7.0, which is ideal for most succulents, including Echeveria Subcorymbosa.
- Nutrient Content: While succulents generally require low fertility, ensuring some minimal nutrient content in the soil can help the plant thrive without over-fertilizing, which could harm it.
You can purchase ready-made succulent or cactus soils from garden centers or mix your own using standard components. A simple DIY mix could be:
- 2 parts regular potting soil (preferably sterile and free from pathogens)
- 1 part perlite or pumice for improved drainage
- 1 part coarse sand for aeration and texture
When potting Echeveria Subcorymbosa, ensure that the container has drainage holes at the bottom to prevent water from pooling. This holistic approach to soil selection ensures that the plant can grow healthily and display its characteristic beautiful rosettes.
Propagating Echeveria subcorymbosa can be done through several methods, primarily focusing on leaf cuttings, offsets, and seeds. Here are the detailed steps for each method:
Leaf Cuttings:
- Select a Healthy Leaf:
- Choose a healthy, mature leaf from the plant. The leaf should be free from any signs of disease or damage.
- Choose a healthy, mature leaf from the plant. The leaf should be free from any signs of disease or damage.
- Remove the Leaf:
- Gently twist the leaf from the base using your fingers. Ensure the entire leaf comes off cleanly without tearing, as a clean break provides the best chance for successful propagation.
- Gently twist the leaf from the base using your fingers. Ensure the entire leaf comes off cleanly without tearing, as a clean break provides the best chance for successful propagation.
- Allow for Callusing:
- Place the leaf in a dry, shaded area for a few days to a week to allow the cut end to callus over. This step helps prevent rot when the leaf is planted.
- Place the leaf in a dry, shaded area for a few days to a week to allow the cut end to callus over. This step helps prevent rot when the leaf is planted.
- Planting:
- Prepare a well-draining succulent soil mix in a small pot. Place the callused end of the leaf on top of the soil. No need to bury it; just let it rest on the surface.
- Prepare a well-draining succulent soil mix in a small pot. Place the callused end of the leaf on top of the soil. No need to bury it; just let it rest on the surface.
- Watering:
- Mist the soil lightly with water every few days. Keep it slightly moist but not wet. Overwatering can lead to rot.
- Mist the soil lightly with water every few days. Keep it slightly moist but not wet. Overwatering can lead to rot.
- Care:
- Place the pot in a bright location with indirect sunlight. Within a few weeks, roots and tiny rosettes should begin to form at the base of the leaf.
- Place the pot in a bright location with indirect sunlight. Within a few weeks, roots and tiny rosettes should begin to form at the base of the leaf.
- Transplanting:
- Once the new plantlets are established and large enough to handle, they can be transplanted into individual pots.
Offsets/Pups:
- Once the new plantlets are established and large enough to handle, they can be transplanted into individual pots.
- Identify Offsets:
- Look for small rosettes (pups) that form around the base of the parent plant. These are natural clones that can be separated and replanted.
- Look for small rosettes (pups) that form around the base of the parent plant. These are natural clones that can be separated and replanted.
- Remove the Offset:
- Using a sterile knife or your fingers, carefully cut or pull the offset away from the parent plant. Make sure to include some roots if possible.
- Using a sterile knife or your fingers, carefully cut or pull the offset away from the parent plant. Make sure to include some roots if possible.
- Allow for Callusing:
- Similar to leaf cuttings, let the cut end of the offset dry and callus over for a few days.
- Similar to leaf cuttings, let the cut end of the offset dry and callus over for a few days.
- Planting:
- Plant the offset in a well-draining succulent soil mix, just as you would with the parent plant.
- Plant the offset in a well-draining succulent soil mix, just as you would with the parent plant.
- Watering:
- Water the soil lightly and keep it slightly moist until the offset establishes itself. Once roots are well-developed, reduce watering frequency.
- Water the soil lightly and keep it slightly moist until the offset establishes itself. Once roots are well-developed, reduce watering frequency.
- Care:
- Place in a bright location with indirect sunlight, and gradually acclimate to more light as it grows.
Seeds:
- Place in a bright location with indirect sunlight, and gradually acclimate to more light as it grows.
- Obtain Seeds:
- If you have seeds, they can be collected from the parent plant after flowering, or purchased from a reputable supplier.
- If you have seeds, they can be collected from the parent plant after flowering, or purchased from a reputable supplier.
- Prepare Soil:
- Fill a shallow tray with a well-draining succulent soil mix.
- Fill a shallow tray with a well-draining succulent soil mix.
- Sowing:
- Scatter the seeds evenly over the surface of the soil. Do not cover them with soil as they need light to germinate.
- Scatter the seeds evenly over the surface of the soil. Do not cover them with soil as they need light to germinate.
- Watering:
- Mist the soil lightly to avoid displacing the seeds. Keep the soil consistently moist but not soggy.
- Mist the soil lightly to avoid displacing the seeds. Keep the soil consistently moist but not soggy.
- Germination:
- Place the tray in a warm, bright location but out of direct sunlight. Seeds typically germinate within a few weeks.
- Place the tray in a warm, bright location but out of direct sunlight. Seeds typically germinate within a few weeks.
- Transplanting:
- Once the seedlings are large enough to handle, carefully transplant them into individual pots.
- Once the seedlings are large enough to handle, carefully transplant them into individual pots.
- Care:
- Continue to provide bright, indirect light and adjust watering as the plants mature.
Each propagation method requires patience and attentiveness to ensure new plants grow healthy and strong. Good luck!
- Continue to provide bright, indirect light and adjust watering as the plants mature.
Common pests of the echeveria subcorymbosa include Mealybugs, aphids, thrips. Make a habit of checking your echeveria subcorymbosa frequently for pests so that any infestations can be caught and managed early.


