Plant Overview
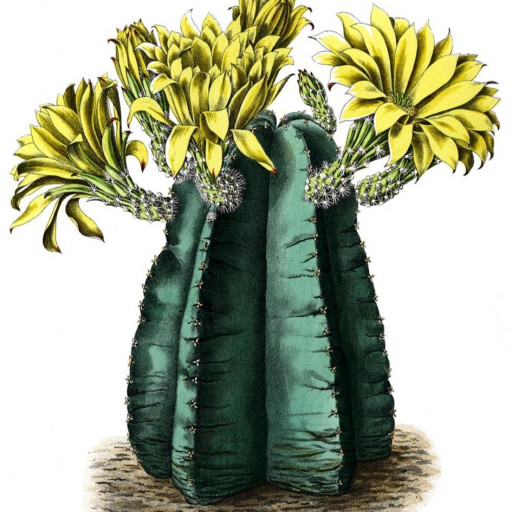
Often called the "Almost Spineless Hedgehog Cactus," Echinocereus subinermis is the minimalist of the cactus world. Hailing from the rugged mountains of Western Mexico, it trades the traditional "don't touch me" armor for a sleek, deep green body that looks remarkably like a sea urchin resting on the desert floor. It is most famous for its disproportionately large, glowing yellow flowers that can practically hide the entire plant when in full bloom.
🔍 How to Identify
- 🌵 The Stem: A globose to cylindrical body with 5 to 11 deep, sharp ribs. It starts life as a single sphere but may slowly form small, architectural clusters as it matures.
- 🚫 The "Armor": True to its name, its spines are very short, yellowish, and often fall off entirely as the plant ages, leaving the surface looking smooth and "unarmed."
- 🌼 The Bloom: Stunning, funnel-shaped flowers that are a brilliant lemon-yellow. They emerge from the sides near the top and carry a surprisingly sweet, citrus-like fragrance.
🏡 In Your Garden
- ☀️ Light & Color: This cactus thrives in bright, indirect light. If it receives a bit of "sun-stress," the skin can transition from deep forest green to a beautiful, smoky purplish-bronze hue.
- 💤 The Winter Sleep: To see those famous giant flowers, the plant needs a "tough love" phase. A strictly dry, cool dormant period during the winter is the biological trigger that tells the cactus to produce buds in the spring.
- 🪴 Breathable Soil: Because it lacks heavy spines to shade its skin, it is sensitive to high humidity and soggy roots. It prefers a very gritty, mineral-heavy soil mix that allows the roots to breathe.
⚠️ Safety & Toxicity
- ✅ Pet & Child Friendly: This species is considered non-toxic to cats, dogs, and humans, making it a great choice for indoor windowsills.
- 🤏 Hidden Bristles: While it is "subinermis" (almost unarmed), young specimens or specific varieties may still have tiny, needle-like spines. They aren't dangerous, but they can cause minor skin irritation if handled without gloves.
✨ Fun Fact
The species name subinermis comes from the Latin words sub (under/almost) and inermis (unarmed). It was historically prized by collectors who wanted the beauty of a cactus without the constant risk of being poked!

Detailed Care Instructions
To grow Echinocereus subinermis successfully, follow these steps:
- Location: Choose a sunny spot for your Echinocereus subinermis plant. It requires full sun for at least six hours a day. If you live in a region with extremely hot summers, some shade during the hottest part of the day may be beneficial.
- Soil: The plant prefers well-draining soil. Use a cactus or succulent potting mix or create your own by mixing regular soil with sand or perlite for improved drainage.
- Planting: Select a pot or container with drainage holes to prevent waterlogged roots. Transplant your Echinocereus subinermis into a new pot or container filled with the prepared soil mix. Ensure the plant is positioned at the same depth as it was in its previous pot.
- Watering: Echinocereus subinermis is a drought-tolerant plant and should not be overwatered. Water the plant only when the top inch of soil feels dry to the touch. Reduce watering during the winter months when the plant is dormant.
- Fertilizer: Apply a balanced cactus or succulent fertilizer once a month during the growing season (spring to summer). Follow the instructions on the fertilizer packaging for the correct dosage.
- Pruning: Prune any dead or diseased portions of the plant using sterilized pruning shears. Avoid pruning too heavily, as Echinocereus subinermis tends to have a dwarf, compact growth habit.
- Repotting: Echinocereus subinermis generally grows slowly, so repotting is only necessary when the plant has outgrown its container. Choose a slightly larger pot and follow the same planting instructions as described above.
- Propagation: Echinocereus subinermis can be propagated from stem cuttings or by sowing seeds. Stem cuttings should be taken in the spring, left to callus for a few days, and then planted in well-draining soil. Seeds require a period of cold stratification before sowing.
Remember to keep an eye out for pests such as mealybugs or scale insects. If pests are present, treat them with an appropriate insecticide or wipe them off with a cotton swab dipped in rubbing alcohol.
Overall, Echinocereus subinermis is a low-maintenance cactus that can thrive with minimal care once you provide it with the right amount of sunlight, well-draining soil, and proper watering practices.

Place in a bright room that is sun drenched almost all day. Or directly in a south-facing window.

To water this plant, you should first check the soil for dryness. Stick your finger about an inch into the soil and see if it feels dry to the touch. If it is dry, you should water the plant thoroughly, making sure the water soaks into the soil. Be careful not to overwater, as this can lead to root rot. Allow the soil to dry out completely before watering again. In general, this plant prefers to be kept on the drier side and should not be watered too frequently.
To fertilize this cactus plant, use a balanced liquid fertilizer during the growing season, which is typically in the spring and summer months. Dilute the fertilizer according to the instructions on the package, as cactus plants are sensitive to over-fertilization. Apply the fertilizer at the base of the plant, taking care to avoid getting any on the spines or areoles. Do not fertilize during the dormant season, which is typically in the fall and winter months.
The soil to use with this plant should be a well-draining mix that is light and airy. It should also be slightly acidic, with a pH between 6.0 and 6.5. The ideal soil mix may contain a combination of ingredients such as perlite, sand, pumice, and peat moss. Avoid using heavy garden soil or clay soil, which can retain too much moisture and lead to root rot. Additionally, make sure to use a pot with drainage holes to allow excess water to escape and prevent the plant from sitting in standing water.
To propagate this plant, you will first need to prepare a well-draining soil mixture that is composed of a combination of sand, perlite, and potting soil. Next, select a healthy, mature stem of the plant and cut a section approximately 4-5 inches long. It is important to use a clean, sharp instrument such as pruning shears or a knife to make a clean cut. Let the cuttings dry and callus over for a few days in a shaded area.
Once the cuttings have callused over, dig a small hole in the soil mix and insert the stem cutting into the hole. Press the soil gently around the stem so that it is held securely in place. Water the soil lightly but do not soak it.
Place the newly potted cutting in a bright, but shaded area and keep the soil moist but not saturated. Make sure to avoid exposing the cutting to direct sunlight or harsh winds as this can cause damage and stress to the plant.
With proper care and attention, the cutting should begin to root within a few weeks. Once the roots have formed, you can move the plant to a slightly sunnier location and gradually increase the amount of sunlight it receives over time. From there, it will grow into a healthy, mature plant.
Common pests of the hedgehog cactus include Scale insect, mealybugs, spider mites. Make a habit of checking your hedgehog cactus frequently for pests so that any infestations can be caught and managed early.


