Plant Overview
Often called the Lesser Globe Thistle, Echinops strigosus is a striking Mediterranean native that brings an architectural, almost "alien" beauty to any landscape. Known for its perfectly spherical, electric blue or silvery flower heads, it looks like a miniature disco ball perched atop a rugged, thorny stem. In folklore, these resilient plants were often seen as symbols of independence and endurance, surviving in sun-scorched soils where softer flowers would quickly wither.
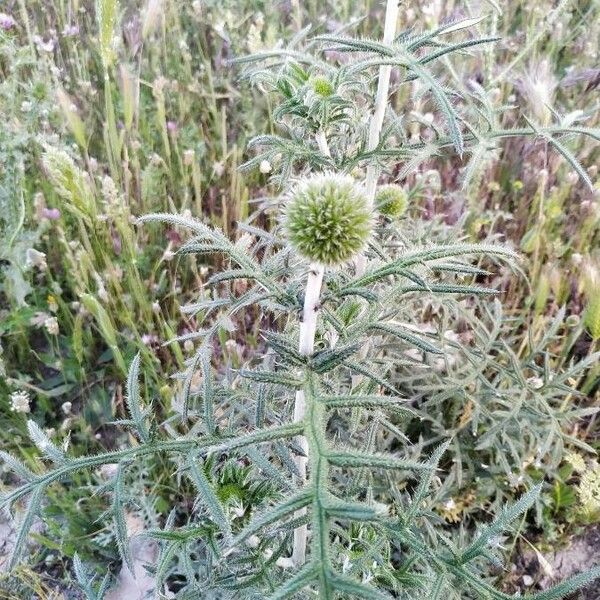
🔍 How to Identify
- 🔵 The Globe: The flowers are clustered into dense, perfectly round spheres. Each tiny floret has its own star-like shape, typically blooming in shades of pale blue or white.
- 🗡️ The Foliage: Leaves are deeply lobed and "strigose," meaning they are covered in stiff, bristly hairs that give the plant a silvery-green, textured appearance.
- 📏 The Stature: It grows on stiff, ribbed stems that can reach up to a meter in height, standing tall and straight without the need for staking.
🏡 In Your Garden
- ☀️ Sun-Seeker: This plant is a champion of the Mediterranean climate; it craves full sun and thrives in poor, rocky soil. It is an excellent choice for xeriscaping or gravel gardens where water is scarce.
- 🦋 Pollinator Magnet: The nectar-rich globes are a favorite for bumblebees and butterflies. It provides a vital pit-stop for beneficial insects during the peak of summer.
- ⚓ The Taproot: Because it develops a long, deep taproot to find water, it is incredibly drought-tolerant but hates being moved. Pick its "forever home" carefully, as transplanting often fails once the root is established.
⚠️ Safety & Toxicity
- 🌵 Physical Hazard: Echinops strigosus is generally non-toxic to humans and pets. However, it is physically aggressive.
- 🧤 Handle with Care: The leaves and stems are covered in sharp, stiff bristles. Always wear thick gardening gloves when pruning or deadheading to avoid painful pricks and minor skin irritation.
✨ Fun Fact
🦔 The Hedgehog Connection: The genus name Echinops comes from the Greek words echinos (meaning "hedgehog") and ops (meaning "appearance"). One look at the spiky, rounded flower head and it’s easy to see why it was named after the prickly woodland creature!

Detailed Care Instructions
To grow Echinops Strigosus, also known as the Globe Thistle, you can follow these steps:
- Choose the right location: Echinops Strigosus thrives in full sun to partial shade. Select a spot in your garden that receives at least 6 hours of direct sunlight per day.
- Prepare the soil: This plant prefers well-draining soil with a pH level of 6.5 to 7.5. Amend the soil with organic matter, such as compost or aged manure, to improve drainage and fertility.
- Planting: Dig a hole that is slightly larger than the root ball of the Echinops Strigosus plant. Place the plant into the hole, ensuring that the top of the root ball is level with the surrounding soil. Fill the hole with soil, gently firming it around the plant.
- Watering: Water the plant thoroughly after planting to settle the soil and promote root establishment. Afterward, water regularly, keeping the soil consistently moist but not soaking wet. Avoid overwatering, which can lead to root rot.
- Mulching: Apply a layer of organic mulch around the base of the plant to help retain moisture, suppress weeds, and keep the soil temperature stable. Maintain a mulch depth of around 2-3 inches.
- Fertilization: Echinops Strigosus generally doesn't require heavy fertilization. However, you can apply a slow-release, balanced fertilizer in early spring to promote healthy growth.
- Pruning: Remove dead or damaged foliage as necessary to improve the plant's appearance and overall health. After the blooming season, you can also cut back the spent flower stalks to encourage further blooming.
- Division: Over time, Echinops Strigosus can form large clumps. If the plant becomes overcrowded, you can divide it in early spring or fall. Dig up the clump, separate the individual plants, and replant them in well-prepared soil.
- Pest and disease control: Echinops Strigosus is generally resistant to pests and diseases. However, you should monitor the plant for any signs of infestation or disease, such as aphids or powdery mildew. Treat any issues with appropriate organic or chemical controls if necessary.
By following these guidelines, you can successfully grow Echinops Strigosus and enjoy its beautiful globe-shaped flowers in your garden.

To water this particular plant, you should allow the soil to dry out partially between waterings but not completely. The plant prefers a well-draining soil mix and should be watered thoroughly until the water runs out of the drainage holes. Be sure to avoid getting water on the leaves and stem of the plant when watering, as this can cause leaf damage and encourage fungal growth. During hot and dry periods, the plant may require more frequent watering to maintain optimal moisture levels.
The Echinops Strigosus plant should be fertilized with a balanced, slow-release fertilizer in early spring before new growth appears. Follow the instructions on the fertilizer package for the appropriate amount to use. Avoid fertilizing in late summer or fall as it may stimulate new growth that could be damaged by winter frosts. Additionally, be sure to water the plant deeply after fertilization to help distribute the nutrients throughout the soil.
When growing Echinops Strigosus, it is important to use soil that is well-draining and rich in organic matter. It prefers a neutral to slightly alkaline soil pH, between 6.5 and 7.5. A mix of loam and sand with some compost or well-rotted manure is ideal for this plant, as it needs good drainage to avoid root rot and prefers soil that is not too compacted. It is also beneficial to add some perlite or vermiculite to the soil to improve aeration and drainage. The plant should not be over-fertilized as this can lead to excessive leaf growth at the expense of flowers. Mulching around the base of the plant with organic matter can help to retain soil moisture and suppress weeds.
To propagate this particular plant, begin by carefully taking stem cuttings from a mature, healthy plant during its growing season. The cuttings should be around 4-6 inches long.
Remove any leaves from the lower half of the cutting, leaving only a few at the top. Dip the cut end of the stem in rooting hormone to promote root growth.
Fill a small pot with potting soil and make a hole in the center for the cutting. Place the cutting in the hole and gently press the soil around it. Water the cutting well and cover the pot with a plastic bag to create a mini greenhouse.
Keep the cutting in a warm and brightly lit spot, but out of direct sunlight. Make sure the soil stays moist, but not waterlogged. After two to three weeks, check for root growth by gently tugging on the cutting. If you feel resistance, it has rooted.
Remove the plastic bag and move the plant to a brighter spot with indirect sunlight. Water regularly and watch for new growth. Once the plant is well-established, it can be transplanted into a larger container or directly into the ground.


