Plant Overview
Affectionately known as the Peanut Cactus, this charming succulent from the high-altitude regions of Argentina is a beloved staple for windowsill gardeners. It gets its nickname from its finger-sized, ribbed stems that sprawl and clump together, looking remarkably like a pile of unshelled peanuts. While it may look humble most of the year, it is famous for its "glow-up," producing massive, funnel-shaped flowers that can almost hide the plant itself.
🔍 How to Identify
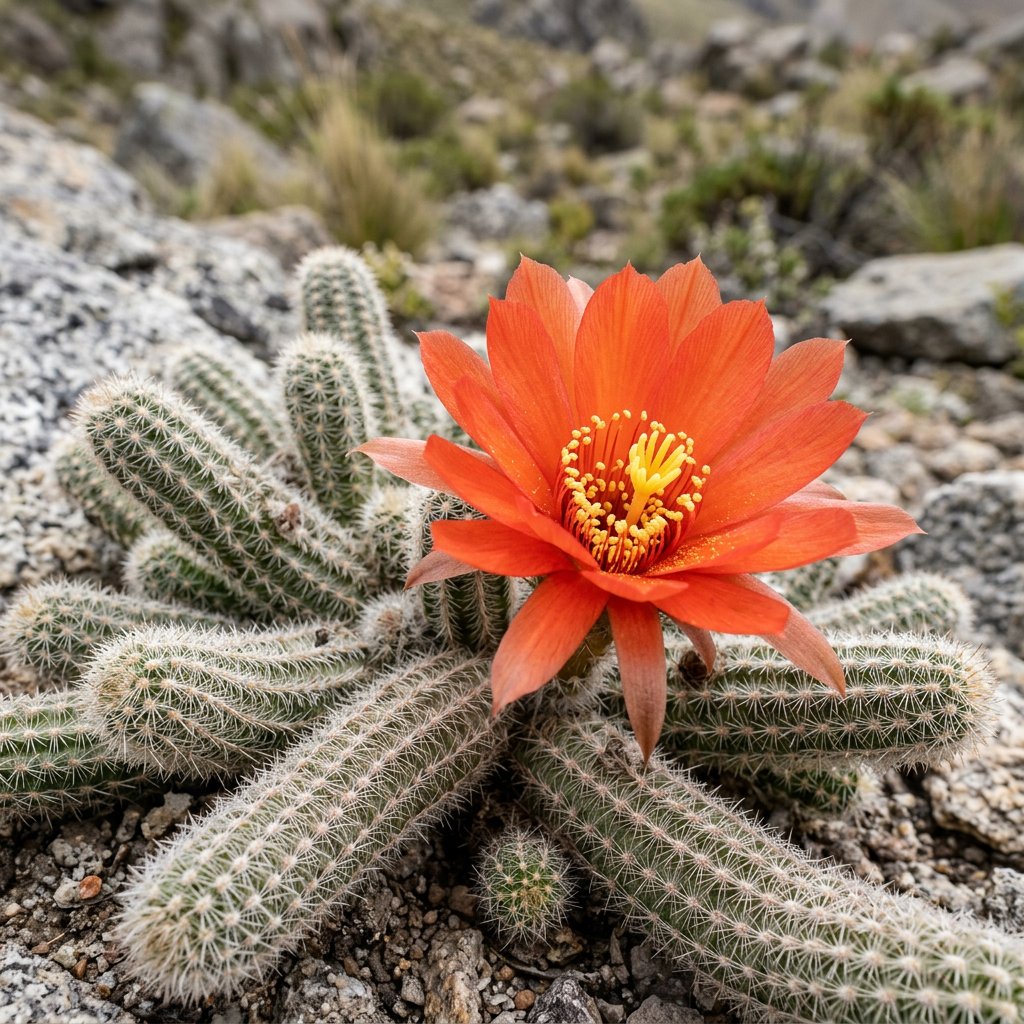
- 🌵 The Stems: Pale green, cylindrical stems that grow about 1/2 inch thick and up to 6 inches long. They tend to "creep" along the ground or hang over the edges of pots.
- ☁️ The Spines: Covered in 10 to 15 rows of soft, white, bristly spines. Unlike many of its desert cousins, these spines are relatively soft to the touch and don't "hook" into the skin.
- 🌺 The Bloom: Large, vivid tomato-red or bright orange flowers that appear in late spring. The blossoms are surprisingly large compared to the slender stems they grow from.
🏡 In Your Garden
- 🪴 Space to Sprawl: Because of its shallow root system and clumping habit, this cactus prefers wide, shallow "bowl" pots rather than deep ones. This allows the "peanuts" to spread out and create a dense mat.
- 💤 The Winter Chill: To see those spectacular red flowers, this plant needs a "tough love" period. It requires a cool, dry dormancy during the winter. Keeping it in a chilly room (around 50°F/10°C) without water for a few months tells the plant it's time to prepare its spring bloom.
- 🌱 Self-Propagation: This plant is a bit of a traveler. The stems are quite fragile and break off at the slightest touch. In nature, this is a survival tactic—each "peanut" that falls off will quickly sprout its own roots and start a new colony.
⚠️ Safety & Toxicity
- 🐾 Non-Toxic: Great news for pet owners! The Peanut Cactus is generally considered non-toxic to cats, dogs, and horses.
- 🧤 Mild Irritant: While the spines are soft and hair-like, they can still cause mild mechanical irritation to sensitive skin or curious toddlers. It’s best handled with light gloves or kitchen tongs if you’re repotting.
✨ Fun Fact
The Peanut Cactus is a "reclassification veteran." For decades, it was known by the scientific name Chamaecereus silvestrii, but DNA testing eventually proved it was part of the larger Echinopsis family. Despite the name change, most enthusiasts still just call it "the Peanut."

Detailed Care Instructions
| Color | Bright Red |
| Soil Ph | Acidic |
| Humidity | Dry |
| Lighting | Full Sun |
| Toxicity | Non-Toxic |
| Soil Type | Well-Drained, Gritty Soils |
| Bloom Time | Spring, Summer |
| Difficulty | Easy |
| Plant Type | Cactus |
| Hibernation | Cold Period |
| Mature Size | 6 In. Tall |
| Temperature | 20°C - 35°C |
| Sun Exposure | Full Sun (Partial Shade In Extreme Heat) |
| Hardiness Zones | 9-11 |
To grow Echinopsis Chamaecereus, also known as the Peanut Cactus, you can follow these steps:
- Planting: Choose a well-draining pot that has drainage holes. Fill it with a cactus-specific potting mix or create your own by combining regular potting soil with perlite or sand for better drainage. Plant the Echinopsis Chamaecereus with the base slightly above the soil level.
- Sunlight: Place the pot in a bright location where it can receive at least six hours of indirect sunlight per day. However, it can also tolerate partial shade.
- Watering: Echinopsis Chamaecereus requires infrequent watering. Allow the soil to dry out between watering sessions. It is better to underwater this plant than overwater it, as excessive moisture can lead to root rot. During winter, reduce watering even further as the plant enters a dormant phase.
- Temperature and Humidity: These plants thrive in temperatures between 60-85°F (15-29°C). They can withstand slightly higher temperatures during hotter months. They prefer low humidity environments, making them suitable for indoor growth.
- Fertilization: Apply a balanced, diluted cactus fertilizer during the growing season (spring and summer) once a month. Follow the manufacturer's instructions for the specific product you choose.
- Propagation: Echinopsis Chamaecereus can be propagated through stem or seed cuttings. Stem cuttings should be left to dry for a few days before planting them in a well-draining soil mix.
- Pruning: Remove any dead or damaged parts of the plant to maintain its overall health and appearance. Be cautious of the spines while pruning.
- Pests and Diseases: These cacti are generally resistant to pests and diseases. However, be observant for signs of common succulent pests like mealybugs or spider mites. If necessary, treat the infestation promptly to prevent damage.
Remember, every plant is unique, so adjust your care routine based on your specific Echinopsis Chamaecereus's needs. Regularly monitor the plant's growth and make adjustments accordingly.

Place in a bright room that is sun drenched almost all day. Or directly in a south-facing window.

To water this plant, ensure that the soil is completely dry before watering. Water the plant slowly and thoroughly until water starts to drain out of the bottom of the pot. It is important not to overwater the plant as this can lead to root rot. During the winter months, the plant will require less frequent watering as it goes into a dormant period. It is also important to avoid getting water on the plant's leaves or stem as this can cause damage.
To fertilize this plant, mix a balanced, water-soluble fertilizer at half strength every two weeks during the growing season. During the winter months, reduce fertilization to once a month. Avoid over-fertilizing as it can lead to leaf burning and other nutrient deficiencies. Always water the plant before fertilizing to prevent fertilizer burn to the roots.
The soil recommended for growing this particular plant is a well-draining and slightly acidic soil mix. It should be a mix of sand, perlite, and peat moss. This will provide good drainage and aeration for the plant's roots while also retaining enough moisture to prevent drying out. The pH level of the soil should be around 6.0 to 6.5. It is important to not use soil that is too heavy or compact because this can lead to drainage problems, which can negatively impact the plant's growth. Additionally, using a soil mix that is too rich in nutrients can cause the plant to grow too quickly and become weak. Therefore, it is recommended to use a soil mix that is low in nutrients and to fertilize the plant sparingly during the growing season.
Propagation of this plant is best done in the early spring or summer when new growth is beginning. The process involves carefully removing offsets from the parent plant. These offsets are small, young versions of the main plant that grow off to the side.
To propagate, first prepare a well-draining potting mix. Use a small container that has drainage holes at the base and fill it with the mix. Then, remove the offsets from the parent plant carefully using a sharp, clean knife or shears. Ensure that each offset has a good root system.
Place the offsets gently into the potting mix and cover the roots with soil, making sure not to damage them. Water the soil well, ensuring that the plant receives enough moisture but is not saturated.
Next, place the newly propagated plant in a warm, bright location but protect it from direct sunlight. Keep the soil moist but not wet and do not fertilize the plant until it has had time to establish itself.
Within a few weeks, the plant should start to grow new roots and produce new growth above the soil. It is important to ensure that the plant is not exposed to full sunlight too quickly as this can cause damage or stress.
Common pests of the peanut cactus include Scale insect, mealybugs, spider mites. Make a habit of checking your peanut cactus frequently for pests so that any infestations can be caught and managed early.


