Plant Overview
Often called the "Flame Violet," these tropical gems are prized more for their metallic, iridescent foliage than their flowers. Native to the humid rainforest floors of Central and South America, they are the flamboyant cousins of the African Violet. They are famous for their "glowing" leaf patterns that look almost like they’ve been painted with neon watercolors.
🔍 How to Identify
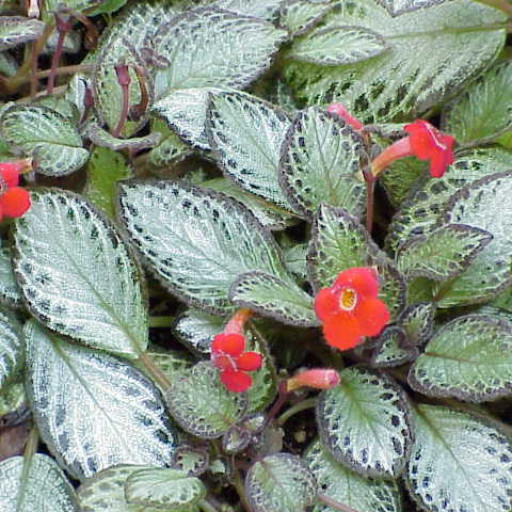
- 🍃 Textured Foliage: The leaves are usually plush and velvety, featuring intricate patterns of silver, bronze, or emerald green with contrasting veins.
- 🌸 Trumpet Flowers: They produce small, tubular flowers that "pop" against the dark leaves, typically in brilliant shades of scarlet, orange, or hot pink.
- 🌿 Creeping Stolons: Unlike many houseplants, they grow via "runners" (stolons), similar to a strawberry plant, which allows them to trail beautifully over the edges of a pot.
🏡 In Your Garden
- ☁️ Humidity is Non-Negotiable: Because they evolved on the damp jungle floor, they struggle in dry indoor air. They are perfect candidates for terrariums or "pebble trays" to keep their leaves from crisping at the edges.
- 🌡️ The "Cold Water" Rule: Never use ice-cold water on an Episcia. Like their cousins, cold droplets can cause permanent, unsightly spotting on their sensitive, fuzzy leaves. Always use room-temperature water.
⚠️ Safety & Toxicity
- 🐾 Pet Safe: Good news for pet parents! The Episcia is considered non-toxic to both cats and dogs.
- 👶 Child Friendly: These plants are safe to keep around curious toddlers, as they do not contain sap that causes skin irritation or internal toxicity.
✨ Fun Fact
In the wild, the Episcia is a master of "walking." By sending out its long runners, it can quickly move across the forest floor to find better light, rooting itself as it goes to create a massive, shimmering carpet of color!

Detailed Care Instructions
To grow an Episcia plant, you can follow these steps:
- Find a suitable location: Episcia plants prefer bright, indirect sunlight. Avoid placing them in direct sunlight as it can scorch the leaves. Choose a spot that receives bright, filtered light.
- Choose the right pot and soil: Use a pot with drainage holes to prevent waterlogged soil. Episcias prefer well-draining soil. A mixture of peat moss, perlite, and potting soil in equal parts works well.
- Planting: Place the Episcia plant in the prepared pot, ensuring that the crown of the plant is level with the soil surface. Gently pat down the soil around the plant to secure it.
- Watering: Episcias prefer consistently moist soil but not overly saturated. Water the plant thoroughly whenever the top inch of soil feels dry. Reduce watering during the winter months, as the plant requires less water.
- Humidity: Episcias thrive in a humid environment. You can increase humidity levels around the plant by placing a tray filled with water near it or by misting the leaves regularly.
- Fertilizing: Episcias benefit from regular fertilization. Use a balanced, water-soluble fertilizer diluted to half the recommended strength. Apply it every two weeks during the growing season (spring and summer), and reduce the frequency in fall and winter.
- Pruning: Prune Episcia plants regularly to maintain their shape and encourage bushier growth. Pinch off the tips of the stems to promote branching and remove any yellow or damaged leaves.
- Propagation: Episcias can be propagated through stem cuttings. Take 2-3 inch stem cuttings from healthy plants and root them in moist potting soil or water. Keep the cuttings in a warm, humid environment until they develop roots.
- Repotting: As Episcia plants grow, they may outgrow their pots. Repot them into slightly larger containers every 1-2 years, preferably in spring. Ensure the new pot has drainage holes and use fresh potting mix.
By following these steps, you can successfully grow an Episcia plant and enjoy its beautiful leaves and sometimes vibrant flowers.

Place in a window with dappled sun or a spot in the middle of a room. Or directly in a window facing west or east.

Episcia plant requires frequent watering as it prefers its soil to be consistently moist but not waterlogged. The best way to water this plant is to allow the top inch of soil to dry out between watering sessions.
When watering, it is important to avoid getting the foliage wet as this can lead to fungal growth and other plant diseases. It is recommended to water the soil directly at the base of the plant using a watering can or a hose with a gentle spray nozzle.
In addition to watering, it is also important to maintain a high level of humidity around the plant to prevent leaf curl and drying out of the leaves. This can be achieved by placing a tray filled with pebbles and water beneath the plant or by misting the leaves regularly.
Overall, Episcia plant requires adequate, consistent moisture to thrive, and by following these watering tips, you can help keep your plant healthy and vibrant.
To fertilize this plant, use a balanced fertilizer with equal amounts of nitrogen, phosphorus, and potassium. Dilute the fertilizer to half strength and apply it to the soil every two weeks during the growing season. Be sure to avoid getting fertilizer on the leaves of the plant, as it can cause burning. In the winter, reduce fertilizing to once a month or stop altogether.
Episcia plants prefer well-draining soils that are rich in organic matter. A good soil mix for Episcia should consist of a combination of peat moss, perlite, and vermiculite. The peat moss provides the necessary moisture retention, while the perlite and vermiculite improve drainage and aeration. Additionally, adding a slow-release fertilizer to the soil mix can help provide the necessary nutrients for healthy growth. It is important to avoid heavy soils that hold onto moisture, as this can lead to root rot and other issues.
To propagate this plant, you will need to first carefully remove a healthy stem from the parent plant. Make sure the stem is at least 4 inches long and has several healthy leaves on it.
Next, prepare a pot with well-draining soil. You can use a mixture of peat moss, perlite, and potting soil. Moisten the soil, but do not make it too wet.
Using a clean and sharp pair of scissors, gently remove the lower leaves from the stem, leaving at least 1 inch of stem below the bottom leaf node. This is where the roots will grow from.
Dip the cut end of the stem into rooting hormone, if desired. This will help the plant establish roots more quickly.
Plant the stem in the prepared pot, burying it to the bottom leaf node. Firmly press the soil around the stem to ensure good contact.
Place the pot in a warm and bright spot, but out of direct sunlight. Keep the soil moist, but not waterlogged.
After 2-3 weeks, you should start to see new growth and roots forming. Once the plant has established roots and is showing good growth, you can transplant it to a larger pot or into your garden.


