Plant Overview
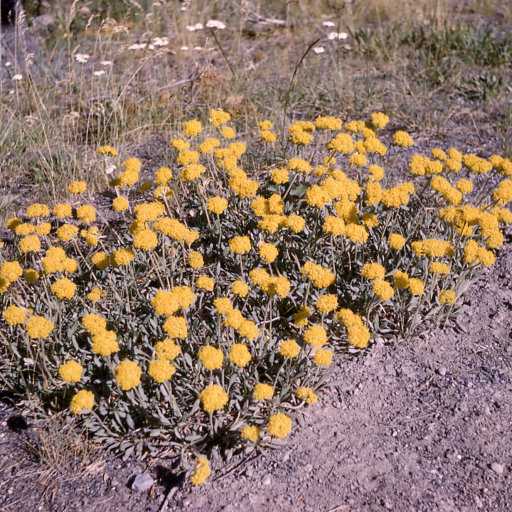
Known as the Alpine Golden Buckwheat, this hardy survivor is the "sunshine of the high plains." It forms low-profile, hugging mats of silvery foliage that explode into brilliant pom-poms of yellow in mid-summer. Native to the rugged landscapes of Western North America, it is a master of endurance, often found clinging to windy ridges where few other plants dare to grow.
🔍 How to Identify
- 🌼 Golden Pom-poms: The flowers are tiny and bell-shaped, gathered into dense, umbrella-like clusters (umbels) that sit atop leafless stems. As they age, the yellow often deepens into a warm orange or copper hue.
- 🍃 Woolly Leaves: Each leaf is covered in a thick, velvety coat of white hairs. This "fuzz" isn't just for looks; it protects the plant from intense mountain UV rays and prevents moisture loss.
- 🪵 Cushion Habit: It grows as a "matted" perennial, forming a tight, woody-based cushion close to the ground to hide from harsh, drying winds.
🏡 In Your Garden
- 🏜️ The Drought Specialist: This plant thrives on what many gardeners would call "bad" soil. It loves sandy, gravelly, or rocky earth and requires very little supplemental water once its deep taproot is established.
- 🪨 No-Move Policy: Because of that long taproot, the Alpine Golden Buckwheat hates being transplanted. It’s best to plant it exactly where you want it to stay for the next decade.
- 🐝 Pollinator Magnet: It is a critical nectar source for native bees and rare alpine butterflies. If you want to support local biodiversity with a low-maintenance plant, this is a top-tier choice.
⚠️ Safety & Toxicity
- ✅ Generally Safe: Eriogonum flavum is not known to be toxic to humans, dogs, or cats. It is a very "friendly" addition to a family garden.
- 🦌 Deer Resistance: While not strictly "deer-proof," the fuzzy texture of the leaves is often unappealing to deer and rabbits, making it more resilient in areas with heavy wildlife traffic.
✨ Fun Fact
✨ Cultural Medicine: Historically, several Indigenous groups of the Great Plains used the roots of the Golden Buckwheat to create a tea for treating sore throats and respiratory ailments, proving this "weed" was once a vital part of the mountain pharmacy.

Detailed Care Instructions
To grow Eriogonum flavum, also known as sulfur flower buckwheat, follow these steps:
- Choose a well-draining location: Eriogonum flavum prefers full sun and well-drained soil. Select a spot in your garden or container that receives at least 6 hours of direct sunlight daily.
- Prepare the soil: If your soil is heavy or clay-based, amend it with compost or well-rotted manure to improve drainage. Eriogonum flavum thrives in alkaline soil, so do not add acidic amendments like peat moss.
- Planting: In spring or fall, dig a hole slightly larger than the plant's root ball. Place the plant in the hole, making sure the top of the root ball is level with or slightly above the soil surface. Backfill the hole with soil, gently firming it around the plant.
- Watering: Give the plant a thorough watering after planting, and then water regularly until it becomes established. After that, reduce watering as Eriogonum flavum is drought-tolerant. Only water when the soil feels dry about an inch below the surface.
- Mulching: Apply a layer of organic mulch around the plant to help retain moisture and inhibit weed growth. Keep the mulch a few inches away from the plant's crown to prevent rot.
- Fertilization: Eriogonum flavum generally does not require additional fertilization. However, if the plant appears weak or lacks vigor, you can apply a balanced slow-release fertilizer following the product's instructions.
- Pruning: Eriogonum flavum has a clump-forming habit and does not require frequent pruning. However, you can remove spent flowers to encourage more blooms and maintain a neat appearance.
- Protection from pests and diseases: Eriogonum flavum is relatively resistant to pests and diseases. However, if necessary, you can address issues like aphids or powdery mildew with appropriate organic pest control methods.
- Propagation: Eriogonum flavum can be propagated through dividing its clumps in early spring or taking softwood stem cuttings in late spring.
- Enjoy: Sit back and enjoy the vibrant yellow flowers of Eriogonum flavum as they bloom throughout the summer and attract pollinators to your garden.

To properly water the Eriogonum Flavum plant, it is important to consider a few factors. First, understand the plant's watering needs based on its growth stage and environment. Generally, this plant prefers well-draining soil and requires regular watering during its establishment phase. Here is a step-by-step guide on watering this plant:
1. Determine watering frequency: Assess the moisture level of the soil by checking the top inch with your finger. Water the plant only when the soil feels dry to the touch.
2. Water deeply: When watering, provide a thorough soaking to ensure the water reaches the plant's entire root zone. This encourages the roots to grow deep and establishes a stronger, healthier plant.
3. Water at the right time: Water the Eriogonum Flavum plant early in the day when temperatures are cooler. This helps prevent moisture loss due to evaporation and allows the plant to dry off before cooler evening temperatures set in.
4. Water nearby, not overhead: To minimize water waste and prevent foliage diseases, water the plant at the base rather than overhead. Direct the water flow to the area around the plant's root system, keeping the leaves as dry as possible.
5. Adjust watering during different seasons: During hot and dry periods, increase the frequency of watering to provide ample moisture. Alternatively, in cooler months or during the plant's dormant stage, reduce watering to prevent excess moisture which may lead to root rot.
6. Use a watering can or hose attachment: Apply water gently to avoid disturbing the plant's delicate structure. Slowly soak the soil around the plant, allowing it to absorb the water gradually.
7. Mulch the plant's base: Apply a layer of organic mulch such as wood chips or compost around the plant to help retain moisture and regulate soil temperature. This helps reduce the plant's water requirements and prevents weed growth.
By following these guidelines, you can effectively water the Eriogonum Flavum plant and promote its overall health and growth. Remember, it is crucial to observe the plant's specific needs and adjust watering accordingly, ensuring it receives the appropriate amount of water for optimal development.
- Before fertilizing, ensure that the Eriogonum Flavum plant has been established in the soil for at least one growing season.
- Choose a balanced, slow-release fertilizer specifically formulated for perennial plants. Look for a fertilizer with an NPK ratio of around 10-10-10 or similar.
- Follow the recommended dosage instructions provided on the fertilizer packaging, as excessive fertilization can harm the plant.
- Apply the fertilizer evenly around the base of the plant, avoiding direct contact with the stems and foliage.
- Gently water the plant after fertilizing to help the nutrients penetrate the soil and reach the plant's roots.
- Repeat the fertilization process once every spring or early summer, as Eriogonum Flavum plants generally benefit from annual fertilization.
- Monitor the plant's growth and health throughout the growing season, making adjustments to the fertilization schedule or dosage if necessary.
- Remember to use caution when handling fertilizers, following all safety guidelines and storing them in a secure location away from children and pets.
Eriogonum flavum, a plant belonging to the Eriogonum genus, requires a specific type of soil to thrive. It prefers a well-draining soil that is sandy or loamy in texture. The soil pH should ideally be slightly acidic to neutral, ranging from 6.0 to 7.0.
When selecting soil for Eriogonum flavum, it is important to ensure that it is not too heavy or compacted, as this can lead to poor drainage and root rot. Soil that retains too much moisture can be detrimental to the plant's health.
To promote optimal growth, the soil should be rich in organic matter. This can be achieved by incorporating compost or well-rotted manure into the planting area. Organic matter helps improve soil structure, nutrient availability, and water-holding capacity.
Additionally, Eriogonum flavum performs best in soils that are moderately fertile. Prior to planting, it is recommended to conduct a soil test to determine the nutrient needs of the soil. Based on the test results, appropriate amendments, such as balanced slow-release fertilizers, can be added to provide the necessary nutrients for healthy growth.
Overall, Eriogonum flavum thrives in well-draining, slightly acidic to neutral soils that are enriched with organic matter and have moderate fertility levels. By selecting the right soil, you can create optimal growing conditions for this plant.
Eriogonum flavum, a perennial plant, can be propagated in several ways, including seed propagation, division, and stem cuttings. Here are the details on each method:
- Seed propagation:
- Collect mature seeds from the plant during autumn when the seed heads have turned brown and are dry.
- Separate the seeds from the seed heads and remove any debris or chaff.
- Place the seeds in a seedling tray filled with well-draining soil mix.
- Cover the seeds lightly with soil or vermiculite, ensuring they are not buried too deeply.
- Water gently and keep the soil lightly moist until germination, which typically takes several weeks to a couple of months.
- Once the seedlings have developed enough, transplant them into individual pots or directly into the garden.
- Collect mature seeds from the plant during autumn when the seed heads have turned brown and are dry.
- Division:
- In early spring or autumn, when the plant is dormant, dig up the mature Eriogonum flavum plant.
- Carefully divide the plant into smaller clumps, ensuring each division has healthy roots and foliage.
- Replant the divisions into prepared, well-draining soil in pots or directly in the desired garden location.
- Water thoroughly after planting and keep the soil consistently moist until the divisions establish themselves.
- In early spring or autumn, when the plant is dormant, dig up the mature Eriogonum flavum plant.
- Stem cuttings:
- Take stem cuttings from the Eriogonum flavum plant in late spring or early summer when the plant is actively growing.
- Select healthy, non-flowering stems with a length of around 4-6 inches (10-15 cm).
- Make a clean cut just below a node using sharp, sterile pruning shears.
- Remove the lower leaves, leaving only a few on the upper portion of the cutting.
- Dip the cut end in rooting hormone powder or gel to enhance root development (optional).
- Prepare a container with a well-draining potting mix or a mixture of peat and sand.
- Insert the stem cuttings about 2 inches (5 cm) into the prepared medium, ensuring they are stable.
- Place the container in a warm location with indirect light and maintain high humidity by covering it with a clear plastic bag or using a propagator.
- Keep the soil slightly moist but not overly wet.
- After several weeks, the cuttings should develop roots. At this point, remove the plastic cover and gradually expose them to normal environmental conditions.
- When the cuttings have established a strong root system, transplant them into individual pots or the desired garden location.
By employing any of these propagation methods, you can successfully propagate Eriogonum flavum and expand your collection or share this beautiful plant with others.
- Take stem cuttings from the Eriogonum flavum plant in late spring or early summer when the plant is actively growing.


