Plant Overview
Known as a rugged beauty from the sun-drenched landscapes of the Mediterranean, Eryngium dilatatum is a plant that looks like it was forged in a blacksmith's shop. Often referred to as a "Sea Holly," this architectural perennial is beloved by gardeners for its metallic, shimmering appearance and its ability to thrive where other plants fail. In old European folklore, these prickly plants were sometimes tucked into windowsills to ward off "sharp-tongued" spirits.
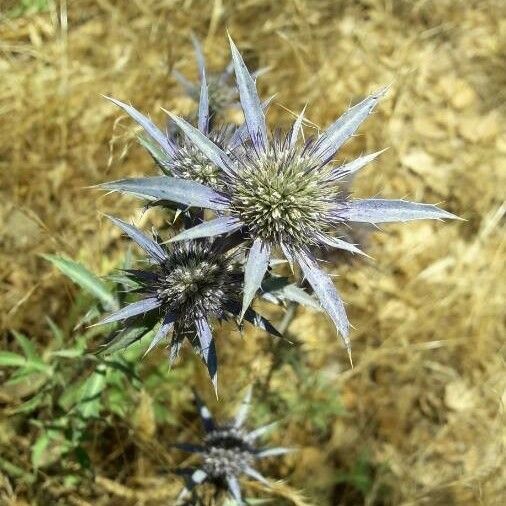
🔍 How to Identify
- 🍃 Spiny Foliage: The leaves are tough, leathery, and deeply lobed, featuring sharp, needle-like spines along the edges. They are typically a dusty grey-green with bright white veining.
- 🧿 Teasel-like Blooms: The flowers are dense, egg-shaped cones packed with tiny blue or white florets. These "cones" sit atop a collar of narrow, star-like bracts that look like a silver crown.
- 💎 Steel-Blue Stems: As the plant reaches its peak blooming season, the upper stems and flower heads often take on a striking, iridescent violet or steel-blue tint.
🏡 In Your Garden
- 🏜️ Xeriscaping Champion: This plant is built for drought. It possesses a long, sturdy taproot that reaches deep into the earth for moisture, making it perfect for rocky slopes or sandy soils that dry out quickly.
- 🛑 The "Forever Home" Rule: Because of that sensitive taproot, Eryngium dilatatum hates being moved. Once you plant it, avoid transplanting it, as the root is brittle and the plant may not recover from the shock.
- 🦋 Biodiversity Hub: While it looks fortress-like to humans, it is an open buffet for pollinators. It is particularly attractive to honeybees and rare predatory wasps that help control garden pests.
⚠️ Safety & Toxicity
- 🌵 Physical Hazard: The primary danger is the spines. They are very sharp and can easily puncture skin or garden gloves. Always handle with thick, leather-palmed gloves to avoid painful pricks.
- 🐾 Pet Context: It is generally considered non-toxic to cats and dogs. However, the mechanical structure of the plant is the real deterrent; the prickly leaves usually prevent curious pets from taking a bite.
✨ Fun Fact
In the 16th and 17th centuries, the roots of Eryngium species were often "candied" with sugar and orange flower water. Known as "Eringoes," these sweets were incredibly popular and were famously cited by Shakespeare as a potent herbal aphrodisiac!

Detailed Care Instructions
To grow Eryngium Dilatatum, also known as Pampas Plains Eryngo, follow these steps:
- Climate and Soil Requirements:
- Eryngium Dilatatum grows best in areas with mild climates and well-draining soil.
- It thrives in full sun or partial shade, so choose a location that receives at least 6 hours of direct sunlight per day.
- The soil should be moderately fertile and have a pH between 6.0-7.5.
- Eryngium Dilatatum grows best in areas with mild climates and well-draining soil.
- Planting:
- Start by preparing the planting area by removing any weeds or debris.
- Dig a hole that is slightly larger than the plant's root ball.
- Gently place the plant in the hole and backfill it with soil, ensuring that the top of the root ball is level with the surrounding soil.
- Water the plant thoroughly after planting to help it establish.
- Start by preparing the planting area by removing any weeds or debris.
- Watering:
- Eryngium Dilatatum requires regular watering, especially during its initial growth period. Keep the soil evenly moist, but not waterlogged.
- Once the plant is established, reduce the frequency of watering, allowing the soil to dry out slightly between waterings.
- Avoid overwatering, as it can cause root rot and other issues.
- Eryngium Dilatatum requires regular watering, especially during its initial growth period. Keep the soil evenly moist, but not waterlogged.
- Fertilizing:
- Apply a balanced, slow-release fertilizer in early spring to provide the plant with essential nutrients.
- Follow the instructions on the fertilizer packaging for proper application rates.
- Additional fertilization may not be necessary unless the plant shows signs of nutrient deficiencies.
- Apply a balanced, slow-release fertilizer in early spring to provide the plant with essential nutrients.
- Pruning:
- Eryngium Dilatatum doesn't require extensive pruning; however, you can deadhead spent flowers to encourage new blooms and maintain its appearance.
- In early spring, before new growth appears, you can also trim back any damaged or overgrown stems to maintain its shape.
- Eryngium Dilatatum doesn't require extensive pruning; however, you can deadhead spent flowers to encourage new blooms and maintain its appearance.
- Pests and Diseases:
- Eryngium Dilatatum is generally resistant to most pests and diseases.
- However, it can occasionally be affected by aphids or spider mites. Monitor the plant regularly and treat any infestations promptly with insecticidal soap or horticultural oil.
- Eryngium Dilatatum is generally resistant to most pests and diseases.
- Propagation:
- Eryngium Dilatatum can be propagated by collecting seeds from mature plants.
- After collecting the seeds, sow them in a well-draining soil mix and keep them moist until they germinate.
- You can also propagate the plant through division in early spring or fall by separating the root ball into smaller sections and planting them in individual containers or prepared ground.
By following these guidelines, you can successfully grow Eryngium Dilatatum and enjoy its beautiful foliage and flowers.
- Eryngium Dilatatum can be propagated by collecting seeds from mature plants.

Place in a bright room that is sun drenched almost all day. Or directly in a south-facing window.

To properly water Eryngium Dilatatum plants, it is important to understand their specific water requirements. Here are some guidelines to follow:
1. Observe the soil moisture: Eryngium Dilatatum plants prefer well-draining soil. Before watering, check the soil's moisture level by inserting your finger about an inch deep into the soil. If it feels dry, it's time to water. Overwatering can lead to root rot, so it's crucial not to keep the soil constantly moist.
2. Water thoroughly: When watering, ensure that all parts of the root ball are adequately moistened. To achieve this, water until you see it coming out through the drainage holes at the bottom of the pot or until the soil is uniformly damp in garden beds.
3. Water deeply and infrequently: It's better to provide a deep watering less frequently rather than shallow watering frequently. This encourages the plant's roots to grow deeply, making them more resilient and able to access water from lower soil levels.
4. Time of day: Water Eryngium Dilatatum plants in the morning or evening when temperatures are cooler to minimize water loss due to evaporation. Avoid watering during the hottest part of the day to prevent damage to the leaves and stems caused by the sun heat.
5. Adjust water requirements based on environmental conditions: Factors such as temperature, humidity, and wind can affect the moisture levels of the plant and soil. During hot and dry weather, plants may require more frequent watering, while cooler and more humid conditions may necessitate watering less often.
6. Mulching: Applying a layer of organic mulch around the base of the plant can help retain soil moisture, regulate soil temperature, and reduce weed growth. This, in turn, reduces the frequency of watering required for Eryngium Dilatatum plants.
7. Monitor and adjust: Regularly monitor your Eryngium Dilatatum plant for signs of under or overwatering. Yellowing or drooping leaves may indicate insufficient water, while root rot, wilting, or stem collapse could signify overwatering. Adjust your watering schedule and amount accordingly based on these observations.
Remember that every plant's water requirements may vary based on its growing conditions, stage of growth, size, and other factors. Therefore, it's essential to adapt these general guidelines to the specific needs of your Eryngium Dilatatum plant.
To fertilize Eryngium Dilatatum plants, follow these instructions:
- Choose a balanced, slow-release fertilizer with an NPK ratio of around 10-10-10 or slightly lower.
- Apply the fertilizer in the early spring, just as the plant starts to show signs of new growth.
- Spread a thin layer of the fertilizer evenly around the base of the plant, taking care not to let it touch the stems or foliage.
- Gently scratch the fertilizer into the soil surface using a garden fork or cultivator, ensuring it is well incorporated.
- Water the plant immediately after fertilizing to help the nutrients penetrate the soil and reach the roots.
- Avoid over-fertilizing, as it can lead to excessive foliage growth and weaken the plant. Follow the recommended dosage according to the fertilizer's packaging.
- Monitor the plant throughout the growing season and look for any signs of nutrient deficiencies, such as pale or yellowing leaves.
- If deficiencies occur, consider supplementing with a liquid organic fertilizer high in nitrogen, phosphorus, or potassium, depending on the specific deficiency.
- Always follow label instructions and guidelines when using any fertilizer product.
- Regularly check the soil's moisture level and adjust watering accordingly to maintain optimal growing conditions for the plant.
Eryngium dilatatum is a plant that prefers well-drained soils with a moderate to slightly acidic pH level. It is important to choose a soil type that allows for good drainage to prevent waterlogging, as this can lead to root rot. Therefore, a sandy or loamy soil with good drainage properties is recommended.
The soil should also have a good amount of organic matter, such as compost, to provide nutrients and improve soil structure. Organic matter helps retain moisture while still allowing excess water to drain away, creating an ideal balance for the plant.
When preparing the planting area, it is advisable to loosen the soil to a depth of at least 8 inches (20 cm). This will facilitate root growth and allow for proper aeration. Mixing in some well-rotted compost or aged manure can provide additional nutrients and improve the overall fertility of the soil.
While Eryngium dilatatum is a moderately drought-tolerant plant, it benefits from regular watering, especially during periods of dry weather. However, it is important not to overwater, as this can lead to root rot. Therefore, a well-draining soil will help maintain the ideal moisture level.
In summary, the ideal soil for Eryngium dilatatum is well-drained, moderately acidic, and enriched with organic matter. This will promote healthy root growth and provide the necessary nutrients for the plant's overall vigor and vitality.
- First, identify a healthy Eryngium Dilatatum plant from which you want to propagate. Look for a plant with sturdy and disease-free stems, vibrant green leaves, and well-developed roots.
- Prepare a pot or container for propagation. Ensure it has drainage holes to prevent waterlogging. Fill the pot with a well-draining propagation mix, such as a mixture of perlite, sand, and peat moss.
- Take a stem cutting from the parent Eryngium Dilatatum plant using clean and sharp pruning shears or scissors. Choose a stem that is approximately 4-6 inches long and has several healthy leaves. Make a diagonal cut just below a node (where leaves emerge) to increase the chances of successful rooting.
- Remove the lower leaves from the stem, leaving only a few on the top. This reduces moisture loss and helps the cutting focus its energy on root development.
- Optionally, you can dip the bottom end of the cutting in a rooting hormone powder or liquid to enhance root growth, although this step is not necessary for all plants.
- Create a small hole in the prepared propagation mix in the pot using a pencil or your finger. Insert the cutting into the hole, making sure at least two nodes are buried beneath the surface. Gently press the mix around the stem to ensure good contact.
- Mist the cutting with water to increase humidity and promote successful rooting. Alternatively, you can cover the pot with a clear plastic bag or a humidity dome to create a greenhouse-like environment.
- Place the pot in a warm, well-lit area, away from direct sunlight. Eryngium Dilatatum prefers bright, indirect light for optimal growth.
- Keep the propagation mix lightly moist but not soggy. Water the cutting when the top inch of soil feels dry. Avoid overwatering, as excessive moisture can lead to rotting.
- After a few weeks, check for signs of root development by gently tugging on the cutting. If you feel resistance, it indicates that roots have formed.
- Once the cutting has established a healthy root system, you can gradually acclimate it to outdoor conditions. Start by placing it in a sheltered spot with partial shade for a few hours each day, gradually increasing the exposure to full sun over a week or two.
- When the propagated Eryngium Dilatatum plant is well-established and showing signs of vigorous growth, it can be transplanted into a larger pot or directly into the garden bed, following the specific care guidelines for this plant.


