Plant Overview
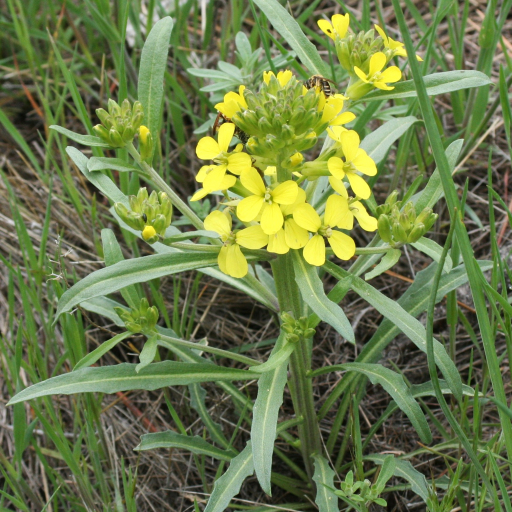
Known widely as the Western Wallflower or the Plains Wallflower, this sun-loving beauty is a staple of the North American prairie and rocky mountain slopes. It earned its name "Wallflower" from its European cousins that frequently grow in the crannies of stone walls, but Erysimum asperum is a rugged adventurer of the open wild. With its brilliant clusters of gold and orange, it acts as a bright beacon for pollinators across dry, grassy landscapes.
🔍 How to Identify
- 🌼 The Blooms: Clusters of four-petaled flowers that form a distinct "cross" shape (a hallmark of the mustard family), ranging from lemon yellow to a deep, burnt orange.
- 🍃 The Foliage: Narrow, lance-shaped leaves that are covered in tiny, stiff hairs, giving the plant a rough or "asperous" texture when touched.
- 📏 The Stature: Typically grows as a single, sturdy upright stem reaching 1 to 2 feet in height, ending in a dense rounded head of blossoms.
🏡 In Your Garden
- ☀️ Sun Worshiper: This plant requires full sun to thrive; it uses the intense light to pump pigment into its petals, resulting in those glowing sunset hues.
- 🌱 Deep Roots: It develops a significant taproot to find water in arid soils. Because of this, it hates being moved—pick a permanent "forever home" in your garden to avoid transplant shock.
- 🦋 Pollinator Magnet: It is a vital nectar source for several species of butterflies and bees, making it an excellent choice for a "wildlife-friendly" or xeriscape garden.
⚠️ Safety & Toxicity
- 🐾 Low to Moderate Risk: Like many members of the Erysimum genus, the Western Wallflower contains trace amounts of cardiac glycosides.
- 👶 Precaution: While not considered high-risk, it can cause stomach upset or skin irritation if handled excessively or ingested by pets or small children. It is best enjoyed visually rather than physically.
✨ Fun Fact
The Western Wallflower is a member of the Brassicaceae family, making it a distant cousin to broccoli, kale, and mustard! If you were to crush its seeds, you might recognize that familiar, spicy "mustard" tang.

Detailed Care Instructions
To grow Erysimum asperum, also known as wallflower, you can follow these steps:
- Choose a suitable location: Erysimum asperum prefers a sunny spot with well-drained soil. Make sure the location receives at least 6 hours of direct sunlight every day.
- Prepare the soil: Work the soil to remove any weeds or rocks, and amend it with compost to improve fertility and drainage.
- Planting: Dig a hole that is slightly larger and deeper than the plant's root ball. Place the plant in the hole, making sure it sits at the same level as it was in its nursery pot. Backfill the hole with soil, gently firming it around the roots.
- Watering: Water the plant thoroughly after planting to settle the soil. Erysimum asperum prefers moderate watering, so water it regularly but avoid overwatering to prevent root rot.
- Mulching: Apply a layer of organic mulch around the base of the plant to conserve moisture in the soil and prevent weed growth. Keep the mulch a few inches away from the stem to prevent rot.
- Fertilizing: Erysimum asperum doesn't require heavy feeding. Apply a balanced slow-release fertilizer in spring and a light application of compost or organic fertilizer in mid-summer to promote healthy growth.
- Pruning: After the plant has finished flowering, prune back any dead or spent flowers to encourage additional blooms. Cut back any leggy growth to maintain a tidy shape.
- Protection: If your region experiences cold winters, provide some protection to the plant by covering it with a layer of mulch or straw.
- Pest and disease control: Monitor the plant for aphids, slugs, or snails, which can sometimes be problematic. Use organic pest control methods if necessary. Erysimum asperum is generally resistant to most diseases.
- Propagation: To propagate additional plants, you can take stem cuttings in early summer and root them in a well-draining potting mix.
With proper care and attention, Erysimum asperum should thrive and produce colorful and fragrant flowers throughout the growing season.

Place in a bright room that is sun drenched almost all day. Or directly in a south-facing window.

To water this particular plant, it is important to observe its soil moisture level. The soil should be moist but not waterlogged, as excessive moisture can lead to root rot. The plant should be watered deeply and thoroughly, allowing the water to soak into the soil and reach the roots. The frequency of watering will vary depending on the climate and the type of soil, but generally the plant should be watered once or twice a week during the growing season and less frequently during dormant periods. It is best to water in the early morning or late afternoon, avoiding the hottest part of the day to prevent water from evaporating too quickly. It is also important to avoid getting water on the leaves, as this can increase the risk of fungal diseases.
To fertilize your Erysimum Asperum plant, use a balanced fertilizer with equal ratios of nitrogen, phosphorus, and potassium. Apply the fertilizer in the spring when new growth appears and again in the summer after the plant has finished blooming. Follow the manufacturer's instructions for the amount to use based on the size of your plant. Water the plant thoroughly after applying fertilizer to help it absorb the nutrients. Avoid over-fertilizing, as this can lead to excessive vegetative growth and reduced flowering.
Erysimum Asperum prefers a well-draining sandy or loamy soil with good fertility. The pH of the soil should be between 6.0 and 7.5. The soil should be rich in organic matter such as compost or aged manure. It is important to avoid compacted or heavy soils that can lead to poor drainage and root rot. It is recommended to add a slow-release fertilizer to the soil before planting. The plant also appreciates a layer of mulch to help retain moisture and provide nutrients to the soil.
To propagate this plant, take stem cuttings from a healthy parent plant. Choose a section of stem that is about 8 to 10 cm long and has at least two sets of leaves. Remove the lower leaves from the cutting, leaving only the top two sets of leaves. Dip the cut end of the stem in rooting hormone powder and plant it in a container filled with moist, well-draining soil. Cover the cutting with a plastic bag to create a humid environment and place it in a warm, bright location, but out of direct sunlight. Keep the soil moist but not waterlogged. After a few weeks, check for root development by gently tugging on the cutting. When it resists, roots have formed. Remove the plastic bag and continue to grow the cutting in its container until it is large enough to be transplanted into its permanent location.


