Plant Overview
Often called the Western Wallflower, Erysimum capitatum is a burst of golden sunshine that thrives where other plants struggle. Its name, derived from the Greek "eryo" (to help or rescue), hints at its ancient history in herbal medicine, though today it is primarily celebrated for its resilience in rocky, windswept terrains. From coastal dunes to high-altitude mountain peaks, this plant acts as a vibrant beacon for weary pollinators.
🔍 How to Identify
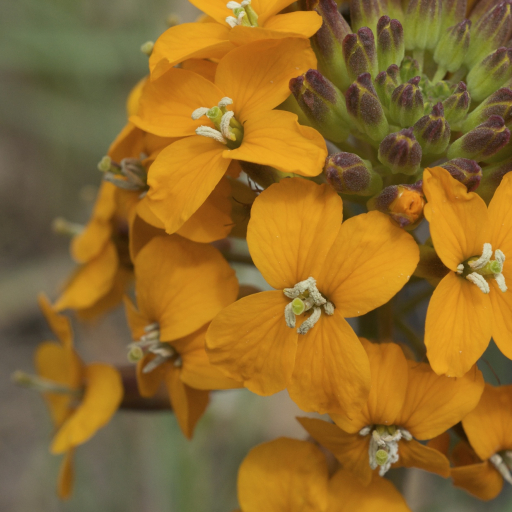
- 🌼 The "Cross" Petals: Like all members of the mustard family, it features four distinct petals arranged in the shape of a cross. The colors range from brilliant lemon yellow to deep, burnt orange.
- 🍃 Lance-Like Leaves: The foliage is narrow and elongated, often covered in tiny, star-shaped hairs that give the leaves a slightly rough, grayish-green texture.
- 🌱 Upward Pods: Once the flowers fade, they are replaced by "siliques"—long, thin seed pods that stand stiffly upright, resembling tiny green antennae reaching for the sun.
🏡 In Your Garden
- 🏜️ Loves the Lean Life: This plant is a specialist of "lean" soil. It thrives in rocky, sandy, or gravelly spots where water drains away quickly. It’s a perfect choice for rock gardens or "hell strips" near sidewalks.
- 🚫 The Taproot Rule: The Western Wallflower develops a long, sturdy taproot to survive drought. Because of this, it hates being transplanted. It is best to sow seeds directly in their permanent home or move seedlings while they are still very small.
⚠️ Safety & Toxicity
- 🐾 Non-Toxic but Not Tasty: While Erysimum capitatum is not considered a high-risk poison, it is not an edible plant. It contains certain compounds that can be bitter or stomach-upsetting if ingested in large quantities.
- 🧤 Mild Irritant: The fine hairs on the leaves and stems can occasionally cause mild skin irritation for those with sensitive skin. Wearing gloves while pruning is a good practice.
✨ Fun Fact
🦋 A Butterfly Lifeline: In the wild, this plant is a critical nectar source for the rare and endangered Quino Checkerspot butterfly. By planting Western Wallflowers, you aren't just adding color—you're providing a vital pit stop for struggling pollinator populations!

Detailed Care Instructions
To grow Erysimum Capitatum plants, also known as Western Wallflowers, you can follow these steps:
- Location: Choose a sunny spot in your garden with well-drained soil. Erysimum Capitatum prefers full sun but can tolerate some light shade.
- Soil Preparation: Amend the soil with organic matter like compost or well-rotted manure to improve drainage and fertility. Mix it well into the existing soil.
- Planting: Plant Erysimum Capitatum seeds or young plants in early spring or early fall. Dig a hole slightly larger than the root ball and place the plant, making sure the crown is level with or slightly above the soil surface. Space plants about 12-18 inches apart.
- Watering: Water the plants deeply after planting and keep the soil consistently moist until established. Once established, water Erysimum Capitatum moderately, allowing the top inch of soil to dry out between waterings. Avoid overwatering, as it can lead to root rot.
- Mulching: Apply a layer of organic mulch around the plant to help retain moisture, suppress weeds, and regulate soil temperature.
- Fertilization: Erysimum Capitatum is not a heavy feeder. You can fertilize sparingly with a balanced slow-release fertilizer in early spring or use a liquid fertilizer diluted to half strength every 4-6 weeks during the growing season.
- Deadheading: To encourage continuous blooming, remove faded flowers by deadheading regularly. This will also prevent self-seeding and maintain a neat appearance.
- Pruning: In early spring, prune the plant back by about one-third to promote bushier growth and additional flower production. Trim back any dead or damaged stems throughout the year.
- Pests and Diseases: Erysimum Capitatum is generally resistant to pests and diseases. However, aphids, snails, and slugs may occasionally attack the plants. Use organic pest control methods or insecticidal soap if necessary.
- Winter Care: Erysimum Capitatum is usually hardy in USDA zones 5-9. Provide a layer of mulch around the base of the plant in late fall to protect the roots during winter months.
By following these guidelines, you can successfully grow Erysimum Capitatum plants in your garden and enjoy their colorful blooms throughout the growing season.

Place in a bright room that is sun drenched almost all day. Or directly in a south-facing window.

To properly water this plant, you should first check the soil for moisture. Insert your finger into the soil to a depth of about an inch. If the soil feels dry at this depth, it is time to water. When watering, aim to moisten the soil to a depth of around 6-8 inches. You can achieve this by slowly watering around the base of the plant, allowing the water to soak into the soil. Be careful not to overwater the plant, as this can lead to root rot. It is generally recommended to water this plant deeply but infrequently, allowing the soil to dry slightly between waterings.
To fertilize this particular plant, use a balanced fertilizer with a ratio of 10-10-10 or 20-20-20. Apply the fertilizer in early spring before new growth starts. Use a rate of about 1 tablespoon of fertilizer per square foot of planting area. Water thoroughly after fertilizing to ensure that the nutrients penetrate the soil and reach the plant's roots. Avoid over-fertilizing, as this can lead to excessive growth and weak stems. Monitor the plant's growth and adjust fertilization as necessary throughout the growing season.
For optimal growth and health, it is recommended to use a well-draining soil that is rich in organic matter and nutrients. A loamy soil with a pH level between 6.0 and 7.5 is ideal. It is important to avoid compacted or clay soils as they can hinder root growth and drainage. A sandy soil can be mixed with compost or peat moss to improve water retention and nutrient availability. Amending the soil with bone meal or organic fertilizer before planting can ensure proper nutrition for the Erysimum Capitatum plant. It is also recommended to mulch around the plant to conserve soil moisture and regulate soil temperature.
To propagate this plant, you will need to take stem cuttings from a healthy and mature plant during the spring or summer months. Choose a stem that is about 4-6 inches long and has several pairs of leaves. Cut the stem at an angle just below a node or leaf.
Remove the leaves from the bottom half of the stem, leaving only a few at the top. Dip the bottom end of the stem in rooting hormone to encourage root growth.
Plant the cutting in a pot filled with well-draining soil. Water the cutting and place it in a bright, indirect light location. Keep the soil moist but not too wet.
After a few weeks, the cutting should start to develop roots. You can gently tug on the cutting to check if it has rooted. Once the roots have developed, you can transplant the cutting into a larger pot or into your garden.
With proper care, your new plant will grow and thrive just like its parent plant.


