Plant Overview
Often called the Teide Wallflower, this resilient beauty is a true mountain survivor, hailing from the high-altitude volcanic slopes of Tenerife in the Canary Islands. It is a "pioneer" plant, famous for its ability to thrive in the rugged, sun-scorched landscapes surrounding Mount Teide, where it paints the rocky terrain with vibrant splashes of violet.
🔍 How to Identify
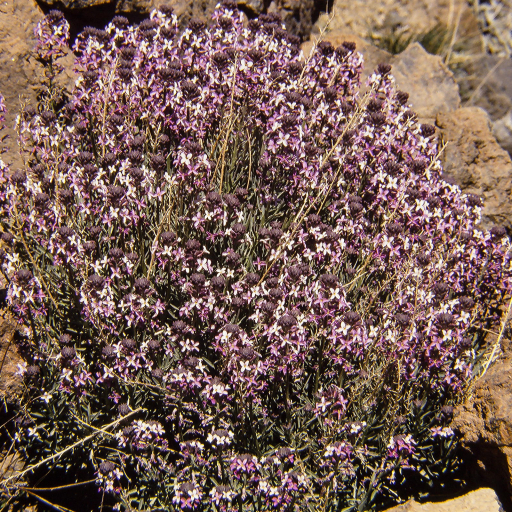
- 🌸 Color-Shifting Blooms: The small, four-petaled flowers are fascinating to watch; they often open as a pale lilac or almost white and deepen into a rich, saturated purple as they age.
- 🌿 Linear Foliage: The leaves are narrow, grayish-green, and needle-like, growing in dense tufts to help the plant retain moisture in dry environments.
- Building Woody Structure: Unlike many delicate garden annuals, this species develops a sturdy, woody base over time, giving it a shrub-like appearance that can withstand high winds.
🏡 In Your Garden
- 🌋 Volcanic Requirements: Because it evolved in porous volcanic soil, this plant is extremely sensitive to "wet feet." It requires exceptional drainage and will thrive in rock gardens or gravel beds where water moves away quickly.
- ☀️ Sun Seeker: It craves intense light. In a garden setting, it performs best in the brightest spot available, mimicking the thin, clear air of its high-altitude home. It is remarkably drought-tolerant once established.
⚠️ Safety & Toxicity
- 🐾 Mild Toxicity: Like many members of the Erysimum genus, the Teide Wallflower contains mild cardiac glycosides and mustard oils. If ingested in large quantities, it can cause stomach upset or nausea in pets and small children.
- 🧤 Skin Irritation: The sap can be a minor irritant to those with sensitive skin. It is always a good idea to wear gloves when pruning or handling broken stems.
✨ Fun Fact
The Teide Wallflower is a vital lifeline for high-altitude insects; it is one of the primary nectar sources for the Boloria butterflies that live near the volcanic peaks where few other flowers can survive.

Detailed Care Instructions
To grow Erysimum scoparium, commonly known as wallflower, follow these steps:
- Location: Choose a sunny spot in your garden as Erysimum scoparium thrives in full sunlight. Ensure the soil is well-draining, as this plant does not tolerate wet or waterlogged conditions.
- Soil Preparation: Prepare the soil by removing weeds, rocks, and debris. Dig in some organic matter such as compost or well-rotted manure to improve drainage and provide nutrients.
- Planting: Dig a hole that is slightly larger than the plant's root ball. Place the plant in the hole, ensuring it is at the same level it was in the nursery pot. Backfill the hole with soil, gently firming it around the roots.
- Watering: Water the plant thoroughly after planting, and provide regular watering until it becomes established. Afterward, reduce the frequency of watering, allowing the soil to dry out slightly between waterings. Wallflowers are drought-tolerant but appreciate occasional deep watering during prolonged dry spells.
- Mulching: Apply a layer of organic mulch around the plant to help retain moisture, suppress weed growth, and cool the soil. However, avoid mulching too close to the plant's stem to prevent rot.
- Fertilizing: Erysimum scoparium typically doesn't require much fertilization. However, if your soil is lacking in nutrients, you can feed the plant with a balanced, slow-release fertilizer once a year in spring.
- Pruning: After flowering, trim back the spent flower stalks to encourage bushier growth and potentially prolong the blooming period. You can also lightly prune the plant in late summer to remove any leggy or overly woody growth.
- Propagation: Erysimum scoparium can be propagated through seeds or softwood cuttings. Collect seeds after flowering, and either sow them directly into the garden or start them indoors in pots. Softwood cuttings can be taken in spring or early summer and rooted in a moist, well-draining soil mix.
- Pests and Diseases: Wallflowers are generally pest and disease resistant. However, keep an eye out for aphids, slugs, and snails. If necessary, treat them with organic methods or appropriate insecticides.
With proper care, your Erysimum scoparium plant should grow and produce beautiful flowers throughout the growing season.

Place in a bright room that is sun drenched almost all day. Or directly in a south-facing window.

To properly water this plant, it is important to take into consideration the environmental conditions in which the plant is growing. Factors such as temperature, humidity, and sunlight can all affect the plant's water needs.
As a general rule, it is recommended to water the plant deeply but infrequently. This means that you should wait until the soil is almost completely dry before watering again. Overwatering can lead to root rot and other issues.
When watering, aim to water directly at the base of the plant, avoiding the leaves and stems. This can help prevent fungal growth and disease. Additionally, ensure that the soil has proper drainage to prevent waterlogging.
In times of extreme heat or drought, the plant may require more frequent watering. However, always check the soil moisture level before watering to avoid excess water.
Overall, paying attention to the plant's environmental conditions and adjusting watering accordingly is key to maintaining the health of this plant.
To fertilize this plant, use a balanced fertilizer in the spring and again in the fall. Follow the manufacturer's instructions for application rates. It's important not to over-fertilize as this can lead to excessive growth and decrease the plant's overall health. Water the plant thoroughly after fertilizing to help the nutrients penetrate the soil.
Erysimum Scoparium plant prefers well-draining soil, with a pH level between 6.5 and 7.5. The soil should be rich in organic matter and nutrients. It is recommended to use a mixture of loam, sand, and compost when planting Erysimum Scoparium. The plant should be placed in full sun and watered regularly, making sure not to waterlog the soil. When fertilizing, a balanced fertilizer with an equal ratio of nitrogen, phosphorus, and potassium should be used. It is important to maintain good soil health for the Erysimum Scoparium plant to grow robust and healthy.
To propagate this plant, you will need to gather cuttings from a healthy parent plant. Choose stems that are firm and have not yet flowered. Cut the stems at a 45-degree angle using clean and sharp pruning shears. Make sure each cutting is about 6 inches long with at least two sets of leaves. Strip the leaves on the bottom half of each cutting.
Prepare a pot with a well-draining soil mix and insert the cuttings in the soil. Cover the pot with a plastic bag to create a greenhouse effect. Keep the soil moist but not waterlogged, and place the pot in a bright and warm location, but out of direct sunlight.
After four to six weeks, the cuttings should have developed roots. At this point, you can remove the plastic bag and move the pot to a brighter location. Water the plant regularly and lightly fertilize it with a water-soluble fertilizer every two weeks.
When the plant has established a strong root system and started to grow, you can transplant it to a larger pot or in the garden. Wait until the plant is fully mature and has started to bloom before collecting it again to make more cuttings.


