Plant Overview
Known as the "Torch Ginger" or "Philippine Wax Flower," this architectural masterpiece looks more like a high-end wax sculpture than a living plant. In Southeast Asia, it isn’t just a garden beauty; it’s a culinary superstar, famous for adding a citrusy, floral punch to spicy traditional dishes. It brings a prehistoric, "Jurassic Park" vibe to any landscape with its towering stems and neon-bright, symmetrical blooms.
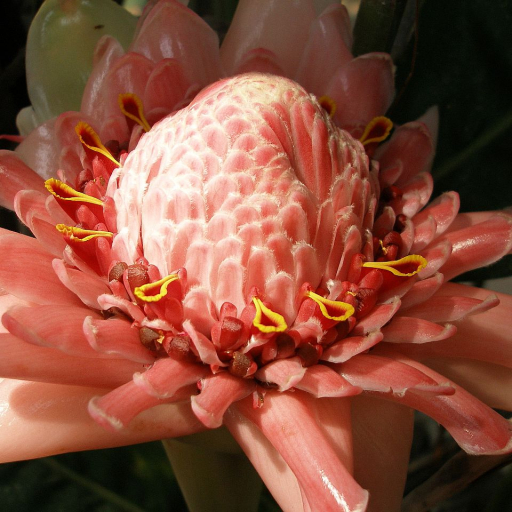
🔍 How to Identify
- 🌺 The Bloom: A showstopping, cone-shaped flower head made of thick, waxy bracts (modified leaves) that look like a burning torch in shades of electric pink, red, or white.
- 🌿 The Foliage: Massive, arching stalks that can reach up to 15 feet in height, adorned with long, blade-shaped leaves that resemble those of a banana or bird of paradise.
- 🏗️ Growth Habit: Uniquely, the flowers do not grow on the leafy stalks. Instead, the "torches" emerge on their own separate, leafless stems directly from the underground rhizomes.
🏡 In Your Garden
- 🌬️ Wind Protection: Because these giants grow so tall, their heavy leaves can act like sails. They prefer a sheltered spot to prevent their impressive stalks from snapping during summer storms.
- 💧 Thirst for Humidity: The Torch Ginger is a true child of the rainforest. It doesn't just need wet soil; it craves high air humidity. If the tips of the leaves turn brown and crispy, it’s likely a plea for more moisture in the air.
- 🥘 Culinary Harvest: If you are growing it for the kitchen, harvest the flower buds while they are still tight and unopened, as this is when their flavor is most potent and the texture is crisp.
⚠️ Safety & Toxicity
- ✅ Safe Status: The Etlingera elatior is non-toxic to humans and is widely used in Southeast Asian cuisine.
- 🐾 Pet Friendly: It is generally considered safe for cats and dogs, though ingesting any large amount of fibrous plant material can cause mild stomach upset in curious pets.
- 👐 Garden Handling: The stalks are sturdy but can be slightly rough; wearing gloves while pruning helps avoid minor skin abrasions from the coarse foliage.
✨ Fun Fact
In Malaysia, the unopened flower bud is known as Bunga Kantan. It is a mandatory ingredient in the famous spicy noodle soup Laksa, providing a complex flavor profile that scientists describe as a mix of ginger, lemon, and rose.

Detailed Care Instructions
Torch ginger can essentially live indefinitely in the garden, as it will continue to spread via rhizomes. Just make sure to divide mature plants to keep them vigorous.
What's the difference between torch ginger and ginger?
Like the ginger root you'd find at the grocery store, torch ginger is edible. However, torch ginger is known for its citrusy taste with hints of sweet and sour floral notes rather than the sharp, spiced taste of common ginger root. All parts of torch ginger are safe to eat, but the flower buds and stems are most often used in cooking.
Can torch ginger grow indoors?
It's possible to grow this species as a houseplant, though it's typically very difficult to mimic torch ginger's natural environment. The plant might not grow and flower to its fullest potential indoors.
| Color | Red, Pink, White |
| Soil Ph | Acidic, Neutral |
| Humidity | High |
| Lighting | Full Sun |
| Soil Type | Loamy, Moist, Well-Drained |
| Bloom Time | Seasonal |
| Difficulty | Medium |
| Plant Type | Herbaceous, Perennial |
| Hibernation | Cold Period |
| Mature Size | 6–15 Ft. Tall, 4–10 Ft. Wide |
| Native Area | Asia |
| Sun Exposure | Full, Partial |
| Hardiness Zones | 10-12 |
To grow Etlingera elatior, also known as torch ginger or ginger flower, you can follow these steps:
- Select a suitable location: Choose a spot that receives partial shade to full sun. The plant prefers a warm and humid environment.
- Soil preparation: Prepare well-draining soil rich in organic matter. You can amend the soil with compost or well-rotted manure.
- Propagation: Torch ginger can be propagated from seeds or divisions. Divisions are usually easier and faster. Divide a mature plant by carefully separating the rhizomes (underground stems with roots) and replant them at the same depth.
- Planting: Dig a hole slightly larger than the rhizome size and place it in the hole. Backfill with soil, ensuring the rhizome is covered but not buried too deep. Leave the growing bud exposed above the soil surface. Space the plants about 3-5 feet apart.
- Watering: Torch ginger requires consistently moist soil, so water regularly to keep the soil moist but not waterlogged. Water deeply when the top inch of soil feels dry.
- Fertilization: Apply a balanced slow-release fertilizer during the growing season to promote healthy growth. Follow the package instructions for dosage and timing.
- Mulching: Apply a layer of organic mulch around the plant to retain moisture, regulate soil temperature, and suppress weed growth.
- Pruning: Remove any dead or damaged foliage regularly. Prune old flower stalks after flowering to allow new ones to emerge.
- Pest and disease control: Torch ginger is generally fairly resistant to pests and diseases. However, keep an eye out for common garden pests such as aphids, mealybugs, or slugs. Take appropriate measures to control them if necessary.
- Blooming: Torch ginger takes about 1-2 years to reach maturity and start blooming. The vibrant red or pink flowers with long protruding stamens are produced on top of tall stalks which can reach up to 15 feet in height. Enjoy the stunning flowers as they appear.
Remember, torch ginger is native to tropical regions and thrives in warm and humid conditions. It may not be suitable for regions with cold winters unless grown indoors or in a controlled greenhouse environment.

Place in a window with dappled sun or a spot in the middle of a room. Or directly in a window facing west or east.

To water this plant, you should first make sure that the soil is dry before providing water. This plant prefers moist soil, but not waterlogged soil. It is important to water at the base of the plant and not on its foliage to prevent it from getting wet, as this can cause disease and rot. The frequency of watering will depend on the temperature, humidity, and amount of sunlight the plant receives. It is recommended to provide enough water to soak the soil, but not flood it. During periods of dry weather or low humidity, the plant may require more frequent watering. It is essential to provide good drainage for the plant to prevent root rot.
To properly fertilize this plant, use a balanced fertilizer with equal parts nitrogen, phosphorus, and potassium. Apply the fertilizer once per month during the growing season, following the manufacturer's recommended dosage. Be sure to water the plant thoroughly after each fertilization to prevent fertilizer burn. Avoid fertilizing during the plant's dormant period.
The ideal soil for this plant is one that is slightly acidic and well-draining. It should have a pH between 5.5 and 6.5. A mix of peat moss, perlite, and sand is a good option, as it provides good drainage and aeration while maintaining moisture levels. Additionally, the soil should be rich in organic matter and nutrients, which can be achieved by adding compost or well-rotted manure. It is important to ensure that the soil is kept moist but not waterlogged, as excessive moisture can lead to root rot.
- Select a healthy parent plant with actively growing shoots.
- Prepare a rooting container with well-draining soil mix.
- Cut a healthy stem or shoots from the parent plant, making sure to use sharp and sterilized pruners to avoid damaging the plant tissues.
- Remove the lower leaves and any flower buds or blooms from the cutting to reduce stress and redirect energy towards the root formation.
- Dip the cut end of the stem in a rooting hormone powder or gel to promote root growth.
- Plant the cutting in the rooting container, burying it at least half of its length in the soil.
- Water the cutting thoroughly, making sure that the soil is moist but not waterlogged.
- Cover the container with a clear plastic bag to create a mini greenhouse and provide high humidity to the cutting.
- Place the container in a bright spot with indirect sunlight or filtered light, but away from direct heat or cold drafts.
- Check the cutting regularly and mist the leaves and soil if necessary to maintain adequate moisture. Avoid overwatering or letting the soil dry out completely.
- After a few weeks to a few months, depending on the temperature, humidity, and rooting ability of the cutting, it should start to form roots and new growth.
- Once the new plant has established a good root system and several leaves, it can be transplanted into a larger pot or directly into the garden.
Common pests of the torch ginger include Scale insect, mealybugs, spider mites, aphids, thrips. Make a habit of checking your torch ginger frequently for pests so that any infestations can be caught and managed early.


