Plant Overview
Often called the "Cider Gum," this Tasmanian native is a favorite for its striking, frost-kissed appearance and that unmistakable "spa-like" fragrance. While it can grow into a towering giant in the wild, gardeners love it as a versatile shrub that adds a cool, silvery-blue pop to floral arrangements and modern landscapes. It is one of the hardiest Eucalyptus species, making it a go-to for those who want an exotic look without the fragile temperament.
🔍 How to Identify
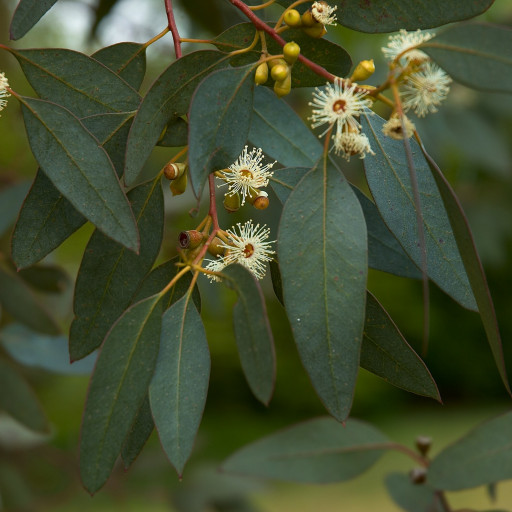
- 🍃 Leaf Transformation: It displays "heterophylly"—meaning the leaves change shape as the plant ages. Young leaves are small, round, and silver-blue, while adult leaves become long, sickle-shaped, and green.
- 🪵 Peeling Bark: The trunk is a work of art, featuring smooth bark that flakes away in patches to reveal shades of white, cream, pink, and even grey-brown.
- 🌬️ Aromatic Scent: Simply brushing against the foliage or crushing a leaf releases a potent, refreshing menthol and citrus aroma.
🏡 In Your Garden
- ✂️ Pruning Magic: If you love the small, round blue leaves for flower arrangements, you must "coppice" or "pollard" the tree (cut it back hard) every spring. This forces the plant to stay in its juvenile stage and prevents it from becoming a massive 40-foot tree.
- 🏗️ Root Sensitivity: Eucalyptus gunnii grows incredibly fast but has a delicate root system. It produces a long taproot, which means it absolutely hates being moved once planted. Choose its location wisely from day one!
⚠️ Safety & Toxicity
- 🐾 Toxic to Pets: This plant is considered toxic to dogs, cats, and horses if ingested.
- 🤢 The Details: The essential oils (eucalyptol) can cause drooling, vomiting, diarrhea, and lethargy. While it smells wonderful to humans, it should be kept out of reach of curious chewers.
✨ Fun Fact
The name "Cider Gum" comes from the sweet, sugary sap that leaks from the trunk. In its native Tasmania, this sap is sometimes fermented—either naturally by insects and birds or manually by humans—to create a drink similar to cider.

Detailed Care Instructions
| Humidity | Normal |
| Lighting | Full Sun |
| Toxicity | Poisonous |
| Difficulty | Hard |
| Temperature | 15°C - 30°C |
| Hardiness Zones | 8A - 10B |
Here are some steps to help you grow Eucalyptus Gunnii plants:
- Climate and Location: Eucalyptus Gunnii plants thrive in USDA hardiness zones 7-10. Ensure that you have the appropriate climate for these plants. They prefer full sun exposure and well-drained soil.
- Seeds or Seedlings: Decide whether you want to start from seeds or purchase seedlings from a nursery. Starting from seeds can be more challenging but gives you more control over the plant's growth.
- Soil Preparation: Eucalyptus Gunnii prefers slightly acidic soil (pH 5.5-6.5). Prepare the soil by loosening it with a garden fork or tiller and removing any weeds or rocks. If the soil is heavy clay or poorly drained, add organic matter like compost to improve drainage.
- Planting: If using seeds, sow them in containers filled with a seed-starting mix. Cover them lightly with soil and keep the soil evenly moist. Once the seedlings are a few inches tall, you can transplant them into bigger pots or directly into the ground. If using seedlings, dig a hole slightly larger than the root ball, place the seedling in the hole, backfill with soil, and gently firm it around the plant.
- Watering: Eucalyptus Gunnii plants require regular watering, especially during the first year. Avoid overwatering, as Eucalyptus prefers drier conditions. Let the top inch of soil dry out between watering sessions.
- Pruning: To encourage bushier growth, prune the plants in spring. Cut off any dead or damaged branches, and also selectively prune to shape the plant.
- Mulching and Fertilization: Apply a layer of organic mulch, like wood chips or bark, around the base of the plant to help retain moisture and suppress weed growth. Avoid placing the mulch directly against the trunk. Fertilizer may not be necessary unless the plant shows signs of nutrient deficiency. If needed, apply a slow-release balanced fertilizer according to the manufacturer's instructions.
- Pests and Diseases: Eucalyptus Gunnii is generally resistant to pests and diseases. However, keep an eye out for common pests like aphids, eucalyptus gall wasps, or leaf-eating insects. Control them with organic insecticidal soap if necessary.
Remember to check the specific needs of the Eucalyptus Gunnii variety you are growing, as some variations may have slightly different requirements.

Place in a window with dappled sun or a spot in the middle of a room. Or directly in a window facing west or east.

To water this particular plant, it is important to observe its soil moisture. The soil should be kept moist but not waterlogged. The frequency of watering will depend on various factors such as the temperature, humidity, and the amount of sunlight it receives. Generally, during hot and dry weather, the plant may need watering more frequently. It is best to water the plant in the early morning or late evening to prevent water evaporation and reduce stress on the plant. When watering, make sure to water the base of the plant and avoid wetting the leaves. Overwatering may lead to root rot, so it is important to allow the soil to dry out between watering intervals.
For optimal growth and health, the plant should be fertilized during the spring and summer growing seasons. Use a slow-release fertilizer with a balanced N-P-K ratio (such as 10-10-10 or 20-20-20) and apply according to package instructions. Avoid over-fertilizing, as this can lead to excessive leaf growth at the expense of root development. Additionally, make sure the plant is well-watered before and after fertilizing to prevent burning of the roots.
Eucalyptus Gunnii plant prefers well-draining soil that is slightly acidic and has a good amount of organic matter. The soil should be loose and well-aerated to facilitate good root growth. A mixture of sand, compost, and peat moss can be used to create the ideal soil mixture. It is important to avoid heavy, clay soils that retain too much moisture, which can lead to root rot and other issues. Additionally, adding a slow-release fertilizer to the soil can provide the necessary nutrients for the plant's growth and health.
To propagate this plant, begin by taking cuttings from a healthy and mature specimen during the active growing season. Choose stem cuttings that are about 3-4 inches long and have at least 2-3 pairs of leaves. Remove any leaves from the bottom half of the stem, and make a clean cut just below a node using a sharp knife or pruning shears. Dip the end of the cutting in rooting hormone powder to encourage root growth.
Next, plant the cutting in a well-draining soil mix that has been moistened. Insert the cutting about an inch deep into the soil, and gently pack the soil around it. Cover the cutting and its container with a plastic bag or dome to create a humid environment and reduce moisture loss. Place the container in a warm spot with bright, indirect light.
Water the cutting regularly to keep the soil slightly moist, but not waterlogged. Check for roots after about 4-6 weeks by gently tugging on the cutting. If it resists, roots have started to form. Once roots have formed, gradually reduce the humidity by opening the plastic bag or dome for longer periods each day.
When the cutting has established a good root system and several new leaves have formed, it can be transplanted into a larger container or planted in the ground if conditions are suitable.
Common pests of the apple eucalyptus include Scale insect, mealybugs, spider mites, aphids. Make a habit of checking your apple eucalyptus frequently for pests so that any infestations can be caught and managed early.


