Plant Overview
Often called the "Amazon Lily," this Colombian native is the definition of tropical elegance. While it isn't a true lily, its pristine white blossoms and intoxicating fragrance have made it a favorite for "moon gardens" and high-end floral arrangements for centuries. It is a plant that brings a sense of serenity and "heavenly" beauty to any humid, indoor space.
🔍 How to Identify
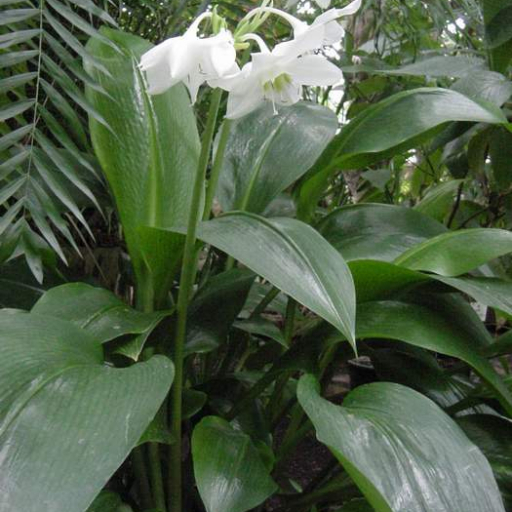
- 🍃 Lush Foliage: Large, elliptical, deep-green leaves that appear polished and glossy, emerging directly from underground bulbs on long, sturdy stalks.
- ❄️ Star-Shaped Blooms: Clusters of 3 to 6 pure white flowers that nod slightly downward, featuring a distinct central "cup" (corona) often tinged with delicate green.
- 👃 Intoxicating Scent: A sweet, sophisticated perfume that is particularly strong in the evening, reminiscent of citrus blossoms and jasmine.
🏡 In Your Garden & Home
- 🏺 The "Homebody" Rule: This plant is famous for its sensitivity to change. It absolutely hates having its roots disturbed and may refuse to bloom for a year if repotted, so only move it when the bulbs are literally bursting out of the container.
- ☁️ Rainforest Vibes: Originating from the Andean forest floor, it craves high humidity and filtered light. If the air is too dry, the leaf tips will turn brown, and direct afternoon sun will quickly scorch the waxy foliage.
⚠️ Safety & Toxicity
- 🐾 Toxic to Pets: Like many bulb-based plants, the Amazon Lily contains alkaloids that are dangerous to cats and dogs. Ingestion can lead to vomiting, drooling, and tremors.
- 👶 Human Safety: All parts of the plant are considered toxic if swallowed. It is best kept on a high pedestal or shelf away from curious toddlers.
✨ Fun Fact
Despite its common name, the Amazon Lily is actually a closer relative to the Amaryllis and the common Daffodil than to the "true lilies" found in ponds or traditional gardens!

Detailed Care Instructions
| Lighting | Full Sun |
| Hardiness Zones | Min 10A |
Here are some tips on how to grow Eucharis × Grandiflora plant:
- Planting: Choose a well-draining pot that is at least 8 inches deep and wide. Fill the pot with a well-draining potting mix.
- Light: Place the plant in bright, indirect light. Avoid exposing it to direct sunlight as it can scorch the leaves.
- Temperature: Eucharis × Grandiflora prefers warm temperatures. Maintain a temperature range between 65-85°F (18-30°C).
- Watering: Keep the soil consistently moist but not waterlogged. Water when the top inch of soil feels dry. Avoid letting the plant sit in standing water, as it can lead to root rot.
- Humidity: Eucharis × Grandiflora thrives in high humidity. Mist the leaves regularly or place the pot on a tray filled with water and pebbles to increase humidity around the plant.
- Fertilization: Use a balanced liquid fertilizer every two weeks during the growing season (spring and summer). Be sure to follow the instructions on the fertilizer packaging for the correct dosage.
- Repotting: Every 1-2 years, repot the plant into a slightly larger pot with fresh potting mix. This will give the plant more space to grow.
- Pruning: Remove any yellow or dead leaves as they appear. Trimming back long or unruly leaves can help maintain a compact shape.
- Propagation: Eucharis × Grandiflora can be propagated through bulb division. Carefully separate the bulbs during repotting and plant them in separate pots.
- Pests and diseases: Keep an eye out for pests such as mealybugs and scale insects. Treat any infestations promptly with the appropriate insecticide. Watch out for fungal diseases caused by overwatering and maintain good airflow around the plant to prevent issues.
Remember to regularly observe and care for your Eucharis × Grandiflora plant to ensure its healthy growth and blooming.

Place in a window with dappled sun or a spot in the middle of a room. Or directly in a window facing west or east.

The plant requires regular watering to keep the soil moist but not waterlogged. The best way to water is to give the plant a deep soak and then let the soil dry out slightly before watering again. It is important to avoid getting water on the leaves or flowers as this can cause damage or disease. Allow any excess water to drain away and ensure adequate drainage from the pot. As with most plants, it is important to adjust the watering schedule based on the current weather conditions and the specific needs of the plant.
To fertilize this plant, first select a balanced fertilizer with equal amounts of nitrogen, phosphorus, and potassium. Dilute the fertilizer to half strength and apply once a month during the plant's growing season. Be sure to water the plant thoroughly before and after fertilizing to avoid burning the roots. Avoid over-fertilizing, as this can cause the plant to become leggy and weak.
Eucharis × Grandiflora plant requires a rich, well-draining soil that is moist but not waterlogged. The soil should be slightly acidic with a pH of around 6.5 to 7.5. A mixture of peat moss, compost, and perlite or vermiculite can be used to create the ideal soil. The peat moss provides organic matter to improve soil quality and water retention, while the compost adds nutrients. Perlite or vermiculite helps improve drainage and aeration in the soil. It is important to avoid using soils that contain high levels of fertilizer or salts, as this can harm the plant's delicate root system. Regularly fertilizing the soil with a balanced fertilizer can help promote healthy growth and flowering.
To propagate this plant, firstly, select a healthy and mature plant with strong stems and roots. Cut the stem about 3 to 5 inches above the soil level. Remove any leaves and side shoots from the lower 2 inches of the stem. Apply a rooting hormone to the cut end of the stem.
Fill a pot with a well-draining soil mix, make a hole in the soil with a pencil or a stick. Place the cut end of the stem into the hole and gently press the soil around the stem. Water the plant until the soil is moist, but not waterlogged.
Cover the pot with a plastic bag to create a humid environment. Place the pot in a bright spot, but not in direct sunlight. Check the soil regularly to ensure it remains moist.
After 2 to 3 weeks, check the plant for root growth by gently tugging on the stem. If there is resistance, roots have developed. Remove the plastic bag and continue to care for the plant as usual.
Once the new plant is established, it can be transplanted into a larger pot or into the ground outdoors.
Common pests of the amazon lily include Spider mites, thrips. Make a habit of checking your amazon lily frequently for pests so that any infestations can be caught and managed early.


