Plant Overview
Known for its architectural, geometric silhouette, Euphorbia buruana is a striking succulent native to the dry scrublands of Kenya and Tanzania. Often referred to as a "living sculpture" by collectors, it forms dense, spiny thickets that look like something out of a prehistoric landscape. This plant is a master of survival, often hiding a massive, woody water-storage system beneath the soil to withstand the African heat.
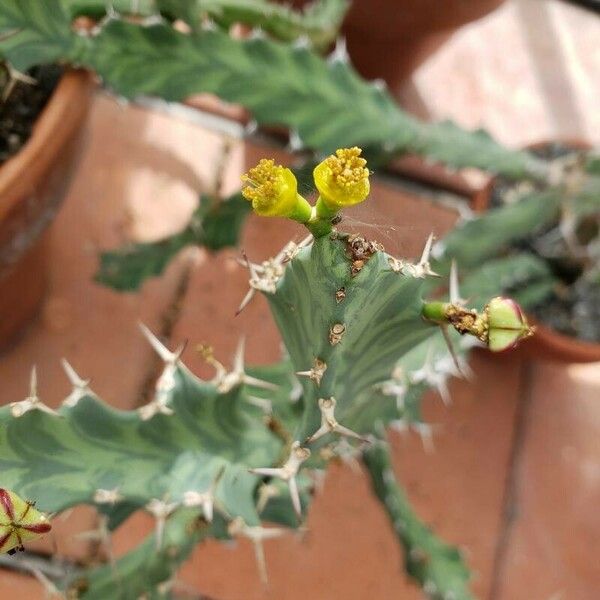
🔍 How to Identify
- 🌵 Geometric Stems: The plant produces upright or sprawling stems that are typically four-angled, featuring a beautiful pale green color often marbled with darker green, "V-shaped" patterns.
- ⚔️ Spine Shields: Along the ridges of the stems are distinct horny "shields" that merge into a continuous strip, each bearing a pair of sharp, dark-tipped spines.
- 🪵 Tuberous Base: Beneath the surface, the plant develops a thick, corky underground rootstock (caudex) that can become quite large in mature specimens.
🏡 In Your Garden
- 🪨 The Hidden Anchor: Because Euphorbia buruana develops a heavy tuberous root, it hates being moved once established. Use a deep, terracotta pot to provide stability and porous, gritty soil to prevent the "hidden" root from rotting.
- ☀️ Light & Pattern: To keep its contrasting "marbled" markings vivid, it requires very bright, indirect light. In too much shade, the stems will stretch and lose their unique geometric sharpness.
⚠️ Safety & Toxicity
- 🚫 Strict Warning: Like all Euphorbias, this species contains a thick, milky white latex (sap) that is highly caustic and toxic.
- 🧴 Contact Risks: The sap can cause severe skin irritation, blistering, and intense pain if it contacts the eyes. It is toxic to cats, dogs, and humans if ingested, leading to swelling of the mouth and digestive distress. Always wear gloves when pruning.
✨ Fun Fact
In its native East African habitat, the complex chemical compounds in the sap of Euphorbia buruana act as a natural deterrent against hungry herbivores, essentially acting like a "chemical fence" to protect the plant’s precious water reserves.

Detailed Care Instructions
To grow Euphorbia Buruana plant, you can follow these steps:
- Purchasing the plant: Locate a reputable nursery or online supplier that offers Euphorbia Buruana plants. Purchase a healthy and preferably well-rooted plant.
- Selecting an appropriate location: Euphorbia Buruana prefers bright, indirect sunlight. Choose a location that receives ample light but is shielded from intense sunlight during the hottest parts of the day.
- Preparing the soil: Euphorbia Buruana thrives in well-draining soil. Prepare a pot or planting bed with a mixture of cactus/succulent soil and perlite or coarse sand to ensure good drainage. Avoid heavy clay soils.
- Transplanting: If starting with a potted plant, gently remove it from its current container and place it in the new prepared soil. If planting outdoors, dig a hole slightly larger than the root ball of the plant and place it in the hole. Backfill with soil, ensuring the top of the root ball is level with or slightly above the soil surface.
- Watering: After transplanting, water the plant thoroughly and allow the soil to dry out partially before watering again. Euphorbia Buruana prefers slightly dry conditions, so avoid overwatering to prevent root rot.
- Fertilizing: Feed the plant with a balanced, water-soluble fertilizer once a month during the growing season (spring and summer), following the package instructions. Avoid fertilizing during the dormant winter period.
- Pruning: Euphorbia Buruana typically requires minimal pruning. However, if it becomes leggy or overgrown, you can trim it back in early spring before new growth emerges to maintain a compact shape.
- Protecting from extreme temperatures: Euphorbia Buruana is sensitive to frost and temperatures below 50°F (10°C). If you live in a colder climate, consider growing it in a container that can be brought indoors during winter or provide protective coverings during cold snaps.
- Monitoring for pests and diseases: Keep an eye out for common succulent pests like mealybugs, aphids, and spider mites. If infestations occur, treat them promptly using appropriate insecticides or neem oil.
Remember to research and respect any specific care requirements for Euphorbia Buruana, as individual plant care can vary.
To effectively water the plant known as Euphorbia Buruana, you can follow these guidelines:
- Assess the soil moisture: Before watering, check the moisture level of the soil by inserting your finger about an inch into the soil. If it feels dry, it indicates the need for watering.
- Choose a suitable watering method: Euphorbia Buruana typically prefers a deep watering technique instead of frequent light watering. This means that you should aim to moisten the soil deeply but not so much that it becomes waterlogged.
- Select the right time: It is ideal to water the plant in the early morning or late afternoon when the temperatures are cooler. This allows for better absorption and minimizes water loss due to evaporation.
- Water directly at the base: Pour water directly onto the soil around the base of the plant. Avoid watering the foliage as this can lead to diseases or fungal issues.
- Apply water slowly: Water should be applied slowly and evenly, allowing it to soak into the soil gradually. This prevents runoff and ensures that the roots can absorb the moisture effectively.
- Use the correct amount of water: The amount of water required depends on various factors such as the plant's size, the weather conditions, and the soil type. Generally, aim to moisten the soil to a depth of 6-8 inches, ensuring that it reaches the root zone.
- Adjust watering frequency: The watering frequency may change according to the plant's growth stage, pot size, and environmental conditions. Observe the plant closely and adjust the watering schedule accordingly, making sure to avoid waterlogging or allowing the soil to become too dry.
- Consider the season: During the plant's active growing season, it may require more water. In contrast, during cooler months or when the plant is dormant, the watering frequency can be reduced.
- Monitor plant response: Observe how the plant reacts to the watering routine. Wilting or yellowing leaves may be a sign of over or underwatering. Adjust the watering schedule based on the plant's response to maintain its health.
Remember, these guidelines are general recommendations, and it is essential to consider specific care requirements for this particular plant species.
To fertilize the Euphorbia Buruana plant, follow these steps:
- Choose a balanced, water-soluble fertilizer designed for indoor plants. Read the instructions on the packaging carefully.
- Dilute the fertilizer in water according to the recommended dosage. Typically, a ratio of 1 teaspoon of fertilizer per 1 gallon of water is suitable.
- Use a watering can or spray bottle to apply the diluted fertilizer to the soil around the base of the plant. Avoid getting the fertilizer on the leaves or stems, as it may cause damage.
- Monitor the soil moisture levels before fertilizing. If the soil is already moist, skip watering and wait until it dries out slightly before applying the fertilizer.
- Apply the fertilizer every month during the growing season, which is usually spring and summer. Reduce or stop fertilizing in the dormant season, typically during fall and winter.
- If the plant shows signs of nutrient deficiency, such as yellowing leaves or stunted growth, you can consider increasing the frequency of fertilization slightly. However, be cautious not to overfertilize, as it can damage the plant.
Following these general guidelines should help you provide adequate nutrients for the Euphorbia Buruana plant without relying on its common names.
When selecting soil for Euphorbia Buruana, it is important to consider a few key characteristics to ensure optimal growth and health for the plant. Euphorbia Buruana thrives in well-draining soil that mimics its natural habitat. The soil should have good moisture retention while also allowing excess water to drain effectively.
A suitable soil mix for Euphorbia Buruana consists of a combination of organic matter, such as compost or peat moss, and inorganic materials like perlite or pumice. Organic matter helps retain moisture and provides essential nutrients to the plant, while inorganic materials aid in improving the soil's drainage.
It is generally recommended to use a mix that contains equal parts of organic matter and inorganic materials. This combination creates a well-balanced soil composition, allowing for proper root development and preventing waterlogged conditions that can lead to root rot.
Additionally, Euphorbia Buruana prefers a slightly acidic to neutral pH range between 5.5 and 7.5. Therefore, it is advisable to monitor the pH of the soil regularly and adjust if necessary using additives such as dolomite lime or sulfur.
When repotting or planting Euphorbia Buruana, ensure that the soil is thoroughly moistened before gently placing the plant into the new pot or garden bed. It is essential to avoid compacting the soil around the roots, as compacted soil may hinder root growth and prevent proper drainage. Properly firm the soil around the base of the plant to provide stability.
Regularly monitor the soil moisture and water the Euphorbia Buruana when the top few inches of the soil are dry. However, it is crucial to avoid over-watering, as this can lead to root rot and other issues. Adjust the frequency of watering based on the specific needs of the plant and the environmental conditions.
In summary, choosing a well-draining soil mix that balances organic matter and inorganic materials, with a slightly acidic to neutral pH, will create an ideal growing environment for the Euphorbia Buruana plant. Regular monitoring and appropriate watering practices will further promote the plant's overall health and growth.
Propagating Euphorbia Buruana plants can be done through several methods, including division, stem cuttings, and seed propagation. Here is a detailed explanation of each method:
- Division: This method involves dividing the plant into smaller sections, each with its own root system. It can be done during the plant's active growing season, usually in spring or early summer.
- Start by carefully removing the plant from its pot or the ground, taking care not to damage the roots.
- Gently shake off excess soil to expose the root system.
- Identify natural divisions or create divisions by carefully separating the root mass into smaller clumps. Each clump should have healthy roots and an adequate number of stems or rosettes.
- Use a sharp, sterilized knife or pruning shears to make clean cuts, ensuring minimal damage to the plant.
- Plant each division in a separate pot or in the desired location in the garden, making sure to provide well-draining soil and proper watering.
- Stem Cuttings: This method involves taking a section of stem or a shoot from the parent plant and encouraging it to root and grow into a new plant.
- Select a healthy stem or shoot that is about 4-6 inches long, preferably without any flowers or buds.
- Use sharp, sterilized pruning shears to make a clean cut just below a leaf node (the area where leaves emerge along the stem).
- Remove any lower leaves, leaving only two or three leaves at the top.
- Place the cutting in a well-draining soil mix or a rooting medium specifically designed for cuttings.
- Optionally, you can dip the cut end of the stem in a rooting hormone powder or gel to aid in root development.
- Place the cutting in a warm and bright location with indirect sunlight.
- Keep the soil slightly moist but not overly wet, as excessive water can lead to rot.
- After a few weeks, the cutting should develop roots. Once the roots are well-established, you can transplant the cutting into its permanent pot or garden location.
- Seed Propagation: This method involves collecting and sowing seeds from mature Euphorbia Buruana plants.
- Wait until the plant produces seeds, usually after flowering.
- Collect the ripe seeds by gently shaking them out into a container.
- Clean the seeds by removing any debris or chaff.
- Fill a seed tray or small pots with a well-draining soil mix suitable for seed germination.
- Sow the seeds on the surface of the soil, lightly pressing them down, but do not cover them with soil as they require light to germinate.
- Mist the soil surface to moisten it, or you can water it from below by placing the tray in a shallow dish filled with water until the soil is evenly moist.
- Place the tray or pots in a warm location with indirect sunlight.
- Keep the soil consistently moist but not waterlogged.
- Germination usually occurs within a few weeks.
- Once the seedlings are large enough to handle, you can transplant them into individual pots or their permanent garden location.
Remember to label your propagated Euphorbia Buruana plants to keep track of their origin and growth progress. Additionally, be cautious when handling Euphorbia plants, as they often produce a milky sap that can cause skin irritation, and ensure proper ventilation when working with the sap.


