Plant Overview
Often referred to as the "Armored Spurge," Euphorbia loricata looks like a botanical relic from a prehistoric era. Hailing from the rugged landscapes of South Africa’s Great Karoo, this succulent shrub is prized for its architectural form, featuring thick, "armored" stems topped with a wild crown of slender leaves. It is the perfect choice for enthusiasts who love the rugged look of a cactus but want the leafy charm of a tropical plant.
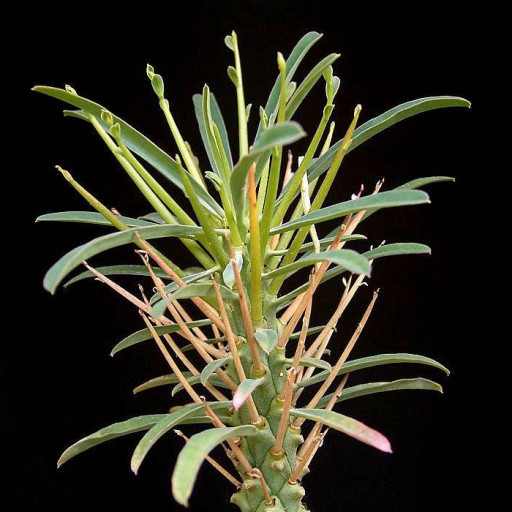
🔍 How to Identify
- 🛡️ The Stem: The main body is a cylindrical, succulent trunk covered in prominent, shield-like scars called tubercles, which give the plant its "armored" appearance.
- 🍃 The Foliage: Long, narrow, willow-like leaves grow in a dense tuft at the very tips of the branches, creating a striking contrast against the rugged wood-like stem.
- 🌵 The "Thorns": What look like thorns are actually persistent dried flower stalks (peduncles). They are blunt rather than needle-sharp but give the plant a prickly, defensive silhouette.
🏡 In Your Garden
- ☀️ Sun Seeker: This plant craves high light levels to maintain its compact, "armored" look. If kept in the shade, the new growth will become thin, weak, and pale, losing its signature prehistoric charm.
- 💧 Drought Specialist: Like many South African succulents, it stores water in its thick stem. It is highly sensitive to "wet feet," so ensure your potting mix is incredibly gritty. It prefers to remain almost completely dry during its winter dormancy period.
- 🪴 Root Sensitivity: Euphorbia loricata develops a significant taproot and does not enjoy being moved frequently. When repotting, be extra gentle to avoid snapping the roots, which can lead to fungal infections.
⚠️ Safety & Toxicity
- 🚫 Toxic Sap: Like all members of the Euphorbia family, this plant contains a milky white latex sap that is highly irritating.
- 👁️ Irritant: The sap can cause localized skin rashes and is extremely dangerous if it gets into the eyes. Always wear gloves when pruning or repotting.
- 🐾 Pet Warning: Keep this plant out of reach of curious cats and dogs; ingestion can cause mouth irritation, drooling, and digestive distress.
✨ Fun Fact
The species name loricata comes from the Latin word lorica, which refers to the "lorica segmentata"—the iconic plate armor worn by ancient Roman legionaries. The plant's scarred stem perfectly mimics the look of overlapping metal plates!

Detailed Care Instructions
To grow Euphorbia Loricata, also known as the African Milk-tree, you can follow these steps:
- Choosing the Right Location: Euphorbia Loricata requires a sunny location with at least 6 to 8 hours of direct sunlight per day. It can tolerate some shade but may not grow as vigorously.
- Soil Preparation: The plant prefers well-draining soil. Mix sand or perlite with regular potting soil to ensure good drainage. A cactus or succulent mix can also work well.
- Potting: Select a pot with drainage holes and fill it with the prepared soil mix. Ensure that the pot is large enough to accommodate the plant and has room for growth.
- Planting: Carefully remove the plant from its nursery pot and plant it in the prepared pot. Gently firm the soil around the roots to stabilize the plant.
- Watering: Euphorbia Loricata is a succulent and stores water in its stems and leaves. Water it sparingly, allowing the soil to dry out between waterings. Overwatering can lead to root rot. The plant is drought-tolerant, but it's always better to underwater than to overwater.
- Fertilization: Euphorbia Loricata doesn't require frequent fertilization. A balanced, diluted liquid fertilizer formulated for succulents can be applied once or twice during the growing season. Follow the instructions on the fertilizer packaging for the correct dosage.
- Pruning: Prune the plant sparingly to maintain its shape and remove any dead or damaged parts. Be cautious when handling Euphorbia Loricata as it produces a milky sap that can cause skin irritation or be toxic if ingested.
- Propagation: African Milk-trees can be propagated from stem cuttings. Allow any cuttings to dry for a few days before planting them in well-draining soil mix. Keep the soil slightly moist until the cuttings establish root systems.
- Pests and Diseases: Euphorbia Loricata is relatively pest-resistant, but it can occasionally be affected by scale, mealybugs, or spider mites. Inspect your plant regularly and treat any infestations promptly using insecticidal soap or horticultural oil.
- Winter Care: If you live in a region with frost or cold winters, it's advisable to bring your Euphorbia Loricata indoors to a bright, cool location during the winter months. Protect it from drafts and avoid overwatering during this period.
Remember, Euphorbia Loricata is a succulent that requires minimal care. With proper sunlight, well-draining soil, and careful watering, it should thrive and grow into a beautiful plant.

Place in a bright room that is sun drenched almost all day. Or directly in a south-facing window.

The plant in question belongs to the Euphorbia family and requires a specific watering routine. To water this plant, you should wait until the soil is completely dry before watering again. Overwatering can cause root rot and other issues, so it is important to monitor the soil moisture carefully. When watering, pour water directly onto the soil and aim to saturate the top few inches of soil. It is important to avoid getting water on the leaves or stems, as this can cause damage or promote fungal growth. To ensure proper drainage, make sure the pot has sufficient drainage holes and that excess water is able to escape. When watering, it is better to water deeply and infrequently rather than giving the plant small amounts of water frequently.
For optimal growth of this particular plant, use a balanced fertilizer with equal amounts of nitrogen, phosphorus, and potassium. Apply the fertilizer according to the manufacturer's instructions, typically once a month during the growing season. Be careful not to over-fertilize, as this may cause the plant to become leggy and weak. Water the plant thoroughly before and after fertilizing. Avoid getting fertilizer on the foliage or stem, as it may cause burning or damage.
When planting Euphorbia Loricata, it is recommended to use a well-draining soil mixture that is rich in nutrients. The soil should be slightly acidic, with a pH between 5.5 and 6.5. A mixture of peat moss, sand, and perlite is a good choice for this plant. It is important to avoid using heavy or compacted soils that can lead to root rot. When planting, make sure to place the roots in the soil and water thoroughly. Allow the soil to dry out between watering to prevent over-watering, which can also lead to root rot. As with many succulent plants, it is important to provide good drainage and avoid excessive soil moisture.
Euphorbia Loricata plant can be propagated through stem cuttings. First, locate a healthy stem on the parent plant and cut a section of it using a sharp, sterile knife or scissors. The cutting should be approximately 4-6 inches long and have several sets of leaves.
Once the cutting is prepared, allow it to dry out and callus over for a few days in a shaded and dry location. After this time has passed, the cutting can be planted in a well-draining potting mix. Choose a pot with drainage holes and fill it with a mix of peat, perlite, and sand. Make a hole in the soil and insert the cutting, gently pressing the soil around it.
Water the cutting thoroughly and insert it into a plastic bag or cover it with a clear plastic dome to create a humid environment. Place the cutting in bright, indirect light and water it as needed to keep the soil moist but not waterlogged.
After a few weeks, new growth should appear, indicating that the cutting has successfully rooted. The plastic covering can then be gradually removed, and the new plant can be acclimated to its new growing conditions.
Common pests of the hedgehog milkbush include Scale insect, mealybugs, spider mites. Make a habit of checking your hedgehog milkbush frequently for pests so that any infestations can be caught and managed early.


