Plant Overview
Known as the Dhamasa plant across the arid stretches of North Africa, the Middle East, and India, Fagonia arabica is a true master of desert survival. This resilient, spiny sub-shrub is a staple in traditional Ayurvedic and folk medicine, where it is often referred to as a "coolant" for the body. Despite its rugged, thorny appearance, it surprises onlookers with delicate, star-shaped purple blossoms that brave the harshest midday sun.
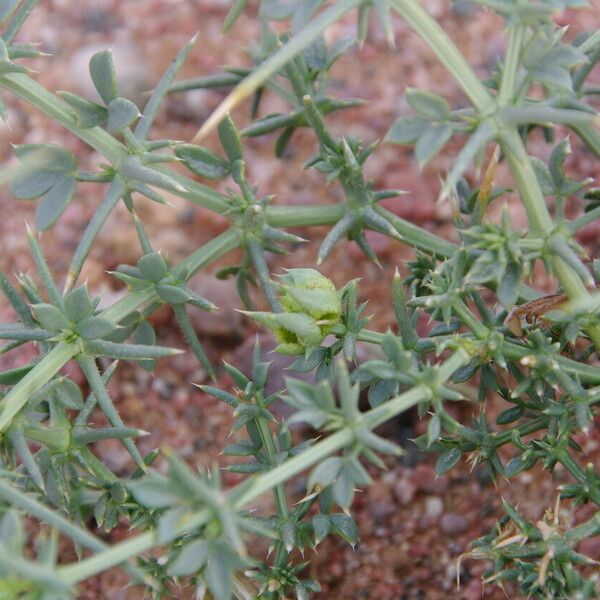
🔍 How to Identify
- 🌵 The Spines: The plant is heavily armed with sharp, green, needle-like thorns that grow in pairs at the base of the leaves, helping it deter hungry desert animals.
- 🌸 The Flowers: Look for tiny, five-petaled flowers ranging from pale lilac to deep pink. They appear sporadically throughout the year, appearing almost like jewels among the thorns.
- 🌿 The Leaves: It features small, narrow, trifoliate (three-part) leaves that are often sparse or fall off during extreme droughts to help the plant conserve precious moisture.
🏡 In Your Garden
- ☀️ Sun Worshiper: This plant requires full, intense sunlight to thrive. It is physically incapable of dealing with shade and will quickly become "leggy" or rot if kept in dark, damp corners.
- 🏜️ Drainage is Key: In a garden setting, it mimics its desert home. It prefers sandy, rocky, or poor-quality soil. The "why" behind its toughness is its deep taproot, which anchors it against winds and reaches deep for water; however, this makes it hate being transplanted. Once you plant it, leave it be!
⚠️ Safety & Toxicity
- 🩹 Physical Hazard: While not chemically poisonous to the touch, the spines are incredibly sharp and can easily puncture skin or pet paws. Wear heavy-duty gloves when pruning.
- 🐾 Pet Safety: It is generally considered non-toxic if nibbled, but the structural thorns pose a significant choking and internal injury risk to curious dogs or cats.
- 🍵 Medicinal Warning: While used in traditional teas and extracts, never ingest this plant without expert consultation, as concentrations of active compounds can vary wildly.
✨ Fun Fact
In some regions, Fagonia arabica is known as the "Green Pharmacy" because traditional healers believe it can treat everything from skin allergies to digestive issues, making it one of the most respected wild plants in desert folklore.

Detailed Care Instructions
To grow Fagonia Arabica plant, follow the steps below:
- Climate: Ensure that you live in a suitable climate for Fagonia Arabica. It thrives in warm regions with full sun exposure.
- Soil: Use well-draining soil with a pH level between 7 and 8. Fagonia Arabica can tolerate a wide range of soil types, including sandy or loamy soil.
- Seed selection: Purchase Fagonia Arabica seeds from a reputable source. You can also collect seeds from mature plants if available.
- Planting: Sow the seeds directly into the prepared soil during the spring season. Space the seeds at least 12 inches apart, as this plant can spread.
- Watering: Initially, keep the soil consistently moist until the seedlings establish. Once established, water the plant moderately, allowing the soil to dry slightly between waterings. Avoid overwatering, as it can lead to root rot.
- Fertilization: Use a balanced organic fertilizer during the growing season to promote healthy growth. Follow the instructions on the fertilizer packaging for proper application.
- Pruning: Prune the plant in early spring to remove any dead or damaged branches and to maintain a compact shape. This will encourage new growth and better flowering.
- Pests and diseases: Keep an eye out for any signs of pests or diseases, such as aphids or powdery mildew. If detected, treat the plant promptly with the appropriate organic insecticides or fungicides.
- Support: As Fagonia Arabica grows, it may require support in the form of stakes or trellises. Provide support to prevent the plant from falling over or sprawling.
- Harvesting: Fagonia Arabica produces small yellow flowers, which can be harvested for medicinal purposes. Wait until the flowers fully open and then gently pluck them. Dry the flowers in a well-ventilated area before storage.
Remember to always consult a local gardening expert or agricultural extension service for specific guidance tailored to your region and climate.
- Research the specific watering needs of the plant, as different plants have different moisture requirements.
- Look at the soil in which the plant is planted to determine if it is dry or moist.
- If the soil is dry, gradually add water to the base of the plant until the soil is evenly moist. Avoid overwatering as it can lead to root rot.
- Water the plant deeply, so that the water reaches the roots, rather than just the surface of the soil.
- Check the soil moisture regularly and adjust the watering schedule as necessary based on the needs of the plant.
- If the plant is in a container, make sure it has proper drainage to avoid waterlogging.
- Consider using a watering can or a hose with a nozzle to control the flow of water and prevent excess runoff.
- Avoid watering during the hottest part of the day to allow the water to be fully absorbed into the soil.
To fertilize the Fagonia Arabica plant, use a balanced, water-soluble fertilizer with an NPK ratio of 10-10-10 or 20-20-20. Dilute the fertilizer according to the instructions on the package. Apply the fertilizer to the soil around the base of the plant, avoiding direct contact with the foliage. Be careful not to over-fertilize as it may cause damage. Fertilize the plant once every four to six weeks during the growing season, which is typically spring to fall. In winter months, reduce fertilization or cease it altogether since the plant is in a period of dormancy. Always water the plant thoroughly after fertilizing to ensure proper distribution and absorption of nutrients.
Fagonia Arabica plant requires a well-draining, mineral-rich soil that is slightly alkaline in pH. The soil should be a mixture of sand and gravel along with some organic matter such as compost. The plant prefers a soil that is not too rich in nutrients, as excess nutrients can cause the leaves to turn yellow. It is essential to keep the soil moist but not waterlogged. Overwatering can lead to root rot and damage the plant. It is also recommended to use a pH meter to monitor the soil's pH level regularly and adjust it accordingly if it deviates from the optimal pH range.
Fagonia Arabica can be propagated by taking stem cuttings. Select a healthy stem from the plant, making sure it has at least one node (a swollen area on the stem from which leaves emerge). Cut the stem at an angle just below a node using a sharp, sterile knife or scissors. Remove any leaves from the bottom half of the stem.
Prepare a pot with a well-draining soil mixture, such as a combination of sand, perlite, and peat moss. Make a hole in the soil and insert the cutting, ensuring that the bottom nodes are buried. Lightly tamp down the soil around the cutting to secure it in place.
Water the cutting thoroughly and place it in a location with bright, indirect sunlight. Keep the soil moist but not waterlogged, as excess moisture can cause the cutting to rot. Within a few weeks, new growth should emerge from the nodes on the stem. Once the cutting has established roots and is growing vigorously, it can be transplanted into a larger pot or into the ground.


