Plant Overview
Often called the Green Strawberry or Creamy Strawberry, Fragaria viridis is the wild, sophisticated cousin of your standard garden fruit. While most strawberries turn deep red and soft when ripe, this hardy perennial keeps a pale, lime-tinted complexion and offers a zesty, pineapple-like crunch. It is a favorite among European foragers who enjoy its unique "musky" aroma that stands out from typical store-bought berries.
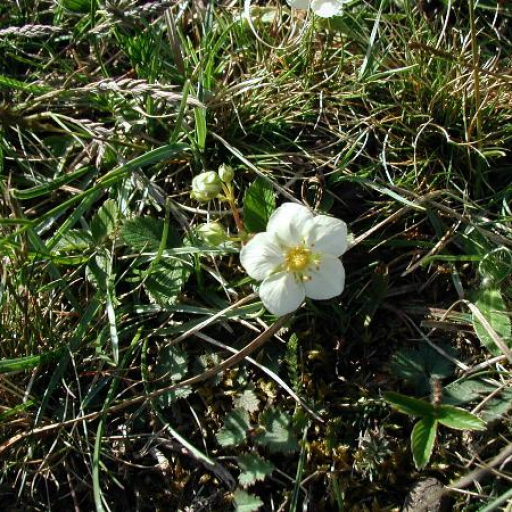
🔍 How to Identify
- 🍃 The Foliage: Look for "trifoliate" leaves (groups of three) with deep serrations; the undersides are notably silvery and silky due to a fine layer of hairs.
- 🌸 The Bloom: Small, five-petaled white flowers with bright yellow centers appear in late spring, sitting just slightly above the leaves.
- 🍓 The Fruit: The berries are small, firm, and globular. Unlike the common strawberry, the green "cap" (calyx) stays tightly attached, and the fruit often retains a greenish-white or pale pink hue even at peak ripeness.
🏡 In Your Garden
- 🧱 Soil Preference: Unlike many berries that demand acidic soil, the Green Strawberry is a "calcicole," meaning it actually prefers lime-rich or alkaline ground.
- 🌞 Drought Tolerance: It is much tougher than the average strawberry; it can handle drier, sunnier spots and is often found on grassy slopes or at the edges of forests where other berries might wither.
- 🏃 Slow Spread: While it does produce runners (stolons) to reproduce, it is much less aggressive than the common wild strawberry (Fragaria vesca), making it an excellent, well-behaved groundcover for rock gardens.
⚠️ Safety & Toxicity
- ✅ Status: Generally safe and edible.
- 🐾 Pets & Kids: The plant and its fruit are non-toxic to humans, dogs, and cats. However, as with all strawberries, individuals with specific berry allergies should exercise caution.
- 🧺 Foraging Tip: Always ensure the area hasn't been treated with pesticides or herbicides before tasting wild-grown berries.
✨ Fun Fact
In many regions, this plant is known as the "Crunchy Strawberry." This is because the fruit is so firmly attached to its stem that it makes a distinct "snap" or clicking sound when you pluck it—a sound you’ll never hear from a soft, supermarket strawberry!

Detailed Care Instructions
To grow Fragaria Viridis, also known as the Green Strawberry or Alpine Strawberry, follow these steps:
- Select a suitable location: Fragaria Viridis prefers full sun to partial shade. It can tolerate a wide range of soil types, but well-draining soil is essential. Choose an area where the plant will receive at least 6 hours of direct sunlight per day.
- Prepare the soil: Remove any weeds or debris from the planting area. Loosen the soil with a garden fork or tiller and amend it with organic matter such as compost or well-rotted manure to improve drainage and fertility.
- Propagation: Fragaria Viridis can be grown from seeds or propagated through division or runners. If growing from seeds, sow them in early spring or late summer directly into the prepared soil, pressing them lightly and covering them with a thin layer of soil. Keep the soil consistently moist until germination occurs, which typically takes around 3 weeks. For division or runners, carefully separate young plants or shoots from an established plant and transplant them into prepared soil.
- Watering: Keep the soil consistently moist, but avoid over-watering to prevent root rot. Water the plants deeply once or twice a week, depending on weather conditions. Mulching around the plants can help retain moisture in the soil.
- Fertilization: Fertilize the plants with a balanced organic fertilizer or compost in early spring and again in mid-summer. Follow the recommended dosage on the package or consult with a local garden center for guidance on the specific fertilizer.
- Pruning: Prune Fragaria Viridis plants regularly to remove any damaged or diseased leaves or runners. This will promote healthy growth and prevent overcrowding.
- Pest and disease control: Monitor the plants regularly for pests like aphids, slugs, or snails. Use organic pest control methods such as handpicking or using natural sprays if needed. Ensure good air circulation around the plants to prevent fungal diseases.
- Harvesting: Fragaria Viridis produces small, flavorful strawberries. Harvest them when fully ripe and enjoy fresh or use them in various recipes.
Remember to provide proper care and maintenance throughout the growing season to ensure healthy and productive Fragaria Viridis plants.

Place in a bright room that is sun drenched almost all day. Or directly in a south-facing window.

To properly water this plant, it is important to consider its growing conditions and needs. The plant requires a good amount of moisture, but it also needs good drainage to prevent the roots from becoming waterlogged and rotting. It is recommended to water it deeply and thoroughly, allowing the soil to become moist but not soaked.
One way to ensure proper watering is to check the moisture level of the soil regularly. This can be done by sticking your finger about an inch into the soil to feel if it is dry or not. If the soil feels dry, then it’s time to water the plant.
In general, it is better to water this plant in the morning or early afternoon to allow the leaves to dry before the evening. Wet foliage can lead to fungal diseases.
It’s also important to be careful not to over-water the plant, as this can lead to root rot and other problems. Once a week is usually sufficient, although this may vary depending on the temperature, humidity and sunlight levels in the plant’s environment.
Overall, it is important to pay close attention to the plant’s needs and adjust watering accordingly to ensure it thrives.
To fertilize Fragaria Viridis, use a balanced fertilizer with an NPK ratio of 10-10-10. Apply the fertilizer in early spring and again in mid-summer. Use a low dose, such as 1/4 cup per plant, and apply it evenly around the base of the plant. Water thoroughly after applying the fertilizer. Avoid fertilizing in the fall and winter as this can encourage new growth that may be damaged by cold weather.
Fragaria Viridis plant thrives in well-draining soil that is rich in nutrients but not overly fertile. The ideal soil mix should have a pH range of 5.5 to 7.5 and should have good structure to allow for proper aeration and water drainage. The plant prefers slightly sandy loam or loamy soil with a good mixture of organic matter like compost or peat moss to boost nutrients. Avoid using heavy clay soils or soils that are too alkaline as they can lead to poor growth and development of the plant. It's best to amend the soil with organic matter regularly to maintain its fertility and structure. Additionally, it's crucial to avoid overwatering the plant as this can lead to root rot and other pest problems.
To propagate this type of plant, there are a few steps that need to be taken. The first step is to obtain a healthy plant. Once a healthy plant has been obtained, a cutting can be taken. The cutting should be taken from a healthy stem that is free from any signs of disease or damage. Once the cutting has been taken, it should be trimmed to remove any leaves or branches.
The next step is to prepare the cutting for planting. This can be done by dipping the cut end of the cutting in rooting hormone. Rooting hormone will help to promote the growth of new roots. Once the cutting has been dipped in rooting hormone, it can be planted in a pot filled with potting soil. The cutting should be planted so that the cut end is buried in the soil.
The pot should be kept in a warm and humid location. This will help to promote the growth of new roots. The soil should be kept moist, but not wet. Overwatering can cause the cutting to rot.
After a few weeks, the cutting should have developed new roots. At this point, it can be planted in a larger pot or in the ground. The new plant should be watered regularly and fertilized as needed to encourage healthy growth. With proper care, the new plant will grow and develop into a healthy and productive plant.


