Plant Overview
Known affectionately as the Sierra Buckthorn, this resilient shrub is a crown jewel of the Western North American mountains. Its name, rubra, hints at its most striking feature—the deep reddish-maroon hue of its young twigs that adds a pop of color to the rugged landscapes of the Sierra Nevada. It’s a plant that tells a story of survival, thriving in thin mountain soils where others might struggle.
🔍 How to Identify
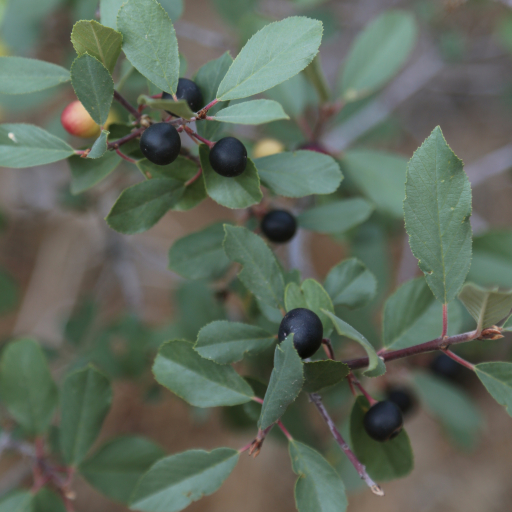
- 🌿 The Foliage: Look for oval-shaped, deciduous leaves with very prominent, straight parallel veins that give the leaf a "ribbed" or pleated texture.
- 🍷 The Stems: Younger branches and twigs typically sport a distinctive reddish to purplish-brown bark, which contrasts beautifully with the green leaves.
- 🍒 The Berries: In late summer, the plant produces small, fleshy fruits that transition from a bright, tempting red to a deep, glossy black when fully ripe.
🏡 In Your Garden
- ⛰️ High-Altitude Native: Because it is adapted to mountain slopes, it prefers well-draining, rocky, or sandy soil. It is an excellent choice for "wild" gardens or restoration projects aimed at supporting local ecology.
- 🦋 A Butterfly Nursery: This plant plays a critical role in the lifecycle of the Pale Tiger Swallowtail butterfly. Its leaves serve as a primary food source for their caterpillars, making it a "must-have" for conservation-minded gardeners.
⚠️ Safety & Toxicity
- 🤢 Mildly Toxic: While birds love the berries, they are generally considered inedible for humans and can cause significant nausea or "digestive distress" if consumed.
- 🐾 Pet Safety: The bark and berries contain anthraquinones, which act as a strong laxative. It is best to keep this plant away from curious dogs or cats who might be tempted to nibble on the low-hanging branches.
✨ Fun Fact
The Sierra Buckthorn belongs to the same family as the plant used to make "Cascara Sagrada," a famous historical laxative. While the Sierra variety is milder, early settlers and indigenous groups recognized the powerful medicinal—and often explosive—properties of the buckthorn family's bark!

Detailed Care Instructions
Growing Frangula rubra, often known as redtwig dogwood, can be a rewarding experience given its attractive red stems and foliage. Here are steps to successfully grow this plant:
Planting
- Select the Right Location:
- Sunlight: Frangula rubra prefers full sun to partial shade. It should receive at least 6 hours of direct sunlight daily.
- Soil: Opt for well-draining soil that is rich in organic matter. While it can tolerate various soil types, it thrives best in slightly acidic to neutral pH (6.0-7.0).
- Sunlight: Frangula rubra prefers full sun to partial shade. It should receive at least 6 hours of direct sunlight daily.
- Planting Time:
- The ideal time to plant Frangula rubra is in early spring or early fall. This allows the plant to establish roots before the extreme temperatures of summer or winter.
- The ideal time to plant Frangula rubra is in early spring or early fall. This allows the plant to establish roots before the extreme temperatures of summer or winter.
- Planting Process:
- Spacing: Space the plants about 3-4 feet apart to allow adequate room for growth.
- Digging the Hole: Dig a hole twice as wide and equal in depth to the root ball of the plant.
- Planting: Place the plant in the hole such that the top of the root ball is level with the surrounding soil. Backfill with soil, pressing gently to remove air pockets.
- Watering: Water thoroughly after planting to help settle the soil around the roots.
Care and Maintenance
- Spacing: Space the plants about 3-4 feet apart to allow adequate room for growth.
- Watering:
- Water regularly, especially during dry spells, to keep the soil consistently moist. However, avoid waterlogging.
- Water regularly, especially during dry spells, to keep the soil consistently moist. However, avoid waterlogging.
- Mulching:
- Apply a 2-3 inch layer of organic mulch (like wood chips or bark) around the base of the plant to help retain moisture, suppress weeds, and regulate soil temperature. Keep mulch a few inches away from the stem to prevent rot.
- Apply a 2-3 inch layer of organic mulch (like wood chips or bark) around the base of the plant to help retain moisture, suppress weeds, and regulate soil temperature. Keep mulch a few inches away from the stem to prevent rot.
- Pruning:
- Prune in late winter or early spring before new growth emerges. Remove dead or diseased branches and thin out crowded areas to improve air circulation.
- Cutting back some of the older stems to the ground every 2-3 years can promote vigorous new growth and maintain the plant’s vibrant red stems.
- Prune in late winter or early spring before new growth emerges. Remove dead or diseased branches and thin out crowded areas to improve air circulation.
- Feeding:
- Apply a balanced, slow-release fertilizer in early spring. Follow package instructions for the appropriate amount.
- Apply a balanced, slow-release fertilizer in early spring. Follow package instructions for the appropriate amount.
- Pest and Disease Control:
- While Frangula rubra is relatively pest and disease-resistant, keep an eye out for common issues like aphids or fungal diseases. Treat with insecticidal soap or fungicide as needed.
Propagation
- While Frangula rubra is relatively pest and disease-resistant, keep an eye out for common issues like aphids or fungal diseases. Treat with insecticidal soap or fungicide as needed.
- From Cuttings:
- Take softwood cuttings in late spring or early summer. Choose a healthy, non-flowering shoot and cut a 4-6 inch section just below a leaf node.
- Remove the lower leaves, dip the cut end in rooting hormone, and plant in a pot filled with a mix of moistened peat and perlite.
- Keep the cuttings in a warm, humid environment and water regularly until roots develop.
- Take softwood cuttings in late spring or early summer. Choose a healthy, non-flowering shoot and cut a 4-6 inch section just below a leaf node.
- From Seeds:
- Collect seeds from the plant in fall. Clean and dry the seeds, then stratify (cold-treat) them for several months by storing them in a moist medium (like sand or peat) in the refrigerator.
- Sow stratified seeds in spring in a well-draining seed-starting mix.
By carefully following these steps, you can successfully grow and maintain a healthy and vibrant Frangula rubra plant in your garden.
- Collect seeds from the plant in fall. Clean and dry the seeds, then stratify (cold-treat) them for several months by storing them in a moist medium (like sand or peat) in the refrigerator.

Frangula rubra is a plant that requires particular care when it comes to watering to ensure it thrives. Here’s a detailed guide on how to water it properly:
1. Soil Moisture:
- Consistent Moisture: The soil should be kept consistently moist but not waterlogged. Overly saturated soil can cause root rot, whereas too dry conditions can stress the plant.
- Drainage: Ensure the planting medium has good drainage. If potted, a container with drainage holes is essential.
2. Watering Frequency:
- Regular Watering: Water the plant regularly, especially during dry or hot periods. This might be every few days, but the frequency should be adjusted based on the local climate and soil conditions.
- Observation: Check the soil moisture by touching it; if the top inch of soil is dry, it’s time to water.
3. Method of Watering:
- Deep Watering: Water deeply to encourage the roots to grow deep into the soil. This can be achieved by watering slowly and allowing the water to penetrate deeply rather than just wetting the surface.
- Avoid Overhead Watering: While not critical, it's generally better to water at the base of the plant to minimize leaf wetness and reduce the risk of fungal diseases.
4. Seasonal Adjustments:
- Growing Season: During the active growth season (spring and summer), the plant will require more water. Adjust your watering schedule accordingly.
- Dormant Season: In the dormant period (fall and winter), the watering frequency can be reduced, as the plant’s water needs decrease.
5. Mulching:
- Mulch Layer: Applying a layer of organic mulch around the base of the plant can help conserve soil moisture, regulate soil temperature, and reduce weed competition. Keep the mulch a little away from the stem to prevent rot.
By paying attention to these details, you can ensure your Frangula rubra remains healthy and vigorous. Regular monitoring and adjusting based on the plant’s specific needs and environmental conditions are key to successful watering.
Frangula rubra, also known by its botanical name, is a type of shrub that can benefit from appropriate fertilization to ensure healthy growth. Here's how to do it:
- Soil Preparation: Before planting, enrich the soil with organic matter such as compost or well-rotted manure. This will provide a good nutrient base.
- Timing: Fertilize in early spring, just as new growth begins, and then again in mid-summer if the plant shows signs of nutrient deficiency.
- Type of Fertilizer:
- Balanced Fertilizer: Use a balanced, slow-release granular fertilizer with an equal ratio of nitrogen (N), phosphorus (P), and potassium (K), such as a 10-10-10 or 14-14-14 formulation.
- Organic Options: Another option is to use organic fertilizers like compost tea, fish emulsion, or seaweed extract, which can provide a broad range of nutrients.
- Balanced Fertilizer: Use a balanced, slow-release granular fertilizer with an equal ratio of nitrogen (N), phosphorus (P), and potassium (K), such as a 10-10-10 or 14-14-14 formulation.
- Application:
- Granular Fertilizer: Follow the instructions on the package regarding the amount but generally, you can sprinkle the fertilizer evenly around the base of the plant, keeping it a few inches away from the stem to avoid burning the roots. Lightly rake it into the topsoil, and then water thoroughly.
- Liquid Fertilizer: Dilute according to the manufacturer's instructions and apply directly to the soil around the base of the plant, ensuring not to wet the leaves excessively to prevent disease.
- Granular Fertilizer: Follow the instructions on the package regarding the amount but generally, you can sprinkle the fertilizer evenly around the base of the plant, keeping it a few inches away from the stem to avoid burning the roots. Lightly rake it into the topsoil, and then water thoroughly.
- Frequency:
- Granular: Apply every 6-8 weeks during the growing season, depending on the specific needs of your plant and the soil conditions.
- Liquid: Can be applied more frequently, typically every 2-4 weeks, as long as the plant shows good growth and no signs of over-fertilization.
- Granular: Apply every 6-8 weeks during the growing season, depending on the specific needs of your plant and the soil conditions.
- Monitoring: Keep an eye on the plant's growth and health. Yellowing leaves or stunted growth may indicate nutrient deficiencies, requiring an adjustment in your fertilizing schedule or the type of fertilizer used.
- Mulching: Applying a layer of organic mulch around the base of the plant helps retain soil moisture, suppress weeds, and gradually enrich the soil as it decomposes.
By following these guidelines, you should be able to maintain a healthy and thriving Frangula rubra.
Frangula rubra plants thrive best in well-drained soils that have ample organic matter. Here are some detailed points to consider when choosing or preparing soil for this species:
- Soil type: Loamy soils are ideal for this plant as they hold sufficient moisture while still allowing for good drainage. These soils have a balanced mixture of sand, silt, and clay.
- Organic Matter: Incorporating organic matter such as compost or well-rotted manure will improve soil structure, enhance nutrient content, and increase moisture retention capacity.
- pH Level: This plant prefers slightly acidic to neutral soils, with a pH range of 5.5 to 7.0. Test the soil pH and amend it if necessary using lime to raise pH or sulfur to lower it.
- Drainage: Good drainage is crucial to prevent waterlogging, which can lead to root rot. Ensure the soil is friable and consider the use of raised beds or planting on slopes to facilitate better drainage.
- Aeration: The soil should be well-aerated to allow roots to breathe. Compacted or heavy clay soils should be amended with organic matter or sand to improve aeration.
- Nutrient Content: Ensure the soil contains adequate levels of essential nutrients. A balanced slow-release fertilizer can be mixed into the soil at planting time, or periodic top-dressing with compost can help maintain fertility.
Preparing the soil with these conditions in mind will provide an optimal growing environment for the Frangula rubra, promoting healthy growth and development.
Propagating Frangula rubra can be accomplished through various methods, including seed, cuttings, and layering. Below are detailed steps for each method:
Propagation by Seed:
- Seed Collection: Collect seeds when the fruits are fully matured, usually in late summer to early fall.
- Seed Cleaning: Remove the flesh from the seeds and wash them to prevent mold.
- Stratification: Seeds often require a period of cold stratification to break dormancy. Store them in a moist medium like sand or vermiculite in a refrigerator for 60-90 days.
- Sowing: After stratification, sow the seeds in a well-draining soil mix. Place them about 0.5 cm deep.
- Germination: Maintain consistent moisture and place the container in a location with indirect sunlight. Germination can take several weeks to a few months.
- Transplanting: Once the seedlings have developed a couple of sets of true leaves, they can be transplanted to individual pots or directly into the ground.
Propagation by Cuttings:
- Selection: Choose healthy, semi-hardwood cuttings from a mature plant. Mid to late summer is ideal.
- Cutting Preparation: Cut sections around 10-15 cm long, ensuring each has at least 2-3 nodes.
- Rooting Hormone: Dip the cut end of each cutting into a rooting hormone to stimulate root growth.
- Planting Medium: Insert the cuttings into a well-draining medium like a mix of sand and peat moss.
- Environment: Place the cuttings in a humid environment, either under a plastic dome or in a propagator. Maintain a warm temperature (around 20-25°C).
- Care: Keep the medium moist but not waterlogged. Roots should develop in 4-8 weeks.
- Transplanting: Once roots are established, transplant the cuttings into individual pots.
Propagation by Layering:
- Selection: Choose a healthy, low-growing branch that can easily be bent to the ground.
- Preparation: Wound a section of the branch by making a small cut or removing a strip of bark to expose the cambium layer.
- Burying: Bend the wounded section of the branch to the ground and bury it in the soil, securing it with a peg or stone. The tip of the branch should remain above the ground.
- Care: Keep the soil around the buried part consistently moist.
- Root Development: Rooting can take several months. Once the new roots are well-developed, cut the new plant from the parent branch.
- Transplanting: Move the new plant to its desired location.
Each propagation method has its own advantages. Seeds are good for creating many plants at once, cuttings provide clones of the parent plant, and layering can be an easier method with a higher success rate but is limited to fewer new plants at a time.


