Plant Overview
Often called the Scrambling Lily or Shepherd’s Joy, this elegant evergreen climber is a hidden gem of the Australian rainforest and coastal scrub. Unlike many aggressive vines that strangle their hosts, the Scrambling Lily gently weaves its way through the undergrowth, offering a delicate display of hanging blossoms. It is beloved by native gardeners for its ability to add vertical greenery to shady spots without taking over the entire yard.
🔍 How to Identify
- 🌿 The Foliage: The leaves are glossy, dark green, and remarkably stiff. They feature distinct parallel veins and grow in an alternate pattern along wiry, "zigzagging" stems.
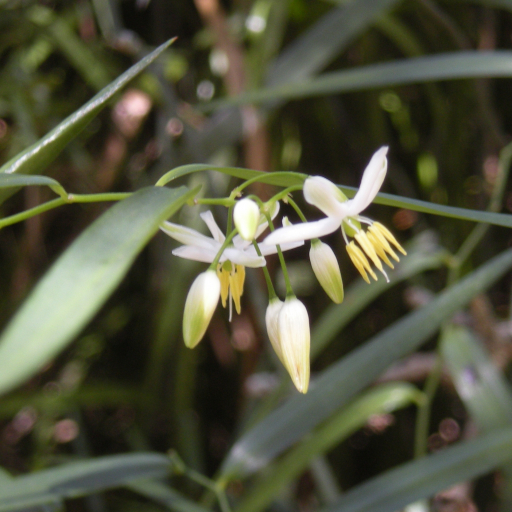
- 🔔 The Flowers: In spring and summer, the plant produces small, drooping, bell-shaped flowers. They are typically white to pale mauve with prominent yellow anthers that hang downward like tiny chandeliers.
- 🫐 The Fruit: After flowering, the plant develops small, succulent round berries. These start green and ripen into a deep, glossy black or dark purple-blue.
🏡 In Your Garden
- 🧗 The Scrambler: This plant is a "scrambler," meaning it doesn't have tendrils to grip surfaces. It needs to lean against a trellis, a fence, or a sturdy shrub to find its way upward.
- 💧 The Comfort Zone: It thrives in "dappled light"—think of the floor of a forest. While it is quite hardy once established, it prefers moist, well-draining soil and a thick layer of mulch to keep its roots cool.
- ✂️ Low Maintenance: Because it is a slow-to-moderate grower, it rarely requires heavy pruning. It’s a "set and forget" plant that provides year-round texture and occasional pops of floral color.
⚠️ Safety & Toxicity
- 🟢 Non-Aggressive: Unlike invasive weeds, this native lily is safe for the local ecosystem and won't outcompete your other garden favorites.
- 🐾 General Precaution: While the young shoots of this plant were historically eaten by Indigenous Australians (similar to asparagus), the ripe berries and older foliage can cause stomach upset in humans and pets. It is best treated as an ornamental plant rather than a food source.
✨ Fun Fact
The name Geitonoplesium comes from the Greek words geiton (neighbor) and plesion (near), referring to how closely this plant resembles its cousin, the Eustrephus latifolius (Wombat Berry). They are often found growing right next to each other in the wild!

Detailed Care Instructions
To grow Geitonoplesium cymosum, also known as the Australian fuchsia or native fuchsia, follow these steps:
- Climate and Location: Geitonoplesium cymosum is a native plant to Australia. It thrives in a subtropical or tropical climate but can also adapt to a variety of conditions. Choose a location with partial shade or filtered sunlight. If you have a cool climate, grow it in a greenhouse or indoors.
- Soil: Geitonoplesium cymosum prefers a well-draining soil that is rich in organic matter. It can tolerate slightly acidic to slightly alkaline soil. Amend the soil with compost if necessary to improve its fertility and drainage.
- Planting: Take a cutting from an existing Geitonoplesium cymosum plant or purchase a young seedling from a reputable nursery. Plant it in the prepared soil at the same depth it was growing before. Water the plant thoroughly after planting.
- Watering: Geitonoplesium cymosum requires regular watering to keep the soil consistently moist but not waterlogged. During the warmer months, water the plant deeply once or twice a week. Reduce watering during winter when the plant is in the dormant phase.
- Fertilizer: Apply a balanced, slow-release fertilizer during the growing season to provide necessary nutrients. Follow the package instructions for application rates. Avoid over-fertilization, as it can lead to excessive foliage growth and reduce flower production.
- Pruning: Geitonoplesium cymosum benefits from light pruning to maintain its shape and promote bushier growth. After the plant finishes flowering, trim back the longer branches to encourage branching and new growth. Remove any dead or diseased parts throughout the year.
- Mulching: Apply a layer of organic mulch around the base of the plant to retain moisture, suppress weeds, and provide extra nutrients as it breaks down. Avoid placing mulch directly against the stem to prevent rot.
- Propagation: Geitonoplesium cymosum can be propagated from seeds or cuttings. For seeds, collect ripe berries from the plant, remove the pulp, and dry the seeds before planting. For cuttings, take 4-6 inch stem cuttings from a healthy plant and root them in a moist potting mix.
- Pests and Diseases: Geitonoplesium cymosum is generally resistant to pests and diseases. However, keep an eye out for common garden pests like aphids, scale insects, and caterpillars. Treat infestations with insecticidal soap or other organic pest control methods if necessary.
By following these guidelines, you can successfully grow Geitonoplesium cymosum and enjoy its beautiful flowers and foliage in your garden or indoor space.

Geitonoplesium Cymosum plant prefers to be watered regularly but not excessively. It is important to let the top layer of soil dry out slightly before watering again. When watering, pour the water slowly at the base of the plant until water starts to come out of the bottom of the pot. Avoid letting the plant sit in standing water. Additionally, misting the plant with a spray bottle can help provide added humidity.
To fertilize this plant, use a balanced fertilizer with equal amounts of nitrogen, phosphorus, and potassium. Feed the plant every two to four weeks during the growing season, which is typically spring through fall. Dilute the fertilizer to half strength and apply it to the soil around the base of the plant. Avoid getting the fertilizer on the leaves or stems, as this can cause burn marks. Water the plant thoroughly after fertilizing to help the nutrients reach the roots.
Geitonoplesium cymosum prefers a well-draining soil that is rich in organic matter. The soil should be slightly acidic with a pH between 5.5 and 6.5. A soil mix with peat moss, perlite, and sand can be ideal as it provides good drainage and aeration. Adding some compost to the soil can also enhance the nutrient availability for the plant. It is important to maintain adequate soil moisture levels, but avoid waterlogging the soil. Overly wet soil can cause root rot, which can damage or kill the plant.
Geitonoplesium cymosum plant can be propagated through stem or tip cuttings. Firstly, select a healthy and mature stem from the parent plant and cut it at an angle of approximately 45 degrees using a sharp and sterilized pruning shear. The cutting should be about 4-6 inches long and have at least one node where a leaf attaches to the stem.
Remove all the leaves from the lower half of the stem to ensure that the cutting can focus its energy on rooting instead of sustaining leaves. Dip the bottom end of the cutting in rooting hormone powder and insert it in moist potting soil. The soil should be well-draining but able to hold moisture to aid in root development.
Place the potted cutting in a warm and humid spot, away from direct sunlight. Water the cutting regularly to keep the soil moist but not waterlogged. After a few weeks, the cutting should develop roots and new growth. At this point, the plant can be transferred to a larger pot with well-draining soil, or it can be planted directly in the ground.
Overall, propagating Geitonoplesium cymosum is a rewarding and straightforward process that ensures the continued growth and vibrancy of this unique and beautiful plant specimen.


