Plant Overview
Often called the "Mourning Widow" or "Dusky Cranesbill," this plant is the moody, elegant star of the shade garden. Native to the damp woodlands of Europe, it earned its somber nicknames from its uniquely dark, chocolate-purple to nearly black flowers. It is a hardy favorite for gardeners who want a touch of gothic beauty in those tricky, sun-starved corners of the yard.
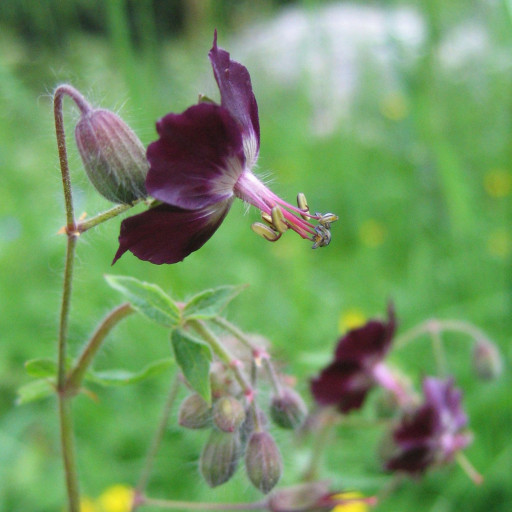
🔍 How to Identify
- 🌸 Reflexed Petals: The small flowers have petals that point backward, exposing the central "beak" and giving them a shuttlecock-like appearance.
- 🎨 Velvety Colors: While most varieties are a deep, bruised purple, some range from maroon to a ghostly lavender-grey.
- 🍃 Spotted Foliage: The large, palm-shaped leaves are soft to the touch and frequently feature dark, brownish-purple blotches near the center.
🏡 In Your Garden
- 🌑 The Shade Specialist: This is one of the few perennials that can handle "dry shade." It is perfect for planting under large trees or along north-facing walls where other flowers might struggle to survive.
- ✂️ Self-Seeding Habit: It is a prolific spreader. If you want to keep it contained, cut the plant back to the ground after the first bloom—this prevents unwanted seedlings and encourages a fresh flush of beautiful new leaves.
⚠️ Safety & Toxicity
- 🟢 Low Risk: Geranium phaeum is generally considered non-toxic to humans, dogs, and cats, making it a safe choice for family gardens.
- 🧤 Skin Sensitivity: Like many garden plants, the sap contains natural oils that can cause mild skin irritation or a "stinging" sensation for individuals with very sensitive skin; wearing gloves while pruning is recommended.
✨ Fun Fact
The common name "Cranesbill" refers to the plant’s seed pod, which looks exactly like the long, pointed beak of a crane. When the seeds are ready, the pod acts like a tiny catapult, springing open to hurl the seeds several feet away from the mother plant!

Detailed Care Instructions
To grow Geranium phaeum, also known as Dusky Cranesbill, follow these steps:
- Choose a suitable location: Select a spot in your garden that receives partial shade to full shade. Geranium phaeum prefers morning sun and afternoon shade or filtered light.
- Prepare the soil: The plant thrives in well-draining soil rich in organic matter. Add compost or well-rotted manure to improve soil fertility and drainage. Remove any weeds or grass from the planting area.
- Planting: Plant Geranium phaeum in early spring or fall. Dig a hole around twice the size of the plant's rootball. Place the plant in the hole, ensuring that the crown (where the roots meet the stems) is level with or slightly above the soil surface. Backfill the hole with soil and gently firm it around the plant.
- Watering: Water the plant thoroughly after planting to ensure the soil settles around the roots. Keep the soil evenly moist but not waterlogged. Water during dry spells or when the top inch of soil feels dry. Avoid overwatering, as it can cause root rot.
- Mulching: Apply a layer of mulch around the plant to conserve moisture, suppress weed growth, and maintain an even soil temperature. Use organic mulch like wood chips, straw, or leaves.
- Fertilizing: Geranium phaeum doesn't require excessive fertilization but can benefit from a balanced granular fertilizer once or twice during the growing season. Follow the package instructions for application rates.
- Pruning: Deadhead spent flowers regularly to encourage continuous blooming and prevent self-seeding. Cut back the plant to the ground in late autumn or early spring to remove dead foliage and buds and promote new growth.
- Division: Every 3-4 years, divide mature Geranium phaeum clumps to improve their vigor and promote better flowering. Dig up the plant and carefully separate the root clumps.
- Pests and diseases: Geranium phaeum is generally resilient to pests and diseases. However, watch out for aphids, slugs, and snails. Treat them with organic pest control methods if necessary.
With proper care and maintenance, your Geranium phaeum plant should thrive and provide you with beautiful blooms for many years to come.

Place in a window with dappled sun or a spot in the middle of a room. Or directly in a window facing west or east.

To properly water this plant, it is important to make sure that the soil is always moist but not waterlogged. It is recommended to water the plant deeply and infrequently, rather than giving it small amounts of water frequently. This will encourage the roots to grow deeper into the soil and help the plant to become more drought-tolerant. It is also important to allow the top layer of soil to dry out slightly before watering again. If the plant is grown in a container, make sure that there is proper drainage to avoid waterlogged soil. Additionally, it is best to water the plant in the morning or early evening to avoid water evaporation during the hottest part of the day.
To fertilize this plant, use a balanced fertilizer with equal amounts of nitrogen, phosphorus, and potassium. Apply the fertilizer every two weeks during the growing season, starting in early spring. You can also use organic fertilizers such as compost or worm castings. Avoid over-fertilizing as this plant prefers a slightly lean soil.
Geranium Phaeum is a popular herbaceous plant that requires well-draining soil with adequate moisture retention. The soil should have a pH range of 6.0 to 7.5 and be rich in organic matter. A mixture of equal parts of peat moss, perlite, and sand can be used for planting, along with a slow-release fertilizer. The plant prefers a slightly acidic soil that is not too alkaline. Adequate drainage is crucial, as the plant may not thrive in waterlogged soil. It is best to plant Geranium Phaeum in a location where it receives partial sun or dappled shade.
To propagate this plant, select a healthy parent plant and carefully remove a stem segment with a sharp, sterile knife or scissors. The stem segment should be around 4-5 inches long and contain several nodes.
Remove any leaves or flowers from the lower third of the stem to reduce stress on the cutting. Dip the cut end into rooting hormone powder and gently tap off any excess.
Fill a small pot with a well-draining soil mix and make a hole in the center. Insert the cutting into the hole and gently press the soil around it to secure it in place.
Water the cutting well and cover the pot with a plastic bag or clear plastic wrap to create a humid environment.
Place the pot in bright, indirect light and keep the soil moist but not waterlogged. It's important to monitor the cutting for signs of wilting, which may indicate the soil is too wet or too dry.
In around 4-6 weeks, the cutting should start to produce roots and new growth. Once the plant has established a good root system, it can be transplanted into a larger pot or into the ground.


