Plant Overview
Often called the "Corn Marigold," Glebionis segetum is a radiant annual that once turned European grain fields into oceans of shimmering gold. While farmers historically viewed it as a stubborn weed, modern gardeners cherish it for its cheerful, long-lasting blooms and its ability to attract vital pollinators. In some cultures, it was so pervasive that ancient laws were once enacted to force landowners to remove it from their crops to protect the harvest.
🔍 How to Identify
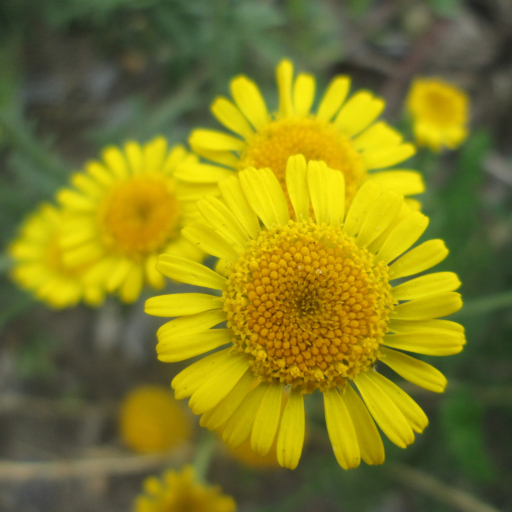
- 🌼 Brilliant Blooms: Features daisy-like flower heads up to 2 inches (5cm) wide. Unlike many daisies with white petals, both the central disc and the surrounding ray petals are a uniform, vivid golden-yellow.
- 🍃 Waxy Foliage: The leaves are a distinct blue-green (glaucous) color, deeply lobed or coarsely toothed, and have a slightly fleshy, succulent-like texture that helps the plant retain moisture.
- 🌱 Upright Stature: It grows as a branching annual, typically reaching 1 to 2 feet in height, with sturdy stems that hold the flowers high above the ground.
🏡 In Your Garden
- ☀️ Sun Seeker: This plant is an absolute sun-worshipper. It requires full light to keep its stems strong; in shady spots, it tends to become "leggy" and flop over as it stretches toward the sun.
- 🧪 Soil & Disturbance: It thrives in well-drained, slightly acidic sandy or loamy soils. It is a pioneer species that loves "disturbed" ground, making it an excellent choice for a new wildflower meadow or a low-maintenance cottage garden.
- 🦋 Wildlife Value: Because it produces nectar and pollen consistently from midsummer through the first frost, it is a high-priority refueling station for hoverflies, bees, and butterflies.
⚠️ Safety & Toxicity
- 🛡️ General Status: Generally considered non-toxic to humans and common pets, but it is not intended for consumption.
- 🖐️ Skin Sensitivity: Like many members of the Asteraceae (Daisy) family, the sap can cause mild skin irritation or "contact dermatitis" in sensitive individuals. It’s a good idea to wear gloves if you are thinning out a large patch.
✨ Fun Fact
In 13th-century Scotland, the Corn Marigold was such a threat to agriculture that "Gool Riders" were appointed to inspect farms. If a farmer had too many of these "Gools" (marigolds) in their fields, they could be heavily fined or even punished!

Detailed Care Instructions
To grow Glebionis segetum, also known as corn marigold or chrysanthemum segetum, follow these steps:
- Choose a suitable location: Glebionis segetum thrives in full sun to partial shade. Select a spot in your garden or outdoor space that receives at least 6 hours of direct sunlight daily.
- Prepare the soil: This plant prefers well-draining soil that is rich in organic matter. Amend the soil with compost or well-rotted manure before planting to improve its texture and fertility.
- Sow or plant seeds: You have two options when it comes to starting Glebionis segetum: sowing seeds directly in the garden or starting seeds indoors.
a. Direct sowing: In late spring or early summer, when the soil has warmed up, sow the seeds directly in the prepared soil. Lightly cover the seeds with a thin layer of soil, as they require light to germinate. Space the seeds about 12-18 inches apart.
b. Starting indoors: If you live in an area with a short growing season, you can start the seeds indoors, 6-8 weeks before the last expected frost. Sow the seeds in seed trays or pots filled with seed-starting mix. Keep the soil moist and provide warmth for germination. Transplant the seedlings outdoors once the danger of frost has passed.
- Watering and maintenance: Keep the soil evenly moist but not waterlogged. Glebionis segetum can tolerate some drought but prefers regular watering. Water at the base of the plant to prevent wetting the leaves, as this can increase the risk of fungal diseases.
- Fertilization: Apply a balanced, slow-release fertilizer once or twice during the growing season to promote healthy growth and blooming. Follow the instructions on the fertilizer packaging for application rates.
- Pruning: Deadhead spent flowers regularly to encourage continuous blooming. This will also prevent self-seeding if you prefer to limit its spread. Additionally, you can trim back the plant after the initial bloom to promote a second flush of flowers.
- Pest and disease control: Glebionis segetum is generally resistant to pests and diseases. However, keep an eye out for common garden pests like aphids or snails and take appropriate measures if needed.
By following these steps and providing the ideal growing conditions, you should be able to successfully grow Glebionis segetum in your garden.

Place in a bright room that is sun drenched almost all day. Or directly in a south-facing window.

To water the plant known scientifically as Glebionis Segetum, you should first check the soil moisture level before watering. Insert your finger into the soil up to your second knuckle and if it feels dry, it needs watering. Water the plant at the base, avoiding wetting the leaves, and allow the water to fully soak the soil. Do not overwater the plant, as it prefers well-drained soil. It is best to water Glebionis Segetum early in the morning or late in the day to avoid evaporation during hot temperatures.
To fertilize this plant, you should use a balanced fertilizer with equal amounts of nitrogen, phosphorus, and potassium. Apply it every two weeks during the growing season, which is typically spring and summer. Water the plant before applying the fertilizer to avoid burning the roots. Follow the instructions on the fertilizer package for the recommended amount to use per application.
The optimal soil for this plant is a well-draining soil that is rich in organic matter. It should have a neutral to slightly acidic pH. Avoid using heavy clay soils or soils that are too sandy, as they may cause drainage problems or nutrient deficiencies. A fertile topsoil with a good amount of compost or aged manure added to it can provide the necessary nutrients for healthy growth. Additionally, this plant prefers a soil that is consistently moist, but not waterlogged, so proper drainage is important to prevent root rot.
To propagate this plant, start by selecting a healthy and mature plant from which to take cuttings. Using clean and sharp pruning shears, cut a stem from the plant that is approximately 4-6 inches long and has several healthy leaves towards the top. Remove any lower leaves or flowers from the stem, leaving only the top few leaves.
Next, fill a small pot with moistened potting soil and create a hole in the center of the soil using your finger or a pencil. Dip the cut end of the stem into rooting hormone powder and gently insert it into the hole in the soil. Pack the soil gently around the stem to make sure it stays in place.
Water the soil to make it moist, but not overly wet. Cover the pot and cutting with a clear plastic bag or a plastic dome to create a humid environment. Place the pot in a warm and bright location, but out of direct sunlight.
Check the cutting regularly and mist the inside of the plastic cover to keep the soil moist. After a few weeks, roots should begin to form. After several more weeks, when the plant has established roots and new leaves are growing, you can remove the plastic cover and transplant the cutting to a larger pot or into your garden.


