Plant Overview
Often called the Radiant Glinus, this hardy little survivor thrives where other plants give up—specifically in the cracked, drying mud of seasonal ponds and riverbanks. It creates beautiful, star-burst-like mats that hug the earth tightly, acting as a natural green lace over barren soil. Native to tropical regions across the Americas and Africa, it is a master of timing, waiting for water to recede before rapidly claiming its space.
🔍 How to Identify
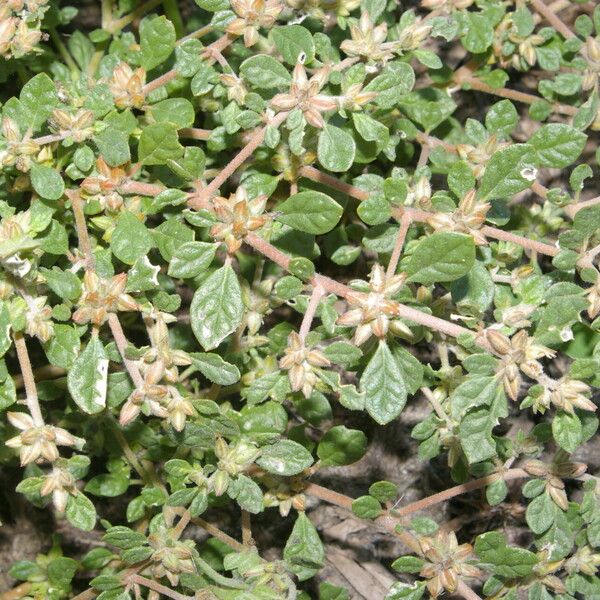
- 🌿 Growth Habit: It grows in a "prostrate" manner, meaning it spreads horizontally along the ground in a circular, radiating pattern from a central taproot.
- ☁️ Velvety Texture: The entire plant is covered in fine, star-shaped (stellate) hairs, giving the gray-green leaves a soft, slightly fuzzy appearance.
- 🌼 Hidden Blooms: Look closely at the leaf joints (axils) to find clusters of tiny, inconspicuous flowers that lack true petals but feature greenish, petal-like sepals.
🏡 In Your Garden
- 🏜️ The Drying Specialist: This plant is genetically programmed to thrive in "drawdown" zones. If you are trying to grow it, it prefers sandy or silty soil that was previously wet but is now drying out.
- 🌱 Root Resilience: Because it relies on a sturdy taproot to find moisture deep underground, it is notoriously difficult to transplant once established. It is best to let it stay where it chooses to sprout.
⚠️ Safety & Toxicity
- ✅ Generally Safe: Glinus radiatus is not known to be toxic to humans or common household pets.
- 🐕 Foraging Caution: While not poisonous, wild specimens often grow in areas where agricultural runoff or heavy metals accumulate in the silt. It is best to keep pets from grazing on wild mats found in public drainage areas.
✨ Fun Fact
The "Radiatus" in its name isn't just for show; it refers to the way its stems branch out like the rays of the sun. In some cultures, related species of Glinus are used in traditional medicine, but the Radiant Glinus is mostly admired for its role as a "pioneer species," being the first to bring life back to scorched, dried earth.

Detailed Care Instructions
Growing Glinus radiatus, also known as Glinus oppositifolius or by common names like slender carpetweed or sweet juice herb, can be a rewarding experience as it is often valued for its medicinal properties. Here are some general guidelines to help you successfully cultivate this plant:
1. Understanding the Plant
- Climate: Glinus radiatus is typically found in warm, tropical, and subtropical climates. It thrives in areas with plenty of sunlight.
- Soil Preferences: The plant prefers well-drained sandy or loamy soils. It can tolerate a range of soil pH but grows best in slightly acidic to neutral conditions.
2. Acquiring Seeds or Seedlings
- Seeds: You can purchase seeds from specialized nurseries or online stores dealing in medicinal or exotic plants.
- Seedlings: Some nurseries might have seedlings available.
3. Planting
- Site Selection: Choose a sunny location, as the plant thrives in full sunlight.
- Soil Preparation: Loosen the soil and mix in some organic compost to enrich it. Ensure the soil drains well.
- Sowing Seeds:
- Direct Sowing: You can sow seeds directly into the garden bed. Scatter the seeds thinly over prepared soil and cover lightly with a thin layer of soil.
- Indoor Sowing: Alternatively, start seeds indoors in seed trays with a seed-starting mix. Sow seeds on the surface and press them in lightly without fully covering them, as they require light for germination.
4. Watering
- Direct Sowing: You can sow seeds directly into the garden bed. Scatter the seeds thinly over prepared soil and cover lightly with a thin layer of soil.
- Initial Watering: After sowing, water the area gently to settle the soil and provide moisture. Keep the soil consistently moist, but not waterlogged, until the seeds germinate.
- Ongoing Watering: Once established, water the plants regularly. They prefer moist soil, but avoid over-watering as it can cause root rot.
5. Maintenance
- Thinning: If you have densely sown seeds, thin out the seedlings to prevent overcrowding and ensure good air circulation.
- Weeding: Keep the area around the plants free from weeds, which can compete for nutrients and water.
- Mulching: Applying a thin layer of mulch can help retain soil moisture and suppress weeds.
6. Fertilizing
- Initial Fertilization: Since you have added compost while preparing the soil, additional fertilization might not be necessary early on.
- Ongoing Fertilization: If the growth seems sluggish, you can apply a balanced, water-soluble fertilizer every few weeks during the growing season.
7. Pests and Diseases
- Monitoring: Regularly inspect the plants for signs of pests or diseases.
- Treatment: Use appropriate organic or chemical treatments if necessary. Maintaining good garden hygiene and good air circulation will help prevent many issues.
8. Harvesting
- Timing: The leaves and stems of Glinus radiatus can be harvested when the plant has sufficient foliage.
- Method: Use sharp scissors or pruning shears to cut the stems. Harvesting in the morning after the dew has dried is often best for plant recovery and quality.
By following these guidelines, you should be able to grow Glinus radiatus successfully. Enjoy your gardening!

Sure, caring for Glinus radiatus involves thoughtful watering practices to ensure its healthy growth. Here’s a comprehensive guide on how to properly water this plant:
1. Soil Check: Before watering, always check the soil moisture level. Insert your finger about an inch into the soil. If it feels dry, it’s time to water.
2. Watering Frequency: In general, water the plant when the top inch of the soil is dry. Depending on the climate and environment, this could be every few days. In hotter, drier climates, you may need to water more frequently.
3. Water Amount: Make sure to water thoroughly so that the water reaches the deeper roots. However, avoid overwatering; the soil should be moist but not waterlogged.
4. Watering Time: The best time to water is in the early morning or late afternoon when temperatures are cooler. This reduces evaporation and ensures that the plant has adequate moisture during the hotter parts of the day.
5. Water Quality: If possible, use rainwater or distilled water. Tap water can sometimes contain minerals or chemicals that might affect the plant’s growth.
6. Drainage: Ensure that the plant pot or soil has good drainage. This helps prevent root rot, which can be caused by water standing in the soil.
7. Mulching: Applying a layer of mulch around the plant can help retain soil moisture, ensuring that the roots have consistent access to water.
8. Adjust for Seasons: During the growing season (spring and summer), the plant will require more water. Reduce watering in the dormant period (fall and winter) but do not let the soil dry out completely.
9. Observation: Regularly observe the plant for signs of water stress—yellowing leaves can indicate overwatering, while crispy, brown-edged leaves might suggest underwatering.
By following these guidelines and closely monitoring the plant’s response, you can maintain optimal soil moisture and promote healthy growth.
Here’s how you can properly fertilize Glinus radiatus:
- Soil Preparation: Before planting, enrich the soil with organic matter, such as compost or well-rotted manure. This encourages healthy root development.
- Choosing the Fertilizer: Use a balanced, slow-release granular fertilizer with an N-P-K ratio around 10-10-10 or similar. Alternatively, you can use an organic fertilizer like fish emulsion or seaweed extract.
- Application Timing:
- Initial Application: When planting, mix a small amount of granular fertilizer into the soil.
- Growing Season: During the growing season, apply fertilizer every 4-6 weeks.
- Initial Application: When planting, mix a small amount of granular fertilizer into the soil.
- Application Method:
- For granular fertilizers, sprinkle the recommended amount around the base of the plants and gently work it into the top inch of soil.
- For liquid fertilizers, dilute according to the package instructions and water the plant thoroughly, ensuring the fertilizer reaches the root zone.
- For granular fertilizers, sprinkle the recommended amount around the base of the plants and gently work it into the top inch of soil.
- Watering: After fertilizing, water the plants well to help dissolve the nutrients and promote absorption by the roots.
- Observation and Adjustment: Monitor the plant for any signs of nutrient deficiency (such as yellowing leaves) or excess (such as burnt leaf tips). Adjust fertilizing frequency and amount accordingly.
By following these guidelines, you’ll provide Glinus radiatus with the nutrients it needs for optimal growth and health.
Glinus radiatus, a type of plant in the Molluginaceae family, thrives best in well-drained soils that are rich in organic matter. Here's a detailed guide to the soil you'd ideally use for cultivating this plant:
Soil Texture and Composition:
- Sandy Loam to Loamy Soil:
- A balanced mix of sand, silt, and clay, often referred to as sandy loam or loam, is ideal. This composition ensures good drainage while retaining sufficient moisture and nutrients.
- A balanced mix of sand, silt, and clay, often referred to as sandy loam or loam, is ideal. This composition ensures good drainage while retaining sufficient moisture and nutrients.
- Well-Drained Soil:
- Ensure the soil has excellent drainage to prevent waterlogging, which can lead to root rot. Adding perlite or coarse sand can enhance drainage if the soil in your area is naturally heavy (clay-like).
Nutrient Content:
- Ensure the soil has excellent drainage to prevent waterlogging, which can lead to root rot. Adding perlite or coarse sand can enhance drainage if the soil in your area is naturally heavy (clay-like).
- Organic Matter:
- Enrich the soil with organic matter such as compost or well-rotted manure. This will not only improve soil fertility but also enhance its structure, promoting better root growth and nutrient uptake.
- Enrich the soil with organic matter such as compost or well-rotted manure. This will not only improve soil fertility but also enhance its structure, promoting better root growth and nutrient uptake.
- Fertility:
- The soil should have a balanced nutrient profile. Organic fertilizers or a balanced slow-release fertilizer can be used to provide essential nutrients over time.
pH Levels:
- The soil should have a balanced nutrient profile. Organic fertilizers or a balanced slow-release fertilizer can be used to provide essential nutrients over time.
- Neutral to Slightly Alkaline:
- The preferred pH range for this plant is typically neutral to slightly alkaline (pH 6.5-7.5). If your soil is too acidic, amend it with lime; if it is too alkaline, sulfur or organic materials like pine needles can help lower the pH.
Moisture Retention:
- The preferred pH range for this plant is typically neutral to slightly alkaline (pH 6.5-7.5). If your soil is too acidic, amend it with lime; if it is too alkaline, sulfur or organic materials like pine needles can help lower the pH.
- Moderate Moisture:
- The soil should retain moisture without becoming waterlogged. Mulching can help conserve moisture, especially in drier climates, while also suppressing weeds and adding organic content as it decomposes.
Preparation and Care:
- The soil should retain moisture without becoming waterlogged. Mulching can help conserve moisture, especially in drier climates, while also suppressing weeds and adding organic content as it decomposes.
- Soil Preparation:
- Before planting, till the soil to a depth of about 12-15 inches. This will help remove any compaction and encourage root penetration.
- Incorporate plenty of organic matter during this process to improve soil structure and fertility.
- Before planting, till the soil to a depth of about 12-15 inches. This will help remove any compaction and encourage root penetration.
- Regular Monitoring:
- Regularly check the soil moisture level, ensuring it stays consistently moist but not saturated.
- Periodically test soil pH and nutrient levels, adjusting as necessary to maintain optimal growing conditions.
Common Amendments:
- Regularly check the soil moisture level, ensuring it stays consistently moist but not saturated.
- Compost:
- Adding compost improves soil structure, nutrient content, and microbial activity.
- Adding compost improves soil structure, nutrient content, and microbial activity.
- Perlite or Vermiculite:
- These inorganic amendments can enhance soil aeration and drainage.
- These inorganic amendments can enhance soil aeration and drainage.
- Gypsum:
- Gypsum can be used to improve soil structure, especially in clay soils, by breaking up compacted soil and promoting better water infiltration.
By adhering to these guidelines, you can create an optimal soil environment for Glinus radiatus, ensuring healthy growth and robust development of the plant.
- Gypsum can be used to improve soil structure, especially in clay soils, by breaking up compacted soil and promoting better water infiltration.
Glinus radiatus is a relatively lesser-known herbaceous plant that can be propagated through seeds to establish new plants. Here's a detailed guide on how to propagate Glinus radiatus:
Seed Propagation:
- Seed Collection:
- Collect mature seeds from existing plants. Ensure that the seeds are fully ripe and have dried on the plant before harvesting. This typically happens at the end of the flowering season.
- Collect mature seeds from existing plants. Ensure that the seeds are fully ripe and have dried on the plant before harvesting. This typically happens at the end of the flowering season.
- Seed Preparation:
- Clean the seeds to remove any debris or plant material. This can be done by gently rubbing the seeds and then winnowing them to separate the seeds from the chaff.
- Clean the seeds to remove any debris or plant material. This can be done by gently rubbing the seeds and then winnowing them to separate the seeds from the chaff.
- Germination:
- Fill seed trays or small pots with a well-draining potting mix. A mix of garden soil, compost, and sand in equal parts makes an ideal medium.
- Sow the seeds lightly on the surface of the soil. Do not bury them too deep; a light covering of soil is sufficient as too much depth can hinder germination.
- Water the soil gently to ensure it is moist but not waterlogged. Use a spray bottle to avoid displacing the seeds.
- Fill seed trays or small pots with a well-draining potting mix. A mix of garden soil, compost, and sand in equal parts makes an ideal medium.
- Conditions:
- Place the seed trays or pots in a warm location with indirect sunlight. The seeds need warmth to germinate, so maintaining a temperature range of 20°C to 25°C (68°F to 77°F) is ideal.
- Keep the soil consistently moist but not soggy. Overwatering can lead to fungal infections and rot.
- Place the seed trays or pots in a warm location with indirect sunlight. The seeds need warmth to germinate, so maintaining a temperature range of 20°C to 25°C (68°F to 77°F) is ideal.
- Care and Maintenance:
- Check regularly for signs of germination, which typically occurs within 1-3 weeks.
- Once seedlings appear, ensure they receive adequate light. If grown indoors, consider using a grow light to supplement natural sunlight.
- Thin out the seedlings if they are too crowded, allowing each one sufficient space to grow.
- Check regularly for signs of germination, which typically occurs within 1-3 weeks.
- Transplanting:
- When the seedlings have developed a few true leaves and are sturdy enough to handle, they can be transplanted to individual pots or directly into the garden.
- Choose a location with well-draining soil and good sunlight exposure.
- Space the transplants adequately, considering the mature plant size, to promote healthy growth and air circulation.
Care Post-Transplant:
- When the seedlings have developed a few true leaves and are sturdy enough to handle, they can be transplanted to individual pots or directly into the garden.
- Watering:
- Water the young plants regularly until they are well-established. After that, they can tolerate moderate drought but will perform best with regular watering.
- Water the young plants regularly until they are well-established. After that, they can tolerate moderate drought but will perform best with regular watering.
- Fertilization:
- Apply a balanced, all-purpose fertilizer to support healthy growth. Avoid over-fertilizing, which can lead to excessive foliage at the expense of flowering.
- Apply a balanced, all-purpose fertilizer to support healthy growth. Avoid over-fertilizing, which can lead to excessive foliage at the expense of flowering.
- Weeding:
- Keep the area around the young plants free from weeds, which can compete for nutrients and water.
- Keep the area around the young plants free from weeds, which can compete for nutrients and water.
- Pests and Diseases:
- Monitor for common pests and diseases. Treat any issues promptly using appropriate organic or chemical methods to prevent widespread damage.
By following these detailed steps, you can successfully propagate and grow Glinus radiatus, ensuring the continuous availability of this unique plant in your garden or natural habitat.
- Monitor for common pests and diseases. Treat any issues promptly using appropriate organic or chemical methods to prevent widespread damage.


