Plant Overview
Often called the Hop Goodenia, this bright Australian native is a true survivor, known for its ability to bounce back quickly after bushfires or heavy pruning. Its nickname comes from its resemblance to the common hop plant used in brewing, though it won't help you make beer! This cheery shrub is a favorite for those seeking a "set and forget" plant that brings consistent color to shaded corners or sunny borders alike.
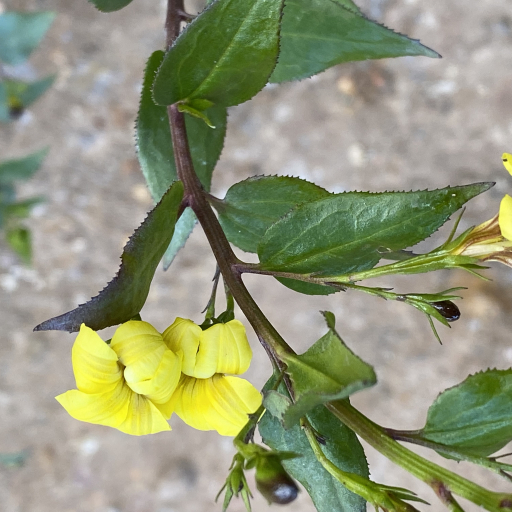
🔍 How to Identify
- 🌿 The Leaves: Glossy, bright green leaves that are egg-shaped (ovate) with finely serrated or "toothed" edges that look like tiny saws.
- 🌼 The Flowers: Striking yellow blossoms that look like tiny hand fans with five petals, appearing mostly in spring and summer.
- 🪵 The Habit: A versatile evergreen shrub that can stay low and sprawling or reach up to 2 meters high depending on the amount of light it receives.
🏡 In Your Garden
- 💧 The "Pioneer" Spirit: This plant is incredibly resilient; it is often the first to colonize disturbed soil and can handle anything from damp, heavy shade to dry, sunny slopes.
- 🦋 Wildlife Cafe: The nectar-rich fan flowers are a massive draw for native butterflies and small honey-eating birds, making it a "must-have" for an ecological garden.
- ✂️ Taming the Beast: Because it is a fast grower, it can become a bit "leggy" or thin over time. It responds beautifully to a hard pruning, which encourages it to grow back thicker and more lush.
⚠️ Safety & Toxicity
- ✅ Family Friendly: The Hop Goodenia is generally considered non-toxic to humans, dogs, and cats.
- 👐 Soft Touch: Unlike many other hardy Australian shrubs, it lacks thorns or irritating hairs, making it a safe choice for planting near high-traffic paths where children or pets play.
✨ Fun Fact
Goodenia ovata seeds have a special "elaiosome"—a tiny, protein-rich attachment—that encourages ants to carry the seeds into their underground nests. The ants eat the snack and "plant" the seed, protecting it from fire and predators!

Detailed Care Instructions
| Humidity | Normal |
| Lighting | Part Sun |
| Difficulty | Medium |
| Hardiness Zones | 8 - 11 |
To grow Goodenia Ovata (Hop Goodenia) plants, you can follow these steps:
- Choose a suitable location: Goodenia Ovata grows best in a sunny or partially shady spot. Ensure the location has well-draining soil.
- Preparing the soil: Before planting, prepare the soil by adding organic matter or compost to improve its fertility and drainage. Goodenia Ovata prefers slightly acidic to neutral soil pH levels.
- Planting: Dig a hole slightly larger and deeper than the root ball. Place the plant in the hole, ensuring the top of the root ball is level with or slightly above the soil surface. Backfill the hole with the soil, gently firming it around the plant.
- Watering: After planting, water the Goodenia Ovata thoroughly to ensure the soil is evenly moist. Once established, water the plant regularly, especially during dry spells or hot weather.
- Mulching: Apply a layer of organic mulch around the base of the plant to help retain moisture, suppress weed growth, and provide insulation for the roots.
- Fertilizing: Feed Goodenia Ovata with a balanced, slow-release fertilizer during the growing season. Follow the manufacturer's instructions regarding application rates.
- Pruning: Prune the plant after flowering to maintain its shape and promote bushier growth. Remove any dead, damaged, or diseased branches.
- Propagation: Goodenia Ovata can be propagated from cuttings or by seed. For cuttings, take semi-hardwood cuttings in late spring or early summer, dip them in rooting hormone powder, and plant them in a well-draining potting mix. Keep the potting mix moist until roots develop. For seed propagation, collect mature seeds and sow them in a seed-raising mix in late spring or early summer.
- Pests and diseases: Goodenia Ovata is generally resistant to pests and diseases. However, regular inspection for any signs of problems such as aphids, whiteflies, or fungal issues is recommended. Treat any issues promptly using appropriate organic or chemical controls.
Remember to research specific care guidelines for your specific region and climate, as some adjustments may be needed based on local conditions.

Place in a window with dappled sun or a spot in the middle of a room. Or directly in a window facing west or east.

To water this particular plant, it is important to consider the amount and frequency of watering. The soil should be kept moist, but not overly saturated, as this can lead to root rot and other issues. It is best to water deeply and infrequently, allowing the soil to dry out partially between watering sessions. When watering, it is important to avoid wetting the foliage, as this can lead to disease and pest problems. Additionally, the plant should be watered at the base, rather than from above, to ensure that the water reaches the root zone. Finally, it is important to consider the environmental conditions of the plant, such as the level of sunlight, temperature, and humidity, as these factors can also impact its water needs.
To fertilize this plant, use a balanced fertilizer with equal parts of nitrogen, phosphorus, and potassium. Apply the fertilizer in early spring or late summer when the plant is actively growing. Dilute the fertilizer according to the manufacturer's instructions and apply around the base of the plant. Do not over-fertilize as it can cause damage to the plant.
Goodenia Ovata plant prefers well-drained soil with a pH between 5.5 and 7.0. The soil should be rich in nutrients and organic matter, and it should be able to retain moisture without getting waterlogged. To achieve this, you can use a mixture of sandy loam, compost, and peat moss. The sandy loam provides good drainage and aeration, while the compost and peat moss add nutrients and help the soil retain moisture. You can also add perlite or vermiculite to improve drainage and prevent soil compaction. Make sure to avoid using soil that is too heavy, clayey, or alkaline, as it can harm the Goodenia Ovata plant.
To propagate this plant, you will need to take stem cuttings from a healthy parent plant. Look for a stem that is green, firm, and about 10cm long. Use a sharp and clean pair of pruning shears or scissors to cut the stem just below a leaf node. Remove all the leaves except for the top two or three.
Prepare a planting pot or container by filling it with a well-draining potting mix. Moisten the soil by lightly spraying it with water. Dip the bottom end of the stem cutting into rooting hormone powder to improve its chances of rooting.
Make a hole in the soil using a pencil or your finger and insert the stem cutting. Firmly press the soil around the stem to hold it in place. Water the soil again to settle it and to provide moisture to the cutting.
Cover the cutting and pot with a clear plastic bag to create a greenhouse-like environment. Place it in a warm and bright spot, but away from direct sunlight. Avoid exposing the cutting to extreme temperatures or drafts.
Check the cutting regularly for signs of growth and root development. In about 4-6 weeks, you should see new growth and roots coming out from the base of the stem. This is a sign that the cutting has successfully rooted and can now be transplanted into a larger pot or garden bed.
Once the new plant has established itself and shown strong growth, it can continue to grow and thrive on its own, provided that it receives adequate care and maintenance.


