Plant Overview
Known affectionately as the Rosemary Grevillea, this Australian native is a master of disguise. At first glance, its narrow, needle-like foliage looks exactly like the common kitchen herb, but instead of producing fragrant leaves for cooking, it erupts in exotic, "spider-like" crimson flowers. It is a rugged survivor, famous for its ability to thrive in harsh conditions while acting as a high-energy canteen for local honey-eating birds.
🔍 How to Identify
- 🌿 The Foliage: The leaves are stiff, narrow, and sharply pointed, mimicking rosemary almost perfectly. They are dark green on top with a silvery, silky underside.
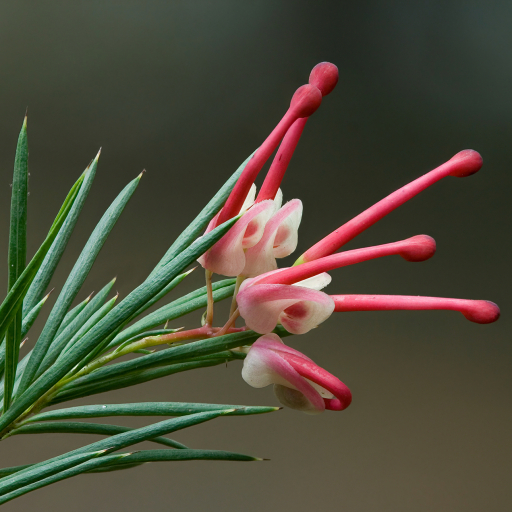
- 🕷️ The "Spider" Blooms: It produces unique, petal-less flower clusters known as racemes. These have long, curving "styles" that give the flower a spindly, leggy appearance.
- 🌳 Growth Habit: It typically grows as a dense, rounded shrub. Depending on the cultivar, it can stay as a low groundcover or reach up to 6 feet in height, often creating a prickly thicket.
🏡 In Your Garden
- 🧪 The Phosphorus Rule: Like most members of the Protea family, this plant is highly sensitive to phosphorus. Avoid standard "all-purpose" fertilizers, as they can actually poison the plant; always opt for a specific "Native" or low-phosphorus blend.
- ✂️ Structural Pruning: While it is naturally bushy, it loves a good haircut after the main flowering flush. This prevents the center from becoming "woody" and sparse, keeping the foliage dense enough for small birds to hide in.
- 🦅 Wildlife Magnet: If you plant this, expect visitors. The flowers are rich in nectar and specifically shaped to fit the beaks of pollinators, making it one of the best choices for a bird-friendly landscape.
⚠️ Safety & Toxicity
- 👐 Skin Sensitivity: Many Grevilleas, including this species, contain resorcinols. Contact with the foliage or flowers can cause "Grevillea dermatitis," a red, itchy rash similar to poison ivy for sensitive individuals.
- 🐾 Pet Safety: While not considered high-risk for toxicity if nibbled, the prickly leaves can cause mechanical injury to mouths or paws, and the nectar-heavy flowers should not be ingested in large quantities by pets.
✨ Fun Fact
The Grevillea rosmarinifolia has a dramatic history! It was once thought to be extinct in its original wild habitat near the Edinburgh Botanic Garden’s collection site. It was "rediscovered" years later, having survived in cultivation, and was eventually reintroduced to the wild from those garden specimens.

Detailed Care Instructions
To grow a Grevillea rosmarinifolia plant, follow these steps:
- Choose a suitable location: Grevillea rosmarinifolia plants prefer full sun exposure and well-draining soil. Ensure the area has adequate space for the plant to spread out as it grows.
- Prepare the soil: Grevillea rosmarinifolia plants tolerate various soil types but prefer slightly acidic to neutral soil. Amend the soil with organic matter, such as compost, to enhance drainage and provide nutrients.
- Planting: Dig a hole that is twice the width and depth of the plant's root ball. Gently remove the plant from its container, loosen the roots, and place it in the hole. Backfill the hole with soil, making sure to firm it gently around the base of the plant.
- Watering: Initially, water the plant deeply to help establish its roots. Afterward, water the plant regularly, especially during dry spells, ensuring the soil remains consistently moist but not waterlogged.
- Mulching: Apply a layer of organic mulch around the base of the plant to conserve moisture, suppress weed growth, and regulate soil temperature.
- Pruning: Grevillea rosmarinifolia plants generally require minimal pruning. However, you can selectively prune to shape the plant or remove dead or damaged branches. Pruning should be done after flowering.
- Fertilization: Apply a slow-release, balanced fertilizer in early spring to encourage healthy growth. Follow the package instructions for proper dosage.
- Pests and diseases: Grevillea rosmarinifolia plants are generally resistant to pests and diseases. However, keep an eye out for common issues such as aphids, scale insects, or root rot. Treat as needed using appropriate organic or chemical controls.
- Propagation: Grevillea rosmarinifolia can be propagated from seeds or cuttings. Collect seeds from mature plants and sow them in a well-drained potting mix. For cuttings, take semi-hardwood cuttings in spring or early summer and place them in a propagation mix. Keep them warm and moist until roots develop.
By following these steps and providing suitable growing conditions, you can successfully grow Grevillea rosmarinifolia plants in your garden or landscape.

Place in a bright room that is sun drenched almost all day. Or directly in a south-facing window.

To properly water this plant, you should avoid over-watering as this can lead to root rot. Check the soil moisture level regularly by sticking your finger into the soil up to your knuckle. If the soil is dry, water the plant deeply until water starts to come out of the drainage holes. Allow the top inch or two of soil to dry out between waterings. Watering less frequently but deeply encourages the plant to grow deeper roots and become more drought-tolerant. Additionally, avoid getting water on the leaves and try to water the soil directly around the plant's root zone.
To fertilize this plant, use a balanced fertilizer with a nitrogen-phosphorus-potassium ratio of 10-10-10. Apply in late winter and again in late summer. Be careful not to over-fertilize, as this can damage the plant. Water well before and after fertilizing to avoid root burn.
For optimal growth of the Grevillea Rosmarinifolia plant, it is recommended to use a well-drained soil that is rich in organic matter. The soil should also have a slightly acidic pH level, with a range between 5.5 to 6.5. This plant prefers sandy or loamy soil with good aeration and drainage. It tolerates drought and is suitable for dry environments, but the soil should not be kept overly dry. In addition, it is important to avoid over-fertilizing the plant as this can lead to excessive growth and weak stems. Instead, a slow-release fertilizer with a balanced ratio of nutrients is recommended for healthy growth. Finally, it is essential to maintain good soil moisture levels by regularly watering the plant, but ensuring the soil is not waterlogged.
To propagate this particular plant, you will need to take softwood cuttings in the early summer months. Choose healthy branches that are not too young or too old, and cut them off just below a node. Remove the leaves from the bottom third of the cutting, and dip the end in rooting hormone powder. Plant the cutting in a pot or tray filled with well-draining soil, and keep it moist but not waterlogged. Place the pot or tray in a warm, bright spot where it will get indirect light. In a few weeks, you should see roots beginning to form. Once the roots are well-developed, you can transplant the new plants into larger pots or directly into the ground.


