Plant Overview
Often called the False Sunflower or Oxeye Sunflower, this North American native is a golden powerhouse of the summer garden. It earns its "False" moniker not by trickery, but by a subtle botanical distinction: unlike true sunflowers, its outer ray petals are actually fertile and produce seeds. If you want a landscape that glows with the intensity of a July afternoon, this hardy perennial is your champion.
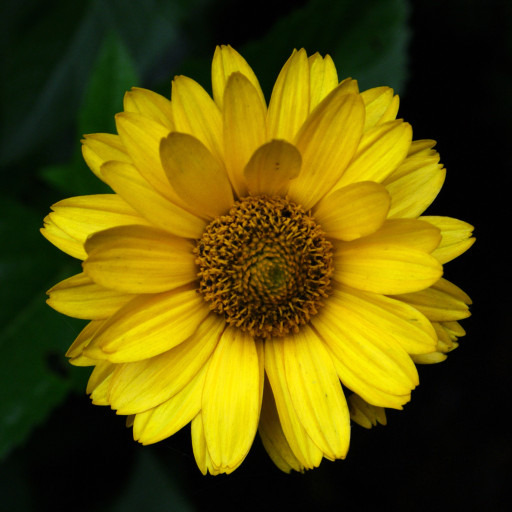
🔍 How to Identify
- 🌻 The Golden Rays: Bright yellow petals surround a raised, deep-gold central disc. These "double-duty" flowers are unique because both the outer petals and the inner disc produce seeds.
- 🍃 Toothed Foliage: The leaves are deep green, arranged oppositely on the stem, and shaped like broad arrowheads with noticeably "toothy" or serrated edges.
- 📏 Sturdy Stature: It grows in bushy, upright clumps, often reaching 3 to 6 feet tall. The stems are stiff and branching, which helps the plant stay upright even in summer storms.
🏡 In Your Garden
- 🌞 Sun Worshipper: This plant lives for the light. While it can survive in partial shade, it will likely become "leggy" or floppy if it doesn't receive at least six hours of direct sun daily.
- 💪 Clay Survivor: Unlike many finicky perennials, the False Sunflower isn't bothered by heavy clay or poor soil. Its tough root system makes it an excellent choice for stabilizing banks or filling out difficult garden corners.
- 🦋 Pollinator Airport: Because it produces abundant nectar over a long blooming season (from mid-summer to frost), it acts as a bustling hub for bees, butterflies, and beneficial predatory wasps.
⚠️ Safety & Toxicity
- ✅ Non-Toxic: Heliopsis helianthoides is generally considered safe and non-toxic for humans, dogs, and cats. It is a "friendly" choice for family-oriented landscapes.
- 🧤 Skin Sensitivity: Some gardeners with sensitive skin may experience mild irritation or a "scratchy" sensation from the rough, sandpaper-like hairs on the stems and leaves. Wearing gloves while pruning is recommended.
✨ Fun Fact
The genus name Heliopsis literally translates from Greek as "sun-like." While true sunflowers (Helianthus) drop their petals quickly after pollination, the ray florets of the False Sunflower stay attached to the seed head for a remarkably long time, often remaining on the plant even as they dry and turn papery!

Detailed Care Instructions
False sunflowers come back every year, but these flowers typically have a lifespan of around five years. They can self-propagate by seeds, or you can propagate them yourself to get new plants.
What are good companion plants for false sunflowers?
False sunflowers pair well with asters, yarrow, hyssop, reed grass, Russian sage, and if planted in containers, include some spiller plants such as million bells or lobelia.
How deep should you plant false sunflowers?
Plant false sunflowers that you get from the nursery or garden center to the same depth as they were in the previous container.
| Color | Yellow-Orange |
| Soil Ph | 6-8 |
| Lighting | Full Sun |
| Soil Type | Average, Dry To Medium Moisture, Well-Draining |
| Bloom Time | June To August |
| Plant Type | Herbaceous Perennial |
| Mature Size | 3 To 6 Feet Tall And 2 To 3 Feet Wide |
| Native Area | North America |
| Sun Exposure | Full Sun |
| Hardiness Zones | 3-9 |
To successfully grow Heliopsis helianthoides (also known as Ox-eye sunflower or False sunflower), you can follow these steps:
- Choose a suitable location: Heliopsis helianthoides prefers full sun to partial shade. Ensure the planting area receives at least 6-8 hours of direct sunlight per day.
- Soil preparation: Prepare a well-draining soil by adding organic matter such as compost or aged manure. Heliopsis helianthoides can tolerate a wide range of soil types but prefers slightly acidic to neutral pH levels (6.0-7.0).
- Planting: Dig a hole slightly larger and deeper than the root ball of the plant. Place the plant in the hole, ensuring the crown is level with the soil surface. Gently backfill the hole with soil, firming it lightly around the roots.
- Watering: After planting, thoroughly water the plant to settle the soil and provide moisture to the roots. Keep the soil evenly moist during the establishment period, typically the first few weeks. Once established, Heliopsis helianthoides is moderately drought-tolerant and does not require excessive watering.
- Mulching: Apply a layer of organic mulch, such as wood chips or straw, around the base of the plant. Mulch helps to retain moisture, suppress weeds, and regulate soil temperature.
- Fertilizing: Heliopsis helianthoides usually does not require excessive fertilization. However, you can apply a balanced, slow-release fertilizer in early spring to provide essential nutrients if necessary.
- Pruning: Deadhead faded flowers regularly to encourage continuous blooming. Cut back the plant to about 6 inches above the ground in late fall or early spring to promote healthy growth and prevent overcrowding.
- Pests and diseases: Heliopsis helianthoides is generally resistant to most pests and diseases. However, keeping the plant well-spaced and ensuring good air circulation can help prevent issues like powdery mildew.
- Division: Over time, Heliopsis helianthoides can form large clumps. To maintain plant health and vigor, divide the clump every 3-5 years in early spring or fall. Dig up the clump, separate it into smaller sections, and replant them with adequate spacing.
By following these guidelines, you can successfully grow and enjoy the beautiful blooms of Heliopsis helianthoides.

Place in a bright room that is sun drenched almost all day. Or directly in a south-facing window.

Heliopsis Helianthoides is a perennial plant that requires proper watering to grow and thrive. When watering this plant, avoid splashing water on the leaves and stems, as this can lead to the development of fungal infections. Instead, focus the water on the soil around the base of the plant.
Check the soil moisture level regularly by sticking your finger 1-2 inches into the soil. If it feels dry, it's time to water the plant. Water deeply to allow the roots to absorb as much moisture as possible. It's important not to overwater the plant, as this can lead to root rot and other problems.
During hot and dry weather, Heliopsis Helianthoides may require more frequent watering. In general, it's best to water this plant in the morning to give it time to dry out before nighttime. Avoid watering in the late afternoon or evening, as this can promote the growth of fungal diseases.
The amount of water Heliopsis Helianthoides needs will depend on factors such as the climate, soil type, and sun exposure. As a general rule, provide enough water to keep the soil evenly moist but not waterlogged. With proper watering, Heliopsis Helianthoides will reward you with beautiful blooms all season long.
- Choose a balanced, slow-release fertilizer.
- Apply the fertilizer once in the spring, before new growth appears.
- Scatter the fertilizer granules evenly around the plant.
- Water the plant well after fertilizing.
- Avoid over-fertilizing, as this can damage the plant.
The best soil to use for this plant is well-draining, fertile soil that is loamy or sandy in texture. It should have a pH level of around 6.0 to 7.5. The soil should be moist but not waterlogged, as this can cause root rot. Adding organic matter such as compost or aged manure can help improve soil structure and provide essential nutrients for the plant. It is also important to ensure adequate drainage to prevent standing water around the roots.
To propagate this plant, you can begin by taking cuttings from a mature plant. Choose a healthy stem that is at least 4-6 inches long and use a sharp, clean pair of shears to make a diagonal cut just below a node. Remove any lower leaves from the stem and dip the cut end into rooting hormone powder.
Next, prepare a pot or container with a well-draining potting mix. Make a hole in the soil and insert the cutting, gently pressing the soil around it to ensure contact. Water the cutting thoroughly and cover it with a clear plastic bag to create a mini greenhouse.
Place the pot in a bright, indirect light location and keep the soil moist but not waterlogged. After a few weeks, you should see new growth appearing from the cutting, which means it has taken root. Once the plant has established roots and begun to grow, you can remove the plastic bag and care for it as you would any other young plant.
Alternatively, you can propagate this plant by dividing the root ball of a mature plant in spring or fall. Carefully dig up the plant and separate the roots into smaller clumps using a clean sharp knife or shovel. Each division should have several stems and a healthy root system. Replant the divisions in a well-draining soil mix, water well, and care for them as you would any other new plants.


