Plant Overview
Often called the Mandrinette, this stunning shrub is a botanical miracle from the island of Mauritius. Once believed to be extinct for nearly a century, it was rediscovered in 1968, making it a true "Lazarus" species that returned from the brink. Its delicate, papery blooms and deep green foliage make it a prized jewel for conservationists and tropical plant enthusiasts.
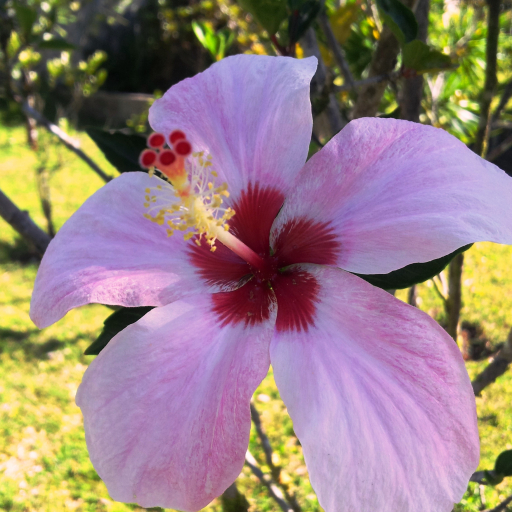
🔍 How to Identify
- 🌸 The Bloom: Large, trumpet-shaped flowers featuring five petals in a soft shade of pinkish-lilac or pale lavender.
- ❤️ The Center: A striking, dark magenta or deep red "eye" at the base of the petals, with a long, prominent reproductive column extending outward.
- 🍃 The Foliage: Medium-green, glossy leaves that are oval-shaped with lightly toothed (serrated) edges.
🏡 In Your Garden
- 🏝️ Island Roots: Because it originates from a specific volcanic island, it thrives in high humidity and constant warmth. It has a sensitive root system that dislikes being moved once established, so choose its location wisely to avoid "transplant shock."
- 💧 Soil & Drainage: Unlike some swamp-loving hibiscus species, the Mandrinette requires exceptionally well-draining soil. It is prone to root rot if left in standing water, favoring a "moist but airy" root environment.
⚠️ Safety & Toxicity
- ✅ Safe Status: Hibiscus genevii is generally considered non-toxic to humans and common household pets like dogs and cats.
- 🐜 Pest Sensitivity: While the plant isn't dangerous to us, it is very attractive to aphids and whiteflies. Keep an eye on the undersides of leaves to ensure these "hitchhikers" don't stress the plant.
✨ Fun Fact
The Hibiscus genevii is so rare that at one point, fewer than 50 individual plants were known to exist in the wild. Its survival today is thanks to dedicated "plant hunters" and botanical gardens that hand-pollinated the remaining flowers to save the species from disappearing forever!

Detailed Care Instructions
Growing Hibiscus Genevii, a rare and beautiful species of hibiscus, requires attention to specific care guidelines to ensure healthy growth and vibrant blooms. Here's a step-by-step guide to help you:
1. Climate and Location
- Climate: Hibiscus Genevii thrives in tropical and subtropical climates, although it can tolerate cooler temperatures as long as there is no frost.
- Sunlight: Plant it in a location that receives full sun for at least 6 to 8 hours a day. This encourages healthy growth and abundant flowering.
2. Soil Requirements
- Soil Type: Well-draining soil is crucial. A mix of loam and sand with organic matter works well.
- pH Level: The ideal soil pH should be between 6.0 and 7.5. You can test your soil and adjust it if necessary using commercial soil amendments.
3. Planting
- Timing: Spring or early summer is the best time to plant Hibiscus Genevii.
- Spacing: If planting multiple Hibiscus Genevii, space them about 3 to 6 feet apart to allow for proper air circulation and growth.
- Depth: Dig a hole twice the width of the root ball and of the same depth. Place the plant in the hole and backfill with soil, firming it gently around the base.
4. Watering
- Frequency: Water regularly, especially during dry spells. The soil should be kept moist but not waterlogged.
- Method: Deep watering is preferable to ensure that water reaches the root zone. Avoid overhead watering to prevent fungal diseases.
5. Mulching
- Apply a layer of mulch around the base of the plant to help retain soil moisture and suppress weeds. Organic mulch like bark chips or compost is ideal.
6. Fertilizing
- Type: Use a balanced, slow-release fertilizer with a ratio of 10-10-10 or 20-20-20.
- Frequency: Feed every 6 to 8 weeks during the growing season (spring to early fall). Reduce feeding in the cooler months when the plant’s growth slows down.
7. Pruning
- When: Prune in early spring before new growth begins or after the flowering season.
- How: Remove dead or weak branches and shape the plant to encourage bushier growth and more blooms. Avoid heavy pruning.
8. Pest and Disease Management
- Common Pests: Watch for aphids, spider mites, and whiteflies. Regularly check the plant and use insecticidal soap or neem oil as needed.
- Diseases: Ensure good air circulation to prevent diseases like powdery mildew and leaf spot. Water the soil directly to keep foliage dry.
9. Propagation
- Hibiscus Genevii can be propagated by seeds, cuttings, or layering.
- Seeds: Sow seeds in a well-draining seed-starting mix and keep them moist until germination.
- Cuttings: Take 4 to 6-inch cuttings from new growth, remove the lower leaves, dip in rooting hormone, and plant in a well-draining potting mix.
- Layering: Bend a low-growing branch to the ground, cover a portion of it with soil, and wait for it to develop roots before cutting it from the parent plant.
10. Winter Care
- Seeds: Sow seeds in a well-draining seed-starting mix and keep them moist until germination.
- If you live in an area with cold winters, consider growing Hibiscus Genevii in containers so you can move them indoors during frost. Alternatively, provide winter protection by mulching heavily around the base and covering the plant with frost cloth.
By following these care tips, you can enjoy the spectacular blooms and lush foliage of Hibiscus Genevii in your garden.

Place in a bright room that is sun drenched almost all day. Or directly in a south-facing window.

Watering **Hibiscus genevii** correctly is crucial for its health and growth. Here's a detailed guide:
1. **Frequency of Watering:**
- **Newly Planted:** When first planted, it requires more frequent watering to help establish strong roots. Water the plant deeply every 2-3 days for the first few weeks.
- **Established Plants:** Once established, this plant is fairly drought-tolerant but still benefits from regular watering, especially during dry periods. Water once or twice a week, depending on soil moisture and weather conditions.
2. **Amount of Water:**
- Water deeply to ensure the roots get enough moisture. This means the water should penetrate at least 6 inches into the soil. Avoid shallow watering, as this will encourage surface roots rather than deep, stable root growth.
3. **Time of Day:**
- Water early in the morning or late in the afternoon when temperatures are cooler to minimize evaporation and help prevent fungal growth.
4. **Soil Moisture:**
- Keep the soil consistently moist but not waterlogged. Check the soil moisture by inserting your finger about an inch deep into the soil. If it feels dry, it’s time to water. If the soil is still moist, hold off on watering.
5. **Avoiding Water Stress:**
- Water stress (either too much or too little) can cause leaf drop, poor growth, and reduced flowering. Ensure drainage is adequate to prevent root rot, which can happen if the plant sits in waterlogged soil.
6. **Mulching:**
- Apply a layer of organic mulch around the base of the plant. This helps retain soil moisture, reduces the frequency of watering needed, and aids in weed suppression. Just make sure the mulch doesn’t touch the stem of the plant to avoid rot.
7. **Special Considerations:**
- During hot and dry periods, increase the frequency of watering.
- During cooler or rainy seasons, decrease watering accordingly.
- Container-grown plants generally need more frequent watering than those planted in the ground, as pots can dry out more quickly.
By following these guidelines, you can ensure that your **Hibiscus genevii** remains healthy and vibrant.
Hibiscus Genevii is a relatively low-maintenance plant when it comes to fertilization, but it still benefits from proper nutrient management. Here are detailed fertilizing instructions to help your plant thrive:
- Choose the Right Fertilizer: Select a balanced, slow-release fertilizer with an NPK ratio of approximately 10-10-10 or 15-15-15. A slow-release formula ensures a steady supply of nutrients over time.
- Frequency: Fertilize the plant every 4 to 6 weeks during the growing season, which typically runs from early spring through late summer. Reduce or stop fertilizing during the dormant period in late fall and winter.
- Application Rate: Follow the manufacturer’s instructions regarding the amount of fertilizer to use per square foot. Usually, a tablespoon of slow-release fertilizer per square foot is adequate, but always check the specific product directions.
- Method of Application:
- Granular Fertilizer: Sprinkle the granules evenly around the base of the plant, avoiding direct contact with the stem. Lightly work the granules into the topsoil with a rake or your hands, and then water thoroughly to help the fertilizer settle into the soil.
- Liquid Fertilizer: If using a liquid form, dilute it according to the package instructions and apply it directly to the soil. Avoid getting the solution on the leaves as it can cause burn.
- Granular Fertilizer: Sprinkle the granules evenly around the base of the plant, avoiding direct contact with the stem. Lightly work the granules into the topsoil with a rake or your hands, and then water thoroughly to help the fertilizer settle into the soil.
- Additional Tips:
- Organic Option: Consider using organic fertilizers like compost, well-rotted manure, or fish emulsion if you prefer a more natural approach. These can be applied in the same manner but may require more frequent applications.
- Soil Testing: Conduct a soil test every couple of years to determine the existing nutrient levels and adjust your fertilization routine accordingly.
- Mulching: Apply a layer of organic mulch around the base of the plant to help retain moisture, improve soil quality, and reduce the need for frequent fertilization.
By following these instructions, you can ensure your Hibiscus Genevii receives the nutrients it needs to grow vigorously and produce beautiful blooms.
- Organic Option: Consider using organic fertilizers like compost, well-rotted manure, or fish emulsion if you prefer a more natural approach. These can be applied in the same manner but may require more frequent applications.
The soil for Hibiscus Genevii should have specific characteristics to ensure optimal growth. Here are the key details to consider:
- Well-Draining: The soil should be well-draining to prevent waterlogging, which can lead to root rot.
- Loamy Texture: A mix of sand, silt, and clay (loamy soil) is usually ideal. It ensures proper air circulation and moisture retention while providing essential nutrients.
- Rich in Organic Matter: Adding organic compost or well-decomposed manure can enhance the soil's nutrient content and improve its structure.
- pH Level: The soil should be slightly acidic to neutral, with a pH range of about 6.0 to 7.0. This range is conducive to the plant's nutrient uptake.
- Adequately Aerated: Ensure the soil is aerated. This can be achieved by incorporating materials like perlite or coarse sand, which prevent compaction and improve root growth.
- Avoid Heavy Clays: Soil with a heavy clay content can retain water excessively and hinder root development. If the native soil is heavy clay, it should be amended with organic matter and sand to improve drainage and aeration.
Regular soil tests can help monitor nutrient levels and pH, allowing for timely amendments to maintain optimal soil conditions for Hibiscus Genevii.
Propagating Hibiscus Genevii can be accomplished primarily through two main methods: seed propagation and vegetative propagation through cuttings. Here's a detailed guide on how to propagate this plant using both methods:
Seed Propagation:
- Seed Collection:
- Wait for the seed pods on the plant to mature and turn brown.
- Carefully harvest the seeds once the pods start splitting.
- Wait for the seed pods on the plant to mature and turn brown.
- Seed Preparation:
- Clean the seeds by removing any debris or remaining pod material.
- Soak the seeds in warm water for about 24 hours to help soften the hard outer shell and enhance germination.
- Clean the seeds by removing any debris or remaining pod material.
- Sowing:
- Prepare a seed-raising mix by blending potting soil with sand or perlite to ensure good drainage.
- Fill seedling trays or small pots with the mix, and moisten the soil evenly.
- Sow the seeds on the surface and lightly cover them with a thin layer of the soil mix, about 1/4 inch (6 mm) deep.
- Prepare a seed-raising mix by blending potting soil with sand or perlite to ensure good drainage.
- Germination Conditions:
- Place the trays or pots in a warm, bright area with indirect sunlight. A temperature range between 70-85°F (21-29°C) is ideal.
- Keep the soil consistently moist but not waterlogged.
- Place the trays or pots in a warm, bright area with indirect sunlight. A temperature range between 70-85°F (21-29°C) is ideal.
- Care After Germination:
- Seedlings usually sprout within 2-4 weeks.
- Once the seedlings are large enough to handle and have at least two sets of true leaves, they can be transplanted into individual pots.
- Gradually acclimate the young plants to outdoor conditions before planting them in their permanent location.
Vegetative Propagation (Cuttings):
- Seedlings usually sprout within 2-4 weeks.
- Selecting the Cutting:
- Choose healthy, non-flowering stems from the parent plant.
- The best time to take cuttings is during the growing season, typically in late spring to early summer.
- Choose healthy, non-flowering stems from the parent plant.
- Preparing the Cutting:
- Cut a stem about 4-6 inches (10-15 cm) long, just below a node (the point where a leaf attaches to the stem).
- Remove the lower leaves, leaving a few at the top to reduce moisture loss through transpiration.
- Cut a stem about 4-6 inches (10-15 cm) long, just below a node (the point where a leaf attaches to the stem).
- Rooting Hormone (Optional):
- Dip the cut end of the stem in rooting hormone powder to enhance root development.
- Dip the cut end of the stem in rooting hormone powder to enhance root development.
- Planting the Cutting:
- Prepare a pot with a well-draining potting mix, such as a blend of peat moss and perlite or sand.
- Insert the cut end of the stem into the soil about 2-3 inches (5-7.5 cm) deep.
- Firm the soil around the cutting to ensure good contact with the soil.
- Prepare a pot with a well-draining potting mix, such as a blend of peat moss and perlite or sand.
- Rooting Conditions:
- Maintain high humidity around the cutting by covering the pot with a plastic bag or placing it in a propagator.
- Place the pot in a warm area with indirect light. A temperature range between 70-75°F (21-24°C) is optimal.
- Keep the soil consistently moist but not soggy.
- Maintain high humidity around the cutting by covering the pot with a plastic bag or placing it in a propagator.
- Care After Rooting:
- The cutting typically takes 4-8 weeks to develop roots.
- Gently tug on the cutting after a few weeks to check for resistance, indicating root growth.
- Once well-rooted, transplant the young plants into larger pots or their final outdoor location.
- Gradually acclimate them to outdoor conditions before full exposure.
Both methods can be effective, but using cuttings often results in faster and more reliable propagation. The choice between seeds and cuttings may depend on your specific growing conditions and the availability of materials.
- The cutting typically takes 4-8 weeks to develop roots.
Common pests of the hibiscus genevii include Mealybugs, spider mites, fungus gnats, aphids, thrips. Make a habit of checking your hibiscus genevii frequently for pests so that any infestations can be caught and managed early.


