Plant Overview
Often called the "Shingle Hoya," Hoya imbricata is a living architectural masterpiece from the humid rainforests of Southeast Asia. Unlike its bushy cousins, this plant is a professional climber that literally "shingles" itself against tree trunks, creating a shield-like appearance that looks more like a collection of sea shells than a plant. In the wild, it forms a fascinating partnership with nature, turning its own leaves into protective shelters.
🔍 How to Identify
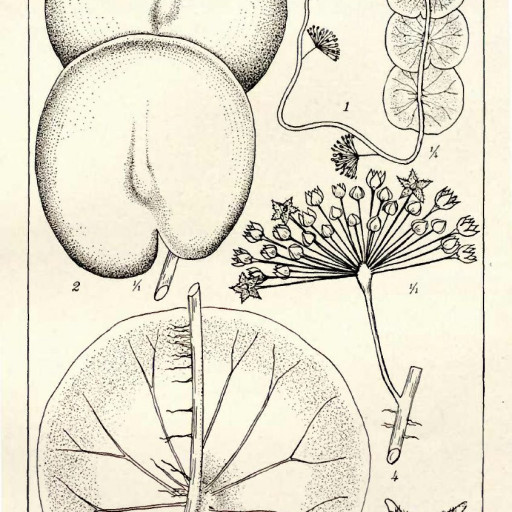
- 🍃 The Shingle Habit: The leaves grow perfectly flat against their support, overlapping one another like roof shingles or dragon scales.
- 🎨 Mottled Foliage: Each circular, succulent leaf features a stunning mosaic of silver, dark green, and sometimes purple flecks, depending on light exposure.
- 🌸 Fuzzy Blooms: It produces star-shaped, creamy-yellow blossoms that are notably "furry" or "fuzzy," growing in the classic Hoya ball-shaped clusters (umbels).
🏡 In Your Garden
- 🧗 The Need to Climb: This Hoya is an epiphyte that craves a vertical surface. It is much happier mounted on a cork slab or a cedar plank than sitting in a traditional pot, as its roots want to "tuck" behind the leaves.
- 🌫️ The Humidity Requirement: Because the leaves press so tightly to their surface, they create a microclimate underneath. It requires very high humidity (60%+) to thrive; otherwise, the new leaves may fail to "shingle" and will curl away from the mount.
- 🚿 Watering Context: Instead of soaking a pot, you must focus on misting the mount and the back of the leaves. It prefers its "feet" to dry out quickly to avoid the rot that comes from stagnant moisture.
⚠️ Safety & Toxicity
- 🐾 Pet Friendly: Good news for pet owners! Hoya imbricata is generally considered non-toxic to cats, dogs, and horses.
- 💧 Latex Sap: Like many Hoyas, it bleeds a milky white sap when cut. While not poisonous, this sap is very sticky and can cause mild skin irritation for people with latex allergies.
✨ Fun Fact
In its natural habitat, Hoya imbricata acts as a landlord! It is a "myrmecophyte," meaning it has a symbiotic relationship with ants. The hollow space between the leaf and the tree trunk creates a perfect "ant condo." The plant provides a home, and in return, it absorbs nutrients from the waste the ants leave behind.

Detailed Care Instructions
To grow Hoya Imbricata plants, follow these steps:
- Choose a suitable location: Hoya Imbricata plants thrive in bright but indirect sunlight. Place them near a window where they can receive filtered sunlight throughout the day. Avoid direct sunlight as it can scorch their leaves.
- Prepare the potting mix: Hoyas prefer loose, well-draining soil. You can create a potting mix by combining equal parts of peat moss, perlite, and orchid bark. This mix will provide good aeration and drainage for the plant's roots.
- Select a container: Choose a pot with drainage holes to prevent waterlogging. The pot should be slightly larger than the root ball of the plant.
- Planting the Hoya Imbricata: Gently remove the plant from its nursery pot, being careful not to damage the roots. Place the root ball in the center of the pot and fill in the gaps with the prepared potting mix. Press the soil gently to secure the plant.
- Watering: Allow the soil to dry slightly between waterings, as Hoyas prefer slightly dry conditions. Check the moisture level by sticking your finger about an inch into the soil. If it feels dry, it's time to water. Water thoroughly and then allow excess water to drain from the pot.
- Humidity: Hoya Imbricata plants thrive in a humid environment. You can increase humidity around the plant by misting it regularly or using a pebble tray filled with water placed near the plant.
- Fertilizing: Feed your Hoya Imbricata plant with a balanced liquid fertilizer diluted to half strength once every two to three months during its active growing season (spring and summer). Reduce feeding during the fall and winter months.
- Pruning: Trim back leggy stems to encourage bushier growth. Prune the plant after flowering is complete or during the spring season.
- Support: As Hoyas grow, they tend to trail or climb. Provide support such as a trellis, stakes, or moss poles to guide their growth. This will help keep the plant in shape and prevent the vines from tangling.
- Repotting: Hoyas generally prefer to be slightly root-bound, so you may not need to repot the Hoya Imbricata for several years. However, if the roots start to emerge from the drainage holes or the plant becomes too crowded, you can repot it into a slightly larger container using fresh potting mix.
Remember to be patient, as Hoya Imbricata plants can be slow growers. With proper care and attention, your Hoya Imbricata will thrive and reward you with beautiful foliage and occasional clusters of sweet-scented flowers.

Place in a window with dappled sun or a spot in the middle of a room. Or directly in a window facing west or east.

Hoya Imbricata plants prefer to be watered thoroughly but infrequently. Allow the soil to dry out slightly before watering, and be sure to use a pot with good drainage to prevent water from accumulating and causing root rot. Water from the base of the plant rather than directly onto the leaves, as this can lead to fungal growth. Additionally, be sure to use room temperature water to avoid shocking the roots with cold water. During the winter months, water sparingly and check the soil moisture level before watering to avoid overwatering.
To fertilize this plant, use a balanced, water-soluble fertilizer with equal amounts of nitrogen, phosphorus, and potassium. Dilute the fertilizer to half strength and apply every two weeks during the growing season. In the winter, reduce fertilization to once a month. Only feed the plant when it is actively growing and the soil is moist. Do not over-fertilize as it can lead to root burn and damage the plant.
Hoya Imbricata plants should be planted in well-draining soil that has a balanced pH level. The soil should be moderately moist and rich in nutrients, but not overly dense. A blend of peat moss, perlite, and coarse sand is a good option. This type of soil ensures that water can move freely through the roots, preventing problems such as root rot. It also provides sufficient space for good air circulation within the soil, which helps to prevent the growth of harmful pathogens. When transplanting or repotting, it is important to choose a pot that allows the soil to easily drain excess water. The plant should be watered regularly, but only when the soil feels dry to the touch.
To propagate this plant, take a stem cutting that has at least three nodes on it. Cut the stem just below a node using a clean, sharp pair of scissors or cutters. Remove all the leaves from the lower two nodes, leaving only a few leaves on the top node.
Plant the cutting into a small container filled with moist, well-draining soil. It's important to avoid overwatering at this stage, as the cutting has not yet established roots.
Place the container in a warm and bright location, but not in direct sunlight. Keep the soil moist but not waterlogged.
After a few weeks, the cutting should develop roots and start to grow new leaves. Once it has reached a decent size, it can be transplanted into a larger pot or planted outdoors in a suitable location.
Ensure that the new plant is kept moist and well-fed during this establishment period, and take care not to expose it to too much direct sunlight until it has adjusted fully to its new environment.
Common pests of the hoya imbricata include Scale insect, mealybugs, spider mites. Make a habit of checking your hoya imbricata frequently for pests so that any infestations can be caught and managed early.


