Plant Overview
Known affectionately as the Shooting Star Hoya or Arrow Hoya, this stunning tropical evergreen is a showstopper in any indoor jungle. Unlike its more laid-back, succulent-like cousins, Hoya multiflora is a high-energy bloomer that produces clusters of aerodynamic, star-shaped flowers that look like they are caught in mid-flight. Native to the humid forests of Southeast Asia, it brings a dramatic, architectural flair to your windowsill.
🔍 How to Identify
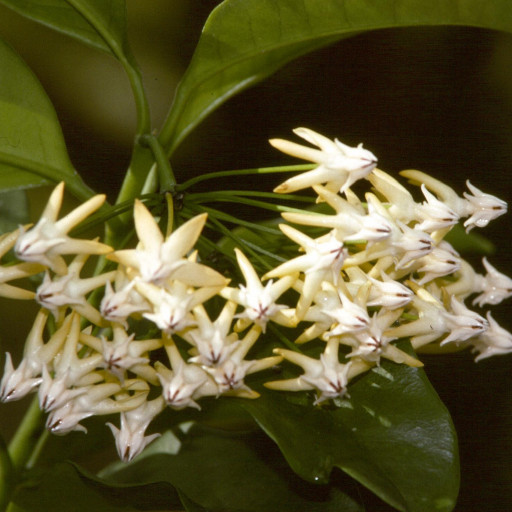
- 🚀 The Flowers: The most distinct feature; white and lemon-yellow waxy petals that peel backward, resembling the tail of a shooting star or a sharp arrowhead.
- 🍃 The Foliage: Large, leathery, dark green leaves that are oblong or lance-shaped, often reaching 4 to 6 inches in length with a slightly wavy margin.
- 🪴 Growth Habit: Unlike many trailing Hoyas, this variety grows in a more upright, shrub-like fashion, though its heavy blooms may cause the woody stems to arch gracefully.
🏡 In Your Garden
- 💧 The "Thirsty" Hoya: While most Hoyas prefer to dry out, the Multiflora is much more sensitive to drought. If the soil stays dry for too long, it will protest by dropping its developing flower buds—a tragedy for any indoor gardener!
- ☀️ Light & Humidity: It thrives in bright, dappled light. Too much direct sun will scorch the leaves, but too little will stop the "shooting stars" from appearing. High humidity is its best friend, mimicking its native jungle canopy.
⚠️ Safety & Toxicity
- 🐾 Status: Generally considered non-toxic to cats, dogs, and humans.
- 🥛 The Sap: Like many plants in the Apocynaceae family, it contains a milky white latex. While not deadly, this sap can cause mild skin irritation for people with latex sensitivities and might cause a tummy ache if a curious pet decides to have a snack.
✨ Fun Fact
The Hoya multiflora is one of the most prolific bloomers in the entire Hoya genus; once it starts flowering, it can bloom continuously throughout the year, often producing a heavy, sweet nectar that drips from the center of the "stars."

Detailed Care Instructions
To grow a Hoya multiflora plant, you can follow these steps:
- Choose a suitable location: Hoya multiflora prefers bright, indirect light. Place the plant near a window where it can receive bright, filtered sunlight. Avoid exposing it to direct sunlight, as it can scorch the leaves.
- Provide the right temperature: Hoya multiflora prefers temperatures between 60-75°F (15-24°C). Avoid placing it near drafts or extreme temperature changes.
- Use well-draining soil: Choose a potting mix specifically formulated for houseplants or succulents. Ensure the soil provides good drainage to prevent waterlogging.
- Watering: Water the plant thoroughly, allowing the top inch of soil to dry between waterings. Hoyas prefer slightly drier conditions, so avoid overwatering, which can lead to root rot. Reduce watering during the winter months when growth slows down.
- Humidity: Hoya multiflora thrives in moderately humid conditions. You can increase humidity around the plant by placing a tray filled with water near it or by using a humidifier.
- Fertilization: Feed the plant with a balanced, water-soluble fertilizer once a month during the growing season (spring and summer). Dilute the fertilizer to half of the recommended strength to prevent overfertilization.
- Pruning: Prune the plant to maintain its shape and encourage bushier growth. Pinch off the tips of the vines to promote branching. Remove any yellow or withered leaves to keep the plant healthy.
- Support: As Hoya multiflora grows, it will produce long, vining stems. Provide a trellis, moss pole, or other support structure for the vines to climb on, as they are epiphytic plants.
- Propagation: Hoyas are easily propagated from stem cuttings. Take a 4-6 inch long cutting with at least 2-3 leaves and place it in a well-draining potting mix. Keep it slightly moist and provide indirect light until roots develop, usually within a few weeks.
- Inspect for pests: Regularly check the plant for pests such as mealybugs or spider mites. If infested, treat the plant with an appropriate insecticidal soap or neem oil.
Remember to be patient with Hoya multiflora, as it may take some time for it to establish and bloom. With proper care and attention, you can enjoy the beautiful clusters of fragrant flowers that the plant produces.

Place in a window with dappled sun or a spot in the middle of a room. Or directly in a window facing west or east.

To water this plant, you should first check the soil moisture level by sticking your finger about an inch deep into the soil. If it feels dry, it's time to water. Use room temperature water and pour it slowly at the base of the plant until it starts to drain out of the bottom of the pot. Avoid getting water on the leaves or flowers, as this can lead to damage or disease. Allow the soil to dry out partially before watering again, as overwatering can be harmful to this plant.
For the Hoya Multiflora plant, fertilize it once a month during the growing season (spring and summer) with a balanced houseplant fertilizer. Mix the fertilizer with water according to the package instructions and apply it to the soil around the plant. Avoid getting fertilizer on the leaves as this can cause burning. In the winter months, reduce fertilizing to every other month or suspend completely. Always make sure the soil is moist before applying any fertilizer.
Hoya Multiflora prefers a well-draining and moderately fertile soil mix that is composed of a blend of organic materials such as peat moss, perlite, and shredded bark. The soil should have a slightly acidic pH level between 5.5 and 6.5. It is important to use a porous soil mix that can hold moisture but also allow excess water to drain out quickly to prevent root rot. It is best to avoid heavy clay or compacted soils that can suffocate the roots. Adding some sand or gravel to the mix can improve drainage. Regularly fertilizing with a balanced fertilizer during the growing season can provide the necessary nutrients for healthy growth.
To propagate this plant, start by taking a cutting that is at least 4 inches long and has a few leaves attached. Remove the bottom sets of leaves and set the cutting aside to dry for about a day. Once it has calloused over, dip the bottom end of the cutting in rooting hormone and then place it in a well-draining potting mix. Water the cutting well and then cover it with a plastic bag or dome to create a humid environment. Place the cutting in a bright, indirect light location and keep the soil moist but not soggy. Within a few weeks, roots should begin to form, and you can transplant the new plant into its own pot once it has several new leaves and a well-established root system.
Common pests of the shooting stars wax plant include Scale insect, mealybugs, spider mites. Make a habit of checking your shooting stars wax plant frequently for pests so that any infestations can be caught and managed early.


