Plant Overview
Known as the Velvet Hydrangea or Rough-leaved Hydrangea, this stunning shrub is the "gentle giant" of the hydrangea world. Unlike its common, round-headed cousins, Hydrangea aspera hails from the misty mountain forests of the Himalayas and China, bringing a prehistoric, architectural drama to any shaded corner. It is beloved by designers for its massive, tactile foliage and its sophisticated, lace-like floral displays.
🔍 How to Identify
- ☁️ Velvety Foliage: The most striking feature is the large, lance-shaped leaves that are covered in fine, soft hairs, giving them a distinct felt-like or "velvet" texture.
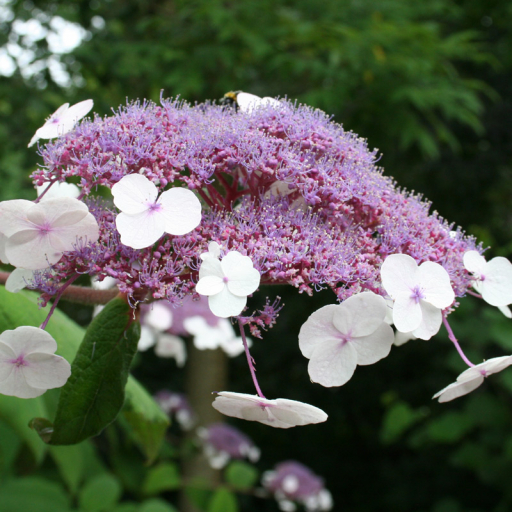
- 🌸 Lacecap Blooms: It produces flat flower heads (corymbs) featuring a center of tiny, fertile purple or blue flowers surrounded by a ring of larger, showy, pale-pink or white sterile florets.
- 📜 Peeling Bark: On older specimens, the stems develop a beautiful, papery, exfoliating bark that adds visual interest to the garden even during the winter months.
🏡 In Your Garden
- 🛡️ Shelter is Key: Because of those large, soft leaves, this plant is prone to windburn. It thrives best in a "woodland" setting—dappled shade where it is protected from harsh afternoon sun and drying winds.
- 💧 Thirsty but Picky: While it loves consistent moisture, it is sensitive to "wet feet." Ensure your soil is rich in organic matter to hold moisture without becoming a swamp, which can lead to root rot.
- ✂️ Pruning Patience: Unlike some garden shrubs, this hydrangea blooms on "old wood" (last year's growth). Avoid heavy pruning in early spring, or you will accidentally cut away all of this season's potential flowers.
⚠️ Safety & Toxicity
- 🚫 Status: Toxic if ingested.
- 🐾 Details: Like all hydrangeas, H. aspera contains cyanogenic glycosides. If leaves or flower buds are eaten in large quantities by pets or small children, it can cause stomach upset, vomiting, or lethargy. It is best placed toward the back of a border where it won't be easily nibbled.
✨ Fun Fact
The species name aspera actually means "rough" or "harsh" in Latin. While the leaves feel like soft velvet to us, the name refers to the tiny, stiff hairs on the leaf surface that can feel quite abrasive if you rub them the wrong way!

Detailed Care Instructions
To grow Hydrangea Aspera plants, you can follow these steps:
- Choose a suitable location: Hydrangea Aspera plants thrive in partially shaded areas, with well-draining soil that is rich in organic matter. Select a spot that receives morning sun and afternoon shade.
- Prepare the soil: Before planting, loosen the soil and remove any weeds or debris. Add compost or well-rotted manure to improve soil fertility and drainage.
- Planting: Dig a hole that is twice the size of the root ball. Place the plant in the hole and backfill with soil, ensuring that the top of the root ball is level with the ground. Gently firm the soil around the plant.
- Watering: Hydrangea Aspera plants require regular watering, especially during dry periods. Water deeply, ensuring that the roots are adequately hydrated, but avoid overwatering, as it can cause root rot.
- Mulching: Apply a layer of organic mulch around the base of the plant to suppress weeds, retain moisture, and regulate soil temperature. Keep the mulch a few inches away from the stem to prevent rot.
- Pruning: Prune Hydrangea Aspera plants in late winter to remove dead or damaged wood and to shape the plant. Additionally, you can remove faded flower heads to tidy up the plant and encourage new growth.
- Fertilizing: Hydrangea Aspera plants benefit from a balanced slow-release fertilizer applied in spring. Follow the instructions on the fertilizer packaging for proper application.
- Protecting from harsh conditions: If your area experiences cold winters, consider protecting the plant with a layer of mulch or burlap to insulate it from freezing temperatures.
- Pest and disease control: Monitor your plants for common pests like aphids, scale insects, and slugs. Treat any infestations promptly using organic or chemical controls as necessary. Also, be vigilant for signs of diseases such as powdery mildew or root rot and take appropriate measures if detected.
- Enjoy the flowers: Hydrangea Aspera plants produce large, showy flowers that are usually blue or purple. Depending on the specific cultivar, their blooming season can vary, but it typically falls between mid-summer and early fall. Admire the beautiful blooms and consider cutting some for floral arrangements if desired.

Place in a window with dappled sun or a spot in the middle of a room. Or directly in a window facing west or east.

Hydrangea Aspera plants require regular watering to keep the soil consistently moist. The plant prefers well-draining soil, so watering should be done slowly and thoroughly to prevent standing water. Watering frequency will depend on the environmental factors such as temperature and humidity, but as a general rule, the plant should be watered deeply every 2-3 days. It’s important to water at the base of the plant to prevent wetting the foliage, which can lead to fungal growth. During hot and dry periods, the plant may require additional watering, but be careful not to overwater as this can cause root rot. Check the soil moisture level regularly, and water when the top few inches of soil feel dry to the touch. Overall, the hydration needs of Hydrangea Aspera plants will depend on various environmental factors and should be monitored closely to ensure the plant's optimal health.
To fertilize this plant, apply a balanced fertilizer in early spring before new growth emerges. Use a slow-release formula or a liquid fertilizer, following the manufacturer's instructions for application rates. Avoid over-fertilizing, as this can lead to excessive growth at the expense of flower production. It is also recommended to mulch around the base of the plant to retain moisture and provide nutrients to the soil.
Hydrangea Aspera prefers acidic and well-draining soil. A good soil mix for this plant would consist of peat moss, pine bark, and perlite or sand to improve drainage. Adding organic matter such as compost or leaf mold can also help to improve soil quality. It is important to avoid using soil that is too heavy or clay-like, as this can lead to poor drainage and root rot. Therefore, a soil mix that is light and airy will ensure that the roots have enough room to grow and thrive.
Hydrangea Aspera can be propagated by taking semi-ripe cuttings from the plant during the summer months. Select a healthy stem that is not yet woody, and cut around 4-6 inches from the tip with a clean, sharp pair of pruning shears.
Remove any leaves from the lower part of the stem, leaving only a few near the top. Dip the cut end of the stem into rooting hormone powder and insert it into a pot filled with a mixture of peat moss and perlite. Water the cutting well and cover it with a clear plastic bag to create a humid environment.
Place the pot with the cutting in a shaded area and check it frequently to ensure that the soil remains moist. After a few weeks, roots should start to form on the stem. Once the new roots have established and the cutting starts to grow new leaves, it can be transferred into a larger pot or planted directly into the ground.


