Plant Overview
Often called the Great Stonecrop, this rugged succulent is a master of survival in the harshest terrains. With its thick, water-storing leaves and clusters of star-shaped flowers, it looks like a piece of living coral found on dry land. In European folklore, it was frequently tucked into thatched roofs or kept on windowsills, as it was believed to protect the home from lightning strikes.
🔍 How to Identify
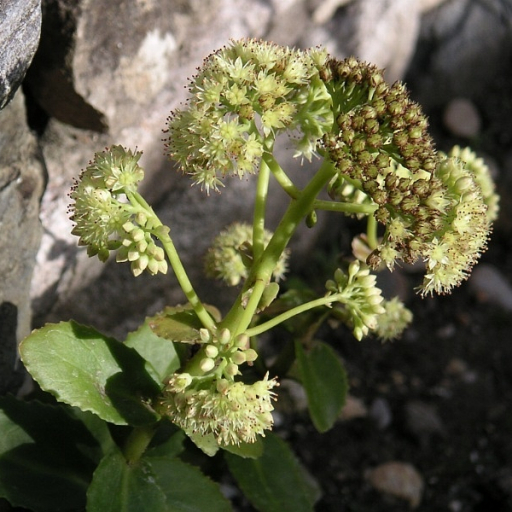
- 🍃 Fleshy Foliage: The leaves are thick, broad, and oval-shaped. They are usually a soft grey-green and grow in opposite pairs or whorls along the stem.
- 🌼 Starry Clusters: It produces dense, flat-topped flower heads (cymes). Each tiny flower is star-shaped and ranges in color from a pale greenish-cream to a soft yellow.
- 🏗️ Sturdy Stems: Unlike its creeping relatives, this variety grows in upright, unbranched clumps that can reach up to 60cm (2 feet) in height.
🏡 In Your Garden
- ⛰️ The Rock Specialist: This plant thrives on "tough love." It has evolved to grip into rocky crevices and sandy banks, meaning it prefers gritty, fast-draining soil. Rich, soggy soil will often cause the roots to fail.
- 🐝 Late-Season Lifeline: Because it blooms in late summer and autumn, it serves as a critical nectar station for bees and butterflies preparing for the colder months.
⚠️ Safety & Toxicity
- 🐾 Low Toxicity: The Large Stonecrop is generally considered non-deadly, but it isn't edible.
- 🤢 Digestive Upset: If ingested by pets or children, the alkaloids in the leaves can cause stomach pain, drooling, or vomiting. The sap may also cause mild skin redness in individuals with sensitive skin.
✨ Fun Fact
In some regions, this plant is nicknamed "Frog’s-stomach." If you gently squeeze a leaf, the upper skin can sometimes be separated from the inner pulp, creating a tiny, air-filled pocket that looks like a balloon or a puffed-out frog's throat!

Detailed Care Instructions
To grow Hylotelephium Maximum, commonly known as sedum or stonecrop, you can follow these steps:
- Choose a suitable location: Sedums prefer full sun to partial shade, so select a spot in your garden that receives at least 6 hours of sunlight per day. The soil should be well-draining, with good fertility.
- Prepare the soil: Ensure that the soil is loose and well-draining by amending it with organic matter, such as compost or well-rotted manure. This will help retain moisture without becoming waterlogged.
- Planting: Dig a hole slightly larger than the root ball of the sedum plant. Place the plant in the hole and backfill with amended soil, gently firming it around the roots. Leave enough space between plants to allow for air circulation and future growth.
- Watering: Initially, water thoroughly after planting to help settle the soil and encourage root establishment. Once established, sedums are drought-tolerant and prefer to be on the drier side. Water sparingly, allowing the soil to dry out between waterings.
- Mulching: Apply a layer of organic mulch around the base of the sedum plant to help retain moisture and suppress weed growth. However, avoid mulching directly against the stem to prevent rot.
- Fertilization: Sedums generally don't require heavy feeding. However, you can apply a balanced, slow-release fertilizer in early spring to promote healthy growth. Follow the package instructions for application rates.
- Pruning: Sedums are low-maintenance plants, but you can trim back any leggy or damaged stems in early spring before new growth appears. This will help maintain the compact shape of the plant.
- Division: Hylotelephium Maximum plants can be divided every 3-4 years to prevent overcrowding and stimulate new growth. Dig up the plant in early spring or fall, and carefully separate the clumps into smaller sections. Replant the divisions in well-prepared soil.
By following these steps and providing adequate care, you can successfully grow Hylotelephium Maximum plants in your garden or containers.

Place in a bright room that is sun drenched almost all day. Or directly in a south-facing window.

The best way to water this plant is to soak the soil around its roots thoroughly, but also ensure that water is not allowed to pool around the stem or leaves, as this can lead to rot. It is important to water only when the soil is dry to the touch, as overwatering can cause root rot and other problems. This plant can also tolerate periods of drought, so it is not necessary to water it too frequently. When watering, use a watering can or hose with a gentle spray, and avoid getting water on the foliage of the plant to prevent burning or damage.
To fertilize this plant, wait until early spring or late fall and apply a slow-release fertilizer. Make sure to follow the manufacturer's instructions for application rates. Avoid over-fertilizing as it can lead to weak growth and susceptibility to pests and diseases. Finally, water thoroughly after fertilizing to help the nutrients penetrate the soil.
The Hylotelephium Maximum plant requires a well-draining soil with a pH level between 6.0 and 7.5. It prefers soil that is rich in organic matter and has a loamy texture. The soil should not be overly compacted, as this can impede water and nutrient uptake. Additionally, the plant should not be placed in soil that is waterlogged, as this can lead to root rot. A good soil mix for Hylotelephium Maximum should contain a blend of peat moss, sand, perlite, and garden soil. The plant should be fertilized with a slow-release fertilizer twice a year, in the spring and fall, to provide it with the nutrients it needs to thrive.
To propagate this plant, first select a healthy stem cutting from the parent plant. Choose a cutting that is approximately 6 inches long and has at least 2-3 leaves.
Next, remove the bottom leaves of the cutting, being careful not to damage the stem. Dip the cut end into rooting hormone powder, then plant it in a well-draining soil mix.
Water the cutting thoroughly and place it in a location with bright, indirect light. Keep the soil moist but not waterlogged, and mist the cutting regularly to keep the leaves hydrated.
After a few weeks, roots should begin to form. You can gently tug on the cutting to see if it is rooted. Once the cutting has established roots, you can transplant it into a larger pot or into the ground.
Be patient during the propagation process, as it may take several weeks for the cutting to root and begin to grow. With proper care and attention, your propagated plant should thrive and grow into a mature plant over time.


