Plant Overview
Known as the Perny Holly, this architectural evergreen is a miniature masterpiece originally from the high-altitude forests of China. Named after Father Paul Perny, a French missionary and botanist who discovered it in 1858, it is prized by enthusiasts for its incredibly geometric foliage and slow, disciplined growth. It offers a sophisticated, formal look that provides year-round structure and a burst of festive color in the dead of winter.
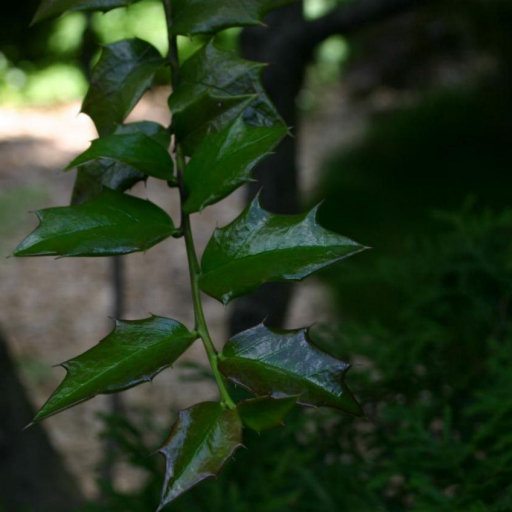
🔍 How to Identify
- 🍃 Angular Foliage: The leaves are remarkably small and leathery, shaped like diamonds or shields. They typically feature 3 to 5 very sharp, stiff spines that point outward.
- 🍒 Winter Berries: In the autumn, female plants produce clusters of small, brilliant red fruits (drupes) that hug the stems closely and often persist until spring.
- 📐 Structured Habit: It naturally maintains a narrow, upright, and dense pyramidal shape. Unlike other hollies that can become leggy, the Perny Holly stays compact and "manicured" without much effort.
🏡 In Your Garden
- 🏺 The "Slow-Burn" Plant: Because it grows quite slowly, it is a perfect choice for small urban gardens or permanent large containers. It won’t outgrow its space quickly, meaning less maintenance and pruning for you.
- 👫 The Mating Game: This species is dioecious, meaning there are separate male and female plants. To enjoy the iconic red berries, you must plant a female variety and ensure there is a male Ilex pernyi (or a compatible hybrid) nearby for pollination.
- 💧 Soil Preferences: It thrives in slightly acidic, well-drained soil. It dislikes "wet feet," so avoid planting it in heavy clay areas where water pools, as this can lead to root rot.
⚠️ Safety & Toxicity
- 🚫 Toxic Berries: The bright red berries are non-edible and contain saponins. If ingested by humans, dogs, or cats, they can cause significant stomach upset, nausea, and vomiting.
- ⚔️ Prickly Protection: The leaves are exceptionally sharp. It is best to plant this away from narrow walkways or play areas where children might accidentally brush against the "stinging" foliage.
✨ Fun Fact
Because of its incredibly dense and prickly structure, the Perny Holly is considered a "fortress" for local wildlife. Small songbirds often choose this specific holly for nesting because the sharp spines act like a natural barbed-wire fence, protecting their eggs and chicks from climbing predators like cats and raccoons.

Detailed Care Instructions
To grow an Ilex pernyi plant (also known as Perny's holly), follow these steps:
- Select a suitable location: Choose a spot in your garden that receives partial to full sun and has well-draining soil. Ilex pernyi can tolerate a range of soil types but prefers slightly acidic soil.
- Prepare the soil: Amend the soil by incorporating organic matter like compost or well-rotted manure to improve drainage and nutrient content.
- Obtain a healthy plant: Purchase a healthy Ilex pernyi plant from a reputable nursery or garden center. Ensure that it is free from pests or diseases.
- Planting: Dig a hole that is slightly larger than the rootball of the plant. Place the plant in the hole at the same depth as it was growing in the container and backfill with soil, gently firming it around the roots.
- Watering: After planting, water the plant thoroughly to settle the soil around the roots. Keep the soil consistently moist, but not waterlogged. Deep watering every 7-10 days during the growing season is sufficient.
- Mulching: Apply a layer of organic mulch like wood chips or straw around the base of the plant. This will help retain moisture, suppress weeds, and regulate soil temperature.
- Pruning: Regular pruning is not necessary for Ilex pernyi, but you can shape or control its size by lightly pruning the plant in late winter or early spring before new growth begins.
- Fertilizing: Ilex pernyi generally does not require much fertilization. However, a light application of a balanced, slow-release fertilizer in early spring can promote healthy growth.
- Protection: Provide protection from strong winds, if necessary, as Ilex pernyi may suffer from windburn.
- Winter care: Ilex pernyi is generally hardy, but if you are in a region with harsh winters, you can protect the plant by applying a layer of mulch around the base and wrapping the plant in burlap.
Remember to regularly monitor the plant for any signs of pests or diseases and take appropriate action, if needed. With proper care, your Ilex pernyi plant should grow and thrive.

Place in a window with dappled sun or a spot in the middle of a room. Or directly in a window facing west or east.

I can provide instructions on how to water Ilex Pernyi plant without using its common names.
1. Observe the plant: Before watering the Ilex Pernyi plant, observe its soil and leaves. If the soil feels dry to touch and the leaves appear wilted, it indicates that the plant needs water.
2. Check the drainage: Ensure that the pot or container where the Ilex Pernyi plant is growing has proper drainage. It will help avoid overwatering, which can cause root rot.
3. Use room temperature water: Always use room temperature water to water the Ilex Pernyi plant. Avoid using cold or hot water as it can shock the plant.
4. Water thoroughly: Pour water evenly around the surface of the soil. Ensure that the water reaches the roots. Wait until the excess water drains out of the pot.
5. Schedule watering: Schedule watering of Ilex Pernyi plant according to the time of year and weather conditions. During summer, the plant might require more frequent watering than in winter.
6. Do not overwater: Overwatering the Ilex Pernyi plant can be harmful as it can cause root rot. It is better to slightly underwater than overwater.
7. Avoid watering from overhead: Do not water the Ilex Pernyi plant from overhead as it can cause damage to the leaves and lead to fungal growth.
8. Mulch the soil: Mulching the soil around the Ilex Pernyi plant can help conserve moisture and regulate the water supply.
Following these tips can help maintain the health and appearance of the Ilex Pernyi plant.
To fertilize this plant, use a balanced fertilizer with equal amounts of nitrogen, phosphorus, and potassium. Apply the fertilizer in early spring before new growth appears and again in midsummer. Avoid fertilizing late in the growing season as it can stimulate new growth that won't have enough time to harden off before winter. Always follow the instructions on the fertilizer package and water the plant well after applying.
Ilex Pernyi prefers well-drained soil that is rich in nutrients and has a pH level between 5.5 and 7.5. It is important to avoid heavy clay soils as they can cause root rot. A soil mixture consisting of equal parts peat moss, sand, and loam is recommended for this plant. Adding perlite to the soil mixture can also improve drainage. When planting this tree, it is important to amend the soil before planting to ensure that it has the appropriate nutrient levels. Fertilizer can be added to the soil once or twice a year to supplement any missing nutrients.
First, select a healthy and mature plant that has strong root and shoot systems. Make sure the plant has been well-maintained and is free from any diseases or pests.
Next, choose a stem or branch to take a cutting from. The cutting should be about 4-6 inches in length and should have a few leaves attached. Remove any lower leaves from the cutting and dip the bottom end in rooting hormone powder.
Prepare a pot with well-draining soil and create a hole for the cutting. Insert the cutting into the soil and gently press down to ensure the cutting is secure.
Place the pot in an area with bright, indirect sunlight and keep the soil moist. Cover the pot with a plastic bag or plastic wrap to create a humid environment around the cutting. This will help the cutting to root faster.
Check the cutting regularly to make sure the soil remains moist and to monitor its progress. After a few weeks, the cutting should begin to develop new roots and leaves.
Once the cutting has rooted and is growing well, it can be transplanted into a larger pot or into a garden bed. Make sure to keep the plant well-watered and protected from extreme temperatures until it becomes established.


