Plant Overview
Often called the Trans-Pecos Morning Glory, this delicate desert climber is a hidden gem of the American Southwest and Northern Mexico. Unlike its more aggressive garden cousins, it features intricate, lace-like foliage and tiny, brilliant scarlet trumpets that glow against rocky landscapes. It is a favorite stop for hummingbirds, who serve as its primary pollinators during the hot summer months.
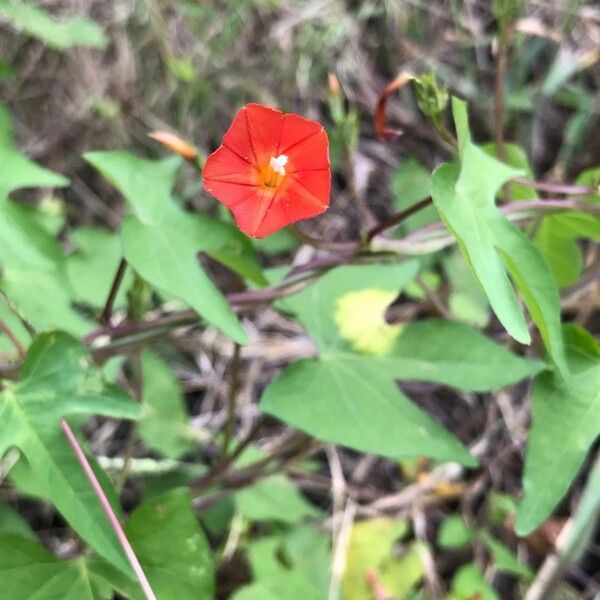
🔍 How to Identify
- 🌺 Scarlet Trumpets: The flowers are small, vibrant orange-red tubes that flare out into a star shape, typically measuring less than an inch across.
- 🌿 Lacy Foliage: Unlike the common heart-shaped leaves of other morning glories, these leaves are deeply divided into thin, finger-like lobes, giving the vine an airy, "crested" look.
- 🌀 Twining Stems: It is a slender, herbaceous vine that gracefully spirals around fences, shrubs, or trekking poles rather than clinging with aggressive suckers.
🏡 In Your Garden
- 🏜️ Arid Specialist: Coming from canyon environments, this plant thrives in rocky, well-draining soil. It is much more drought-tolerant than commercial morning glories and hates "wet feet" or heavy clay.
- ☀️ Heat Lover: While many plants wilt in the afternoon sun, Ipomoea cristulata craves the heat. It is an excellent choice for south-facing walls or rock gardens where other vines might struggle.
⚠️ Safety & Toxicity
- 🚫 Toxic Ingestion: Like most members of the Ipomoea family, the seeds contain alkaloids that can be dangerous if consumed.
- 🐾 Keep Away from Pets: Ingesting the seeds or foliage can cause digestive distress, lethargy, or disorientation in dogs, cats, and horses. It is best planted in areas where curious pets cannot graze.
✨ Fun Fact
The name cristulata comes from the Latin word for "crested," referring to the unique, jagged appearance of its foliage. In the wild, its seeds can remain dormant in the parched desert soil for several years, waiting for a single heavy "monsoon" rain to trigger a sudden, spectacular growth spurt.

Detailed Care Instructions
Ipomoea cristulata, more commonly known as the "sweet potato vine," is a beautiful and hardy plant that can be relatively easy to grow. Here are some steps to successfully grow Ipomoea cristulata:
1. Choosing the Right Location:
- Sunlight: Ipomoea cristulata thrives in full sun to partial shade. A location that receives at least 6 hours of sunlight per day is ideal.
- Soil: It prefers well-draining, loamy soil. You can amend your soil with organic matter (like compost) to improve fertility and drainage.
2. Planting:
- Seeds or Cuttings: You can start Ipomoea cristulata from seeds or vine cuttings. If using seeds, sow them in spring after the last frost; if using cuttings, plant them in early summer.
- Spacing: If you're planting multiple vines, space them about 12-24 inches apart to allow for their spreading nature.
3. Watering:
- Keep the soil evenly moist but not soggy, especially during the establishment phase. Once established, these plants are relatively drought-tolerant.
4. Fertilizing:
- Fertilize with a balanced fertilizer or compost during the growing season, especially if the soil quality is poor. Excess nitrogen can lead to more foliage and less flowering.
5. Pruning:
- Regularly prune back the vines to maintain a desired shape and control their spread. This also encourages bushier growth and flowering.
6. Pest and Disease Management:
- Be on the lookout for common pests such as aphids and spider mites. Use natural pest control methods whenever possible.
- Ensure good air circulation around the plant to prevent powdery mildew or other fungal diseases.
7. Overwintering:
- In colder climates, you may need to bring potted plants indoors during the winter or propagate cuttings to grow new plants in spring, as Ipomoea cristulata may not survive frost.
8. Propagation:
- You can propagate the plant through cuttings or by dividing root clumps in the spring or fall.
Additional Tips:
- Keep the area around your plant free from weeds to reduce competition for nutrients and water.
- If grown in containers, ensure that the pots have sufficient drainage holes.
Following these guidelines will help you successfully grow and enjoy your Ipomoea cristulata plants!

Place in a bright room that is sun drenched almost all day. Or directly in a south-facing window.

To water the plant, use a small watering can or a hose with a gentle stream of water. Slowly pour water onto the soil around the base of the plant, making sure not to splash water onto the leaves. Water deeply enough to soak the soil to the roots, but avoid overwatering as this can lead to root rot. The frequency of watering will depend on the climate and soil conditions, but it is important to keep the soil moist but not waterlogged. Regularly check the soil moisture by inserting a finger into the soil to the depth of about an inch. If the soil feels dry at this depth, it is time to water. In hotter, drier climates, the plant may need more frequent watering, while in cooler or more humid areas, less watering may be necessary.
To fertilize your Ipomoea Cristulata effectively, follow these guidelines:
- Type of Fertilizer: Use a balanced, all-purpose fertilizer with an N-P-K ratio of approximately 10-10-10 or 14-14-14. Alternatively, you can opt for a slow-release granular fertilizer or organic options like compost or well-rotted manure.
- Timing: Fertilize during the growing season, which typically spans from early spring to late summer. In cooler climates, adjust according to local growing conditions.
- Application Method:
- Granular Fertilizer: Sprinkle the recommended amount around the base of the plant, avoiding direct contact with the stem. Lightly work it into the top layer of soil and water well to help it dissolve and reach the roots.
- Liquid Fertilizer: Dilute according to the manufacturer’s instructions and apply it directly to the soil around the plant. This method allows for quicker nutrient absorption.
- Granular Fertilizer: Sprinkle the recommended amount around the base of the plant, avoiding direct contact with the stem. Lightly work it into the top layer of soil and water well to help it dissolve and reach the roots.
- Frequency: Fertilize every 4-6 weeks during the growing season. If using slow-release fertilizers, follow the product recommendations for frequency, typically a couple of times per season.
- Observation: Monitor your plant’s health. If you notice yellowing leaves or stunted growth, it may indicate a nutrient deficiency, requiring adjustment in your fertilization routine.
- Soil Testing: For optimal results, consider conducting a soil test prior to fertilizing. This will provide information on existing nutrient levels and pH, allowing you to tailor your fertilization to the plant's specific needs.
By following these instructions, you can promote healthy growth and vibrant blooms for your Ipomoea Cristulata.
Ipomoea Cristulata is a type of plant that requires a specific type of soil to grow healthily. It prefers a well-draining soil that is rich in nutrients. The ideal pH level for this type of plant is between 6 and 7. It is recommended to use a mix of peat moss, perlite, and vermiculite to provide the proper drainage and nutrient content for the plant. Organic matter can also be added to the soil to improve its fertility. It is important to ensure the soil is moist but not saturated as the plant does not tolerate standing water. Over-fertilization should also be avoided as it can cause damage to the roots. Overall, providing the proper soil conditions is essential for the growth and success of Ipomoea Cristulata.
Ipomoea cristulata can be propagated through several methods, including seeds, cuttings, and division.
Seed Propagation:
- Seed Collection: Collect mature seeds from the plant during the late growing season once the seed pods have dried and turned brown.
- Seed Preparation: Clean the seeds to remove any pulp or debris. Some gardeners recommend soaking the seeds in water for 24 hours before planting to improve germination rates.
- Soil Preparation: Use a well-draining potting mix or seed-starting mix that retains moisture but allows excess water to escape.
- Sowing Seeds: Sow the seeds approximately 1/4 to 1/2 inch deep. If starting indoors, use seed trays with individual cell compartments.
- Watering: Lightly moisten the soil without saturating it. Keep the soil consistently moist but not overly wet.
- Light Requirements: Place the seed trays in a warm location with bright, indirect light. You can also use grow lights if necessary.
- Germination: Seeds should germinate within 7 to 14 days, depending on environmental conditions.
- Transplanting: Once seedlings have grown several true leaves and are large enough to handle, transplant them into individual pots or directly into the garden after the last frost date.
Cutting Propagation:
- Selecting Cuttings: Choose healthy stems from the parent plant. Look for non-flowering stems that are 4 to 6 inches long.
- Cutting Preparation: Make a clean cut just below a leaf node. Remove the lower leaves while keeping the upper leaves intact.
- Rooting Hormone: Dip the cut end in rooting hormone (optional) to encourage root development.
- Planting Cuttings: Place the cuttings in a well-draining potting mix or a sterile medium. Make sure the cut end is buried at least an inch deep.
- Watering: Water the cuttings lightly and cover them with a plastic bag or humidity dome to maintain moisture and humidity.
- Light and Temperature: Place the cuttings in a warm area with indirect light. Ensure they are not exposed to direct sunlight, which can cause them to dry out.
- Root Development: Cuttings will typically root within 2 to 4 weeks. You can check for roots by gently tugging on the cuttings.
- Transplanting: Once the cuttings have established roots, transplant them into larger pots or directly into the garden.
Division:
- Timing: The best time for division is during the spring or fall when the plant is actively growing.
- Digging Up the Plant: Carefully dig around the plant, lifting it from the soil without damaging the roots.
- Dividing: Gently separate the root ball into sections, ensuring each section has at least one stem and a healthy root system.
- Replanting: Replant the divided sections immediately in a new location or in pots with a suitable potting mix.
- Watering and Care: Water the divided plants thoroughly and provide care similar to newly propagated seedlings.
By following these methods, you can successfully propagate Ipomoea cristulata and enjoy its growth in your garden or home.


